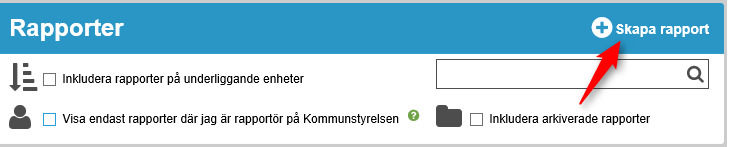
1-Select report type
Select Standing rapporttyp
2-Tab generally
Tab: General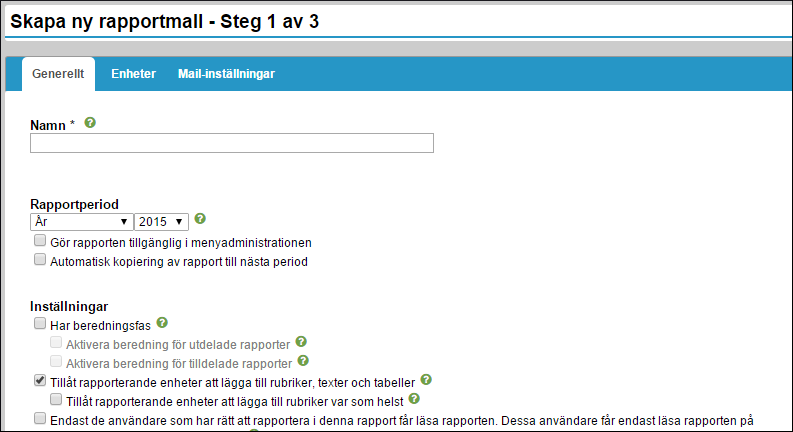
Name
Here you name the report template.
Version
Choose which version the report should have. The selection affects both the version of the report on the report page and the version of report parts that retrieves the text/dimension and Aktivitetsnoder.
Obs! Do not control which period data to the nodes is retrieved from. This is controlled by the reporting period.
Report period
Here you can specify which period the report will be based on. All report parts will retrieve information from the period you specify here.
You can set the report to be available in the menu administration, which means it will go to a tab in the menu.
You can specify that the report be copied automatically to the next period, which means that it is copied automatically when the last reporting entity has sent its report to finished, or a specific number of days after the deadline.
Settings
Preparation phase.
This means that the units first approve the report and then it is sent in a preparatory phase where the Board, board or other body will first write a formal decision, comment or similar before the report is marked as finished. You have the option to choose if you want to Enable preparation for distributed reports and/or Enable preparation for Assigned reports. How the preparation phase should look like is set in the administration. If you do not tick the check box, the report will instead go directly to the ready when reporting approval.
Checkmarked
Here you select whether the report headings should Checkmarked And if so, if it is in one or two steps. The headers will have one or two checkboxes indicating that the title is complete. You can also choose whether to require all headings to be Checkmarked For the report to be sent to finished. This setting can help if one or more units have failed to Checkmarked their headlines.
Readability
Sets the user to access the report for users other than contributors.
Available Export
You can choose whether users have access to export to Word, PDF, or to both.
Word template for Export
In the drop-down list, select a Word template to associate with the report template. A Word template determines the layout of how the report should look when exporting to Word, such as fonts, line spacing, margins, etc. For further information and administration of the template, see Word and Export Settings.
Deadline
Here you specify the deadlines for the completion of the reporting and for when the report should be finished in the preparation phase if available. (In step 3, you can then decide whether mail reminders should be sent based on the deadline date. If the report does not have a deadline, no reminders are sent.) Reminders are sent to people who are contributors to the current report entity.
No deadline: Indicates that the report will not appear as overdue. It appears on the home screen under reporting.
Same deadline: All reporting entities receive the same deadline. E-mail reminders can be sent out before or after the deadline, depending on the settings made for the report. The report appears on the start page a fixed number of days before the deadline.
Automatic deadline: Retrieves the offset that is set for the reportperiod on which the report is based. It is then possible for each reporting entity to change the date to a specific date. It is also possible to adjust the deadline to a specific date on the report page.
Categories
Here you select the category that the report template will belong to. The category aims to make it easier to sort and keep track of different templates in the system. The categories that are available depend on the choices that your local administrator has made. (If your local administrator has not created any rapportmallskategorier, you do not need to select anything here.) for administration, see Report catagories
Contact
If you type any letters from the contact person's name, you'll get a list of users who have those letters in their name. Users can see the contact person's name and email address at each report in the reports list.
3 units
Reporting units (Settings/reporting units)
Select the units to report in the template. You can only choose your own and underlying units.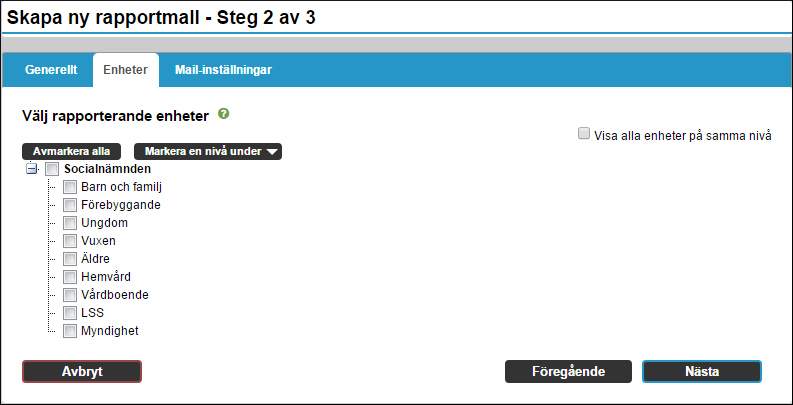
4-Mail Settings
Tab: Mail settings
If you want to change settings for sending E-mail reminders for the report, go to the Report, click your report, and select show administration and Settings. Here under General click the Change and select Next to get to Mail settings.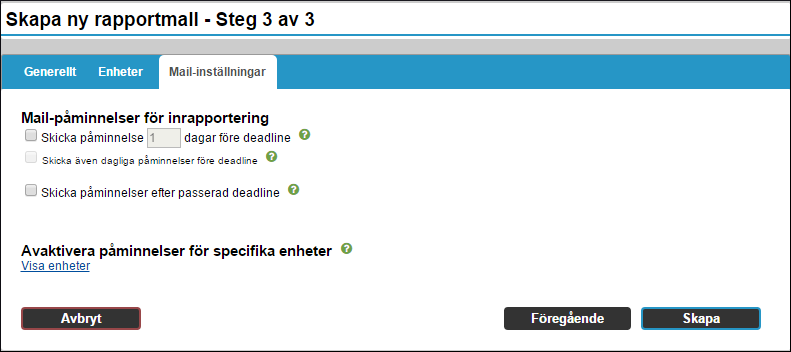
Mail Reminders for reporting
You can control how many days before the deadline for a report to send a reminder email and whether to send daily reminders until the deadline. You can also control whether reminders are sent if a deadline is passed. Reminders are always sent in the morning and reminders after a deadline will continue to be sent until the report is approved.
Reminder emails are sent only to units that have not yet approved the report and only to those people who have permission to approve the report.
Disabling reminders for specific units
To prevent selected units from receiving reminders, click View units and tick the units you want to exclude.
Finish by clicking Create.
The report is now created and it is time to start Build Common Template.
Click the ![]() To access the preview report. You can access the preview from the report template, the entity template, the reporting mode, and the report list.
To access the preview report. You can access the preview from the report template, the entity template, the reporting mode, and the report list.
The preview window has several useful features:
-
Unit selector -At the top left, you can select the unit you want to preview.
-
Report Mode selection -to the right of the unit selection, select whether you want to preview the report in template mode, change structure in unit templates, or report. You can preview unit customizations even before you activate the report.
-
Heading filter –You can choose to filter out a particular heading. Through the check box Show only the selected title , you can choose to show only the title you searched in the title filter, which can be useful if you want to print or export a specific title and do not want to include the other parts of the report.
-
Include Permissions – By clicking on the button Include Permissions , you can see the reporting permissions associated with each title in the report.
-
Include Instructions –If you check Include instructions menu, you can also show the instructions in the preview. This setting also affects the content that comes with when you export to Word/PDF or print directly.
-
Export to PDF -Export the report with the current settings to PDF.
-
Export to Word – Here you can export the report to a Wordfil. If you click the lower part of the button, you have the option to choose if you want to export with or without a table of contents.
-
Print – Here you can print the report directly from the system.
Obs! This is only intended for preview and not for finished reports when formatting is interpreted differently in a direct printout!
If you preview the report in the reported state, you also have the following options:
-
Include reported text -Check it out if you just want to print for example. Instructions.
-
Approve (Checkmarked) – Here you can quickly and easily Checkmarked and approve several sections at once. Click on the button Approve In the toolbar on the right side of the Förhandsgranskafönstret. Next to each title, a check box is now visible for clear markup and one for approval (assuming that you have these permissions). When you are finished, click the Save Far top right. There, you can also see bars that indicate how many percent of the headings are clear or approved.
Report parts are automatically updated with information from the scorecard when a unit report is previewed, exported to Word, or when a user clicks report
In addition, updates of reports are automatically made when you enter them if:
1. There have been changes in any scorecard that a report part of the report is based on.
2. Four hours have elapsed since the last automatic synchronization.
The frequency of the update is controlled by the settings on the report template.
When a report is sent to ready (with thumbs up), the report part is no longer updated.
That the report part is not updated may also be because the report has been Klarmarkerad and then has backed in status and chosen to report data no longer be done. The report version is also based on a deleted version.
More information about this can also be found in:
Reversing status
Print and export a report
Click the current report in the list and select Visa administration And Enable template.
After you do this, you will be given a choice as to whether you want to notify the people of the units with permission to administer the report enhetsmallar. If you choose to notify, it will send mail to unit administrators with information that the template has been activated to their unit.
You still have the option to make changes to a template after it has been activated, but we recommend that you be restrictive with such changes. They strike through in all enhetsmallar and this can easily lead to confusion among the unit administrators. You must be responsible for informing the unit administrators about any Changes made!
To activate your report go to reports in the menu, click up the report you want to activate and click on the white arrow after the text "Enable report". The report's status mode now changes from Enhetsanpassning To Reporting Available to all who are set to report in the report.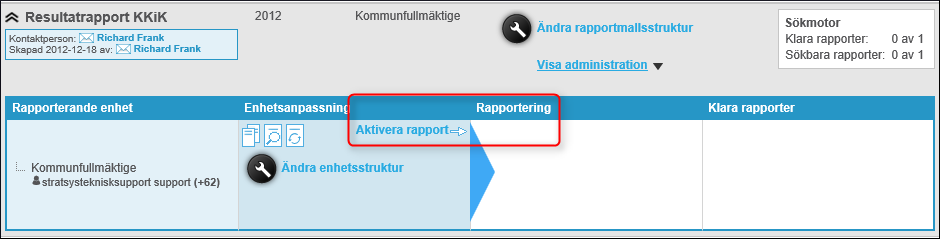 Inactivate the report template
Delete the report on selected units
Is Settings/Reporting units To delete only the report for one or more units.
Remove the report for all units
To delete a report, click the report name (to remove it). Then click the three dots that appear at the far right of the image below. Select Remove.
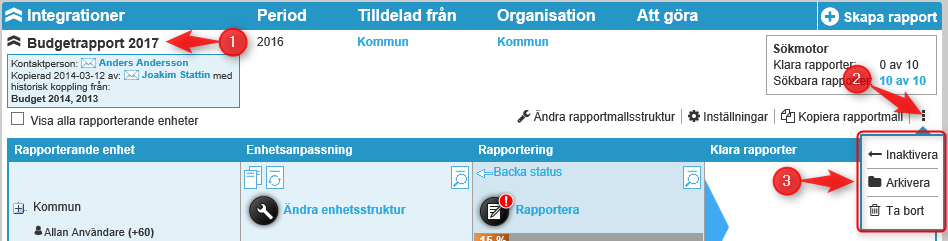
In the administration, you can restore deleted reports.
Administering reporter for a report
Add contributors to a unit
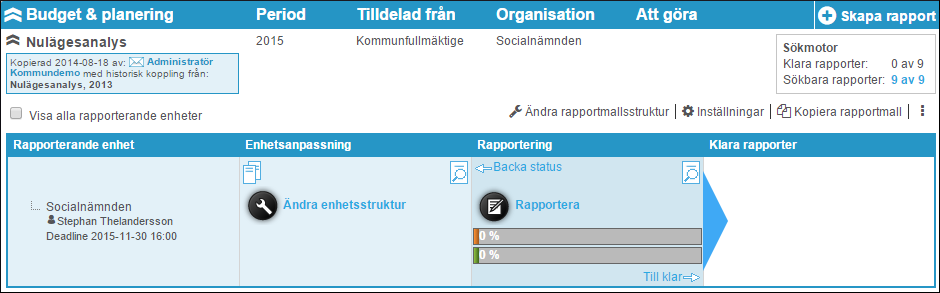
It is easy to add and remove users who will be the reporter for a unit on a report. Click the name of the report to view additional information about the report. Below the unit you will see a small person icon and the name of the first reporter as well as also a "+" sign with a figure behind depending on the total number of contributors.
Click the icon to view all contributors. Click the Add Reporter (or start typing immediately if the cursor is already to the right of the last name) and start typing the first few letters of the name and you'll get suggestions for users. You can also type the name of the unit and you will get a list of users belonging to that unit. Users who are shown with a yellow background are listed as Standard rapporteurs For this unit.
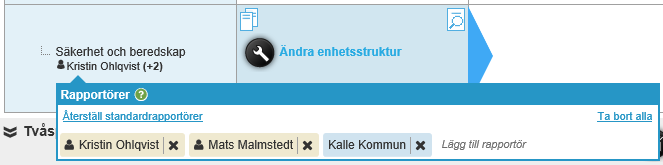
Remove contributors on a unit
To remove contributors, simply click the x next to the user (see above). Saving is done automatically. There is also an option to remove all contributors, then click the top right of the box on the Remove all. See the report's Settings and Rapporteurs For information about how to remove all contributors on one unit at a time.
Standard rapporteurs
Standard rapporteurs is a function that automates the distribution of the reporter responsibility. People who are set as standard contributors on a unit will automatically be contributors in all new reports (not copied) that are created on units where they are set as the default reporter. Old reports or reports that are copied are not automatically affected by changes to the default reporter for the unit.
Manage deadlines on the report page
On the report page, it is possible to adjust the date of the deadline on the current unit and for the underlying units of the report. To do this, click the deadline date.

When you change the deadline for the underlying units, new units will also be added to the new deadline.
The users who are contributors to a report or receive the Enhetsanpassa report may change the deadline on the report. To reset the deadline to the time set for the period, you can go to Report settings.
Obs! Note that when you adjust the underlying units, the deadline is overwritten. This is true even if the units themselves set a specific date.
Click the Reinstate standard rappotuer to update in the selected report. Users that are manually added as contributors are not deleted if the default reporter is reset.
To restore all default contributors on all reporting entities in the report at the same time, you can find it under the report's Settings.
What permissions are required to change contributors?
The user needs to be either a reporter for the report on the reporting entity or have permission to administer enhetsmallar or templates (see User groups and Users).