Under Administration And Word and Export Settings You can control things that affect exports from the tool. Among other things, you can define how your reports are formatted when they are exported to Word, which logos to use for separate units, and which file format the reports will be exported to.
The settings are divided into four different tabs:
General
Here you will find general settings that affect exports from the system. Looking for another setting, they can be found under Word templates, for each report (general) and for different types of Views of scorecards.
 Use agent on export (recommended)
If you have your own operation, this option means that you do not need to install Word on the server. At the same time, you limit export opportunities to no longer include exports with tables of contents or PDF format. Please contact your consultant for more detailed information.
Use docx format instead of DOC format for Wordexport
This option allows you to disable if you have many users who use Word in Version 2003, or earlier, and who do not have the extension installed to open docx documents. Some Wordfunktionalitet will be limited on export.
Enable first page export
If this option is enabled, an export icon appears on the Reports tab. It is only possible to export first pages for reports created with that entity as its main unit. Förstasidesexporten also displays archived reports and reports from all versions.
Include first title when previewing and exporting first pages
The front page and first heading are merged when exporting first pages.
Word templates
Here you can define how all Word and PDF exports from the tool should look. You can change/copy an existing Word template or add brand new ones. You can see which unit the template belongs to and in which reports it is used. You can also see which template is set as the default. The default template is the one that is automatically merged with new templates if you do not make an active selection.
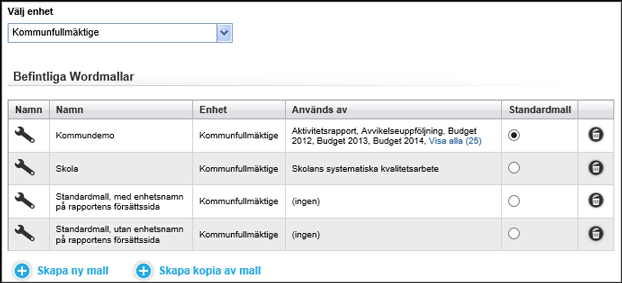
Click the  Create new Template Or Create copy of template To create a new Word template.
Select Create copy of template First, select which template you want to copy before you proceed to step 1: Step 1: Generally in the Word templates guide.

The settings for the for Templats Throug are divided into 5 different steps:
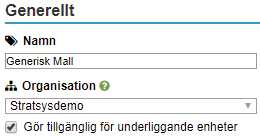
Name
Specifies the name of the Wordmallens, the unit to which it belongs, and whether it will be available to the underlying units.
First page
Automatgenererad first Page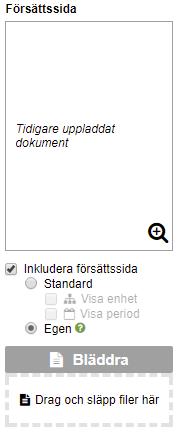
You can choose to have the program create a front-page for you automatically. The report name always appears on the cover page, but you can choose whether to also display the unit name or the name of the period.
Customised own front Page
If you have more detailed requests, you can also upload your own cover page with your own settings.
When creating your front page, we recommend that you start with a new blank document that you give Same margin settings Specified at the bottom of this page. If you do not set worddokumentets margins to the same margins that you define in the Stratsys, there is a risk that the content parts will have a different position when the margins change during the report export.
You can choose which parts to automatically add to the cover page and what location they should have. The options you have are title, unit, period, preamble, and date when the Klarmarkerades report. Type # {title} #, # {department} #, # {period} #, # {Preamble} # or # {clear markup Date} # in the desired location on the cover page.
write #{title}#, #{department}#, #{period}#, #{Preamble}# or #{clearmarkupDate}#
Limitations
- If you want to use a background image, it is important that the background image is not larger than the document and is not positioned with bleed (that any part of the image is outside the document area).
- Be careful that no content should be placed in the header or footer of this document! If there is still information there, the header and footer will be downloaded both from here and from your footer settings. This is true even if you use Wordfunktionen Different front page and has a footer for Subsequent pages.
- This feature only supports uploading word files that have the file extension. docx (not. doc). When exporting reports with this Word template, both. doc and. Docx are supported.
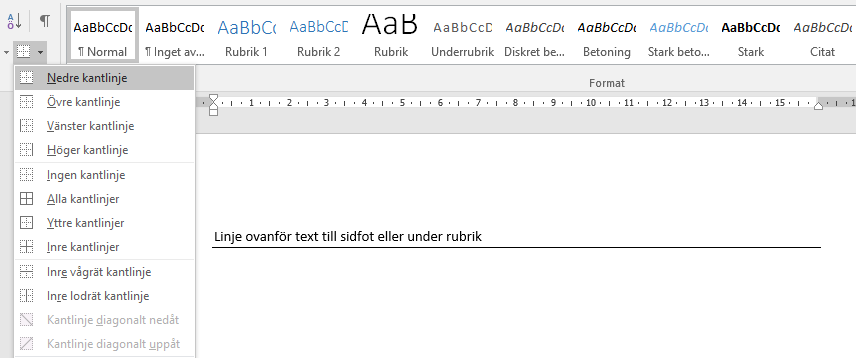
- If you want to use other fonts on the face page, against the rest of your documents, you need to create and apply your own styles to them. All lines on the Insert page that use Word's default styles will listen to settings from the Stratsys instead of the settings you make manually in the Worddokument. Custom styles do not work if you have inadvertently added content to the header or footer of the cover page itself. In the following illustration, you can see some of the default styles in Word (Heading1, Heading2, etc.)
- We do not support text fields or graphic objects in the form of lines or shapes. If you want to use a line, you can instead select the text and add a table border.
Sidhuvud/sidfot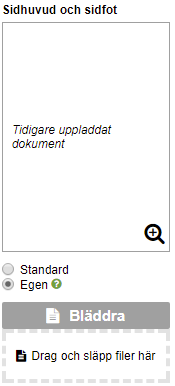
Autogenerated pagehead
By default, a footer that contains the name of the unit, the report name, the current page number, and the number of pages in the report are used.
Page head
To customize the header and footer, you can do so by starting a new blank word that you first give Same margins As you have indicated here to ensure that the header and footer content will remain in the desired location after you export your report. You may choose to want parts to be automatically added to the header or footer and what location they should have. The options you have are title, unit, period, preamble, and date when the clearmarkupDate report.
write #{title}#, #{department}#, #{period}#, #{Preamble}# or #{clearmarkupDate}#
It is possible to also use Different front page.
Be careful that no content should be placed outside the header or footer of this document! If information is left in other locations, this content might be added in addition to the content you have defined for the cover page.
This feature only supports uploading word files that have the file extension. docx (not. doc). When exporting reports with this Word template, both. doc and. Docx are supported.
If you want to use other fonts in the header/footer, against the rest of your documents, you need to create and apply your own styles to them. Any character that uses Word's default styles will listen to settings from the Stratsys instead of the settings you make manually.
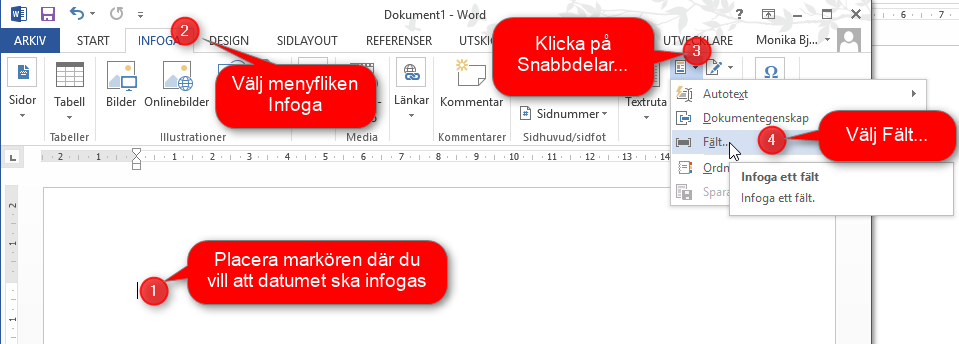
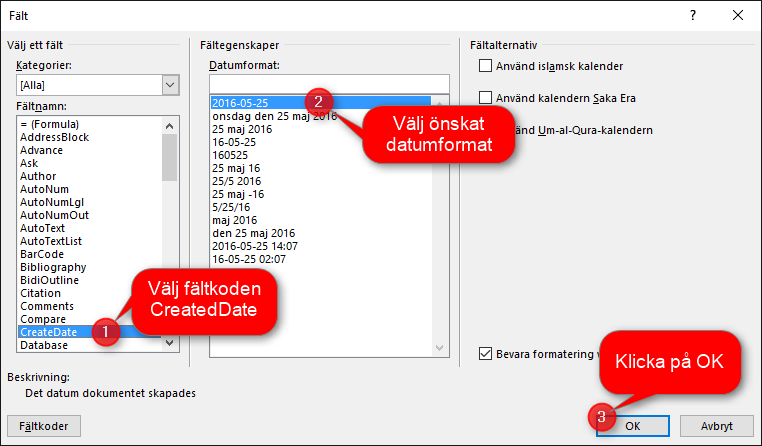
If you want the page or header and footer document to automatically display the date that the report was exported from the system, use a wordfunktion named CreatedDate.
Sidlayout
You can choose which orientation the template should have-landscape or portrait. You can also turn automatic hyphenation on or off.
Keep in mind that a two-column design is not optimally left to include wide tables or large images so use this setting sparingly!
Margins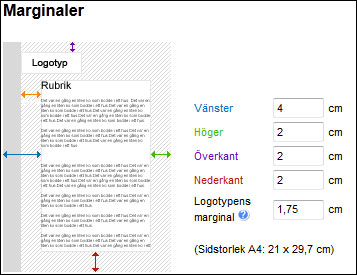
If you have uploaded a logo to a cover page or a header/footer, you do not need to worry about the setting of Logo marginal. This setting applies only to users who choose to use the auto generated page and header/footer.
The logo margin setting assumes that you have uploaded a logo. If you haven't, you can get help from your CSM. See contacts after clicking the Green questionmark in the top right corner of the Stratsys.
Logot marginal Moves the left side of the unit logos to the left relative to your left margin setting. For example, if your document is Has a left margin of 4 cm and you want the left edge of the logo to be 2 cm from the left side of the paper, type 2 cm in the logo margin field. The image moves 2 cm to the left from the margin setting (4 cm).
If your workplace usually uses gutter settings, add this width to the setting for example, Left margin.
Provides a choice for users to include an automatic table of contents when they export their reports. You can also select the number of heading levels as EV. Tables of contents should contain.
You can specify the appearance of the different heading levels in the TOC. You can choose font, size, style, color, spacing before/after and indentation from the left side. The colors you have to choose from are the ones you set during Look.
Step 3: Headlines
You can set how 6 different heading levels and a column name heading are formatted when exported to Word or PDF. Be sure to choose the formatting that makes it clear to the readers what level each title belongs to.
Formatting the heading 1-6
For each heading, you can define font, size, style, color, left-side indentation, and spacing before or after. For example, if you want the report to look more airy, specify the amount of space between the heading and the surrounding content. You can also control the distance between the heading numbering and the title title using the Hanging indent.
The colors you have to choose from are the customer-specific colors you have defined Look.
For each heading level, you also have the option to choose whether to follow the numbering in the export, and whether to display the current heading on a continuous basis or always start on a new page.
The fonts that appear in the font list in your version of the tool are the ones that are available to you. If you have custom fonts that do not belong to Microsoft Office standard selection, these fonts will not be used for direct PDF exports from the tool. Contact your consultant If you want to add your own fonts. This needs the ISF. Be ordered as a redevelopment. To see contacts, click the green question mark in the top right corner of the Stratsys.
Column name header
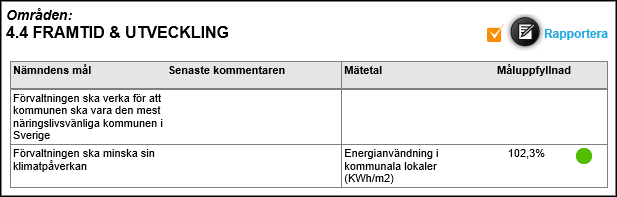
If you have a report with a report part that collects headings from one or more scorecard columns (see Scorecards), you can choose to have the scorecard column name appear above the regular heading. See the sample image below where Areas is the name of a scorecard column and 4.4 Future & Development is a selected area that appears as the title.
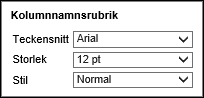
In Wordmallen, you can control the font, size, and style of the column name headings. All column name headers in the same report will have the same formatting.
There are three types of body text used in reports: Title in body text, Body And Fast text. See description of each type below.
Title in body text
This formatting is applied to nodegenskaper for texts with overlying title (ex. "Comment (with title)". In the picture to the right you will see the options available. The colors that are selectable are defined for the entire tool during Look.
Body text (and supplementary texts for tables)
Body text refers to all other texts in the report-that is, the large text masses. This setting also affects the Supplemental texts You added below a table.
You can choose the font, size, line spacing, and how far the distance below each body of text should be.
You can also set the text to be vänsterjusterad (The left side has a straight edge while the right side is jagged) or justified (the spacing between the words is aligned so that both the left and right side have a smooth edge).
Generally
Choose the amount of space you want between your table and any footnote (used for table descriptions) or body text. You can also choose whether table rows are split across two pages if they don't fit at the bottom of the same page, or if the entire row is moved down to the next page.

Title for Table
These settings apply only to the heading that is outside a table. You can choose the font, size, style, color (the options are Colors), distance before and after the title, and whether there should be any indentation from the left.
Text in cells
Here you customize all the text that is used inside the table itself. Spacing before and after determines how much air there should be inside each cell in the table. These values allow you to fine-tune if you think the tables are taking too much space when they are exported.
Obs! The setting you make for Text in cells Also affects the texts in tables in the header/footer.
Footnote to tables
You can add table descriptions (called a footnote in the Stratsys). Select the font and size to type.
Click on the button Shoot When you are done with your settings. You can of course also choose to preview your Word template whenever you want and for any report. Click Preview along with the Save button and then select the report in the drop down menu and confirm your selection via OK.
The report now runs as a background job in the Stratsys, and depending on the Web browser, you notified the finished export.

You can use the Wordtemplate in a new report or change to the new template in an existing report.
Change a Word template Click the Wrench To modify an existing Word template.
Delete a Word template
Before removing a Word template, we recommend that you check the list of templates and see if it is currently in use and if so. You can remove a Word template that is in use, but there is no way to restore deleted templates afterwards. Reports that used the template will still do so in their exports but in settings it will say that Wordmallen is removed and there is no way to make future edits in deleted templates.When you are sure you want to delete a Word template, click  Dust bin That appears on the right side of the list of existing for Templats Throug.
![]()
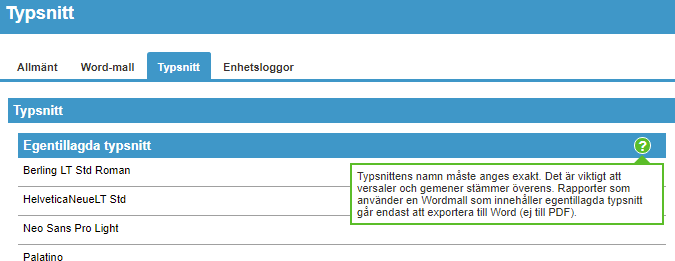
Fonts
Stratsys comes prepared with a number of fonts which you can select inwhen exporting to Word and PDF. However, it is also possible to use ownfonts if the font you use in your organization is missing from our list, see the table "fonts".
You enter the name of the font in the table "Added fonts".
Obs! Reports that use a Word template with a egentillagt font will not be exportable to PDF, see the green question mark in the image below.
If you use the auto generated pages, you can upload logos to be displayed for each unit at these Word and PDF exports. Units that have no uploaded logo are exported without a logo.
In the picture example to the right you will see Administrative department And Fire defence have unit logos uploaded.
Upload a unit logo
Click the Green plusset, click Browse and select the correct image file in Windows Explorer. The file must be in WMF format. Contact your consultant If you need help with this. To see contacts, click the green question mark in the upper-right corner of the Stratsys. You can select Make the logo available to underlying units Relevant.
Remove a unit logo
Click on the link to the logo and select Remove.
Replace a unit logo
Click on the link to the logo, browse and select a new logo (in WMF format) and finish with the button Shoot.
Log height in cm
You set the log height in cm for all logos throughout your organization. A change here also affects logos uploaded by other users at an earlier time.
When uploading a logo, we recommend that you choose a version that is at least as large as you want it to appear on the export. If you upload a logo that is higher than the height you set, it will be rescaled automatically. Scaling up the size of an image is rarely timely, as it can cause it to look blurry on screen, export, or projector display.
Change the logo for your entire Organization/company
If you are looking for an option to change the logo that appears in the upper-left corner of your browser window, you can find this under Look and the Tab Change logo. This will affect how all users see the system and have no connection to exports. Please contact your consultant if you want to do this! To see contacts, click the green question mark in the upper-right corner of the Stratsys.