Find the settings
If you do not see the inputs described below, you lack permission. Contact your administrator.
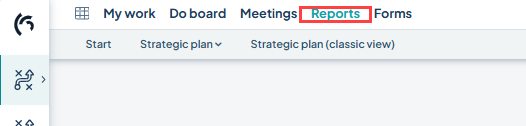
Find the settings via the report page
Go to the report page. You will usually find this page in the top menu:
Click on the report’s name to expand it, then select Settings.
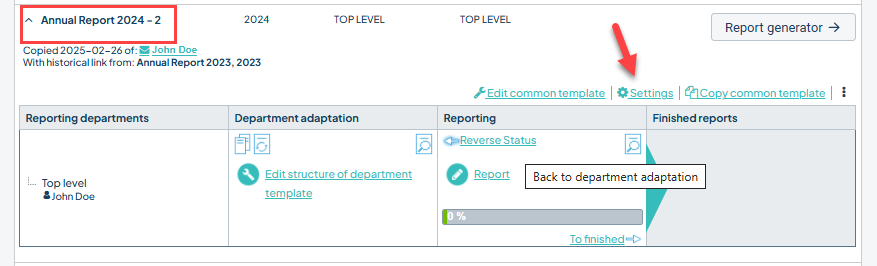
Find the settings directly from the report
You can also access the settings directly from the report. First, click Edit structure in common template at the bottom left of the report page:
Then you will find the settings by clicking the gear icon in the toolbar to the right in the shared template:
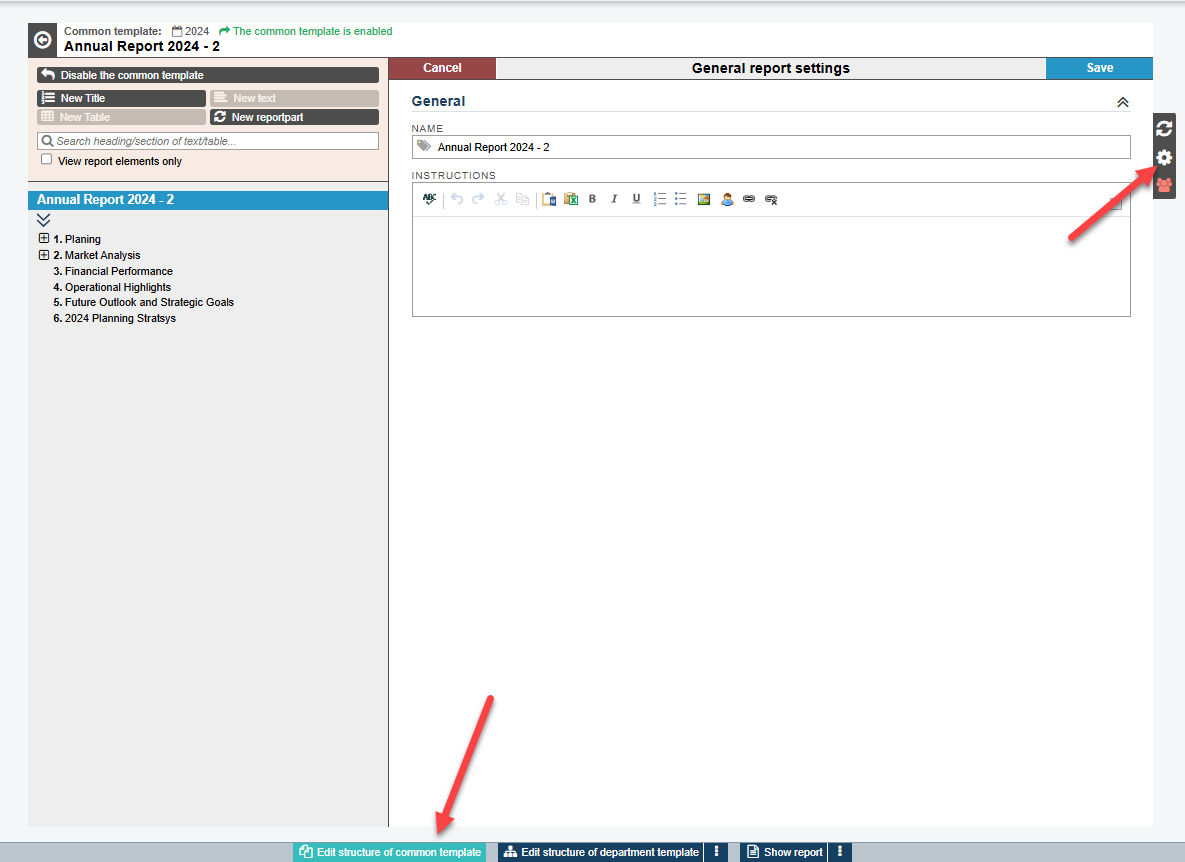
Report settings
The administration settings for a report are divided into four parts:
-
General
-
Table layout template
-
Reporting units
-
Reporters
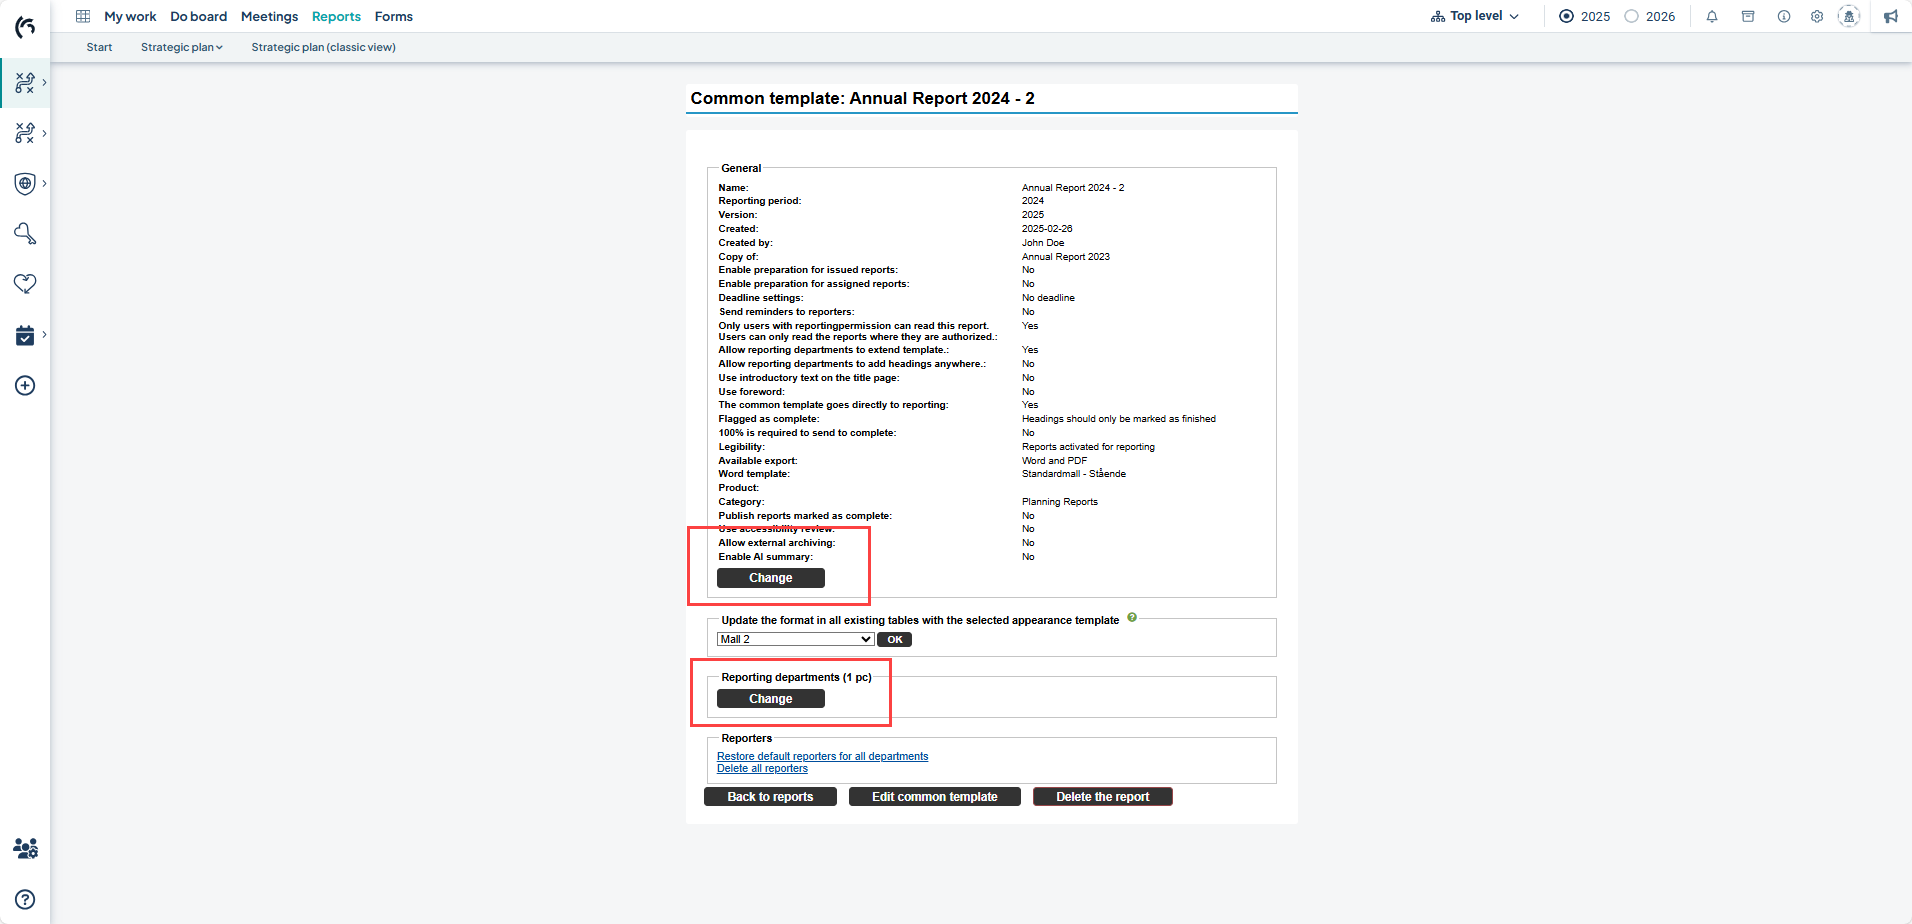
Overview of settings
Here you can see all the current settings the report has.
If you want to make a change, click the Edit button at the bottom of the section and make your changes in two different steps: General and Mail settings.
You can also change reporting units using the black View/Edit further down the page.
Edit report settings
Tip: There are help texts for most sections—click the (i)-icon to get help directly in the tool.
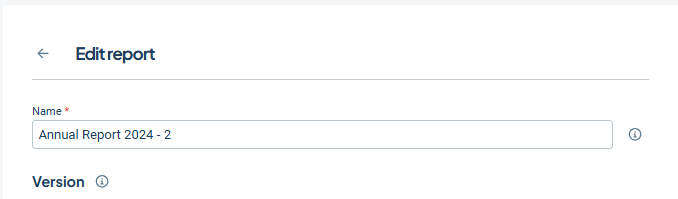
Name
Here you name the report template.
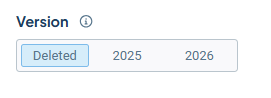
Version
Choose whether the report applies to the current version or the planning version. If you want the content of the report sections to be fetched from the current version, select that. If you have new units and objects in the planning version that you want to include in the report, select the planning version instead.
The report will be displayed in the chosen version, but all reports carry forward after version management.

If the setting says Deleted version, it means the report is based on an earlier version that has now been removed due to version management. Such a report cannot be updated with new information. If the report still needs to be changed, you can switch version, but information in the report may then disappear—contact Stratsys for consultation if you have questions regarding this.
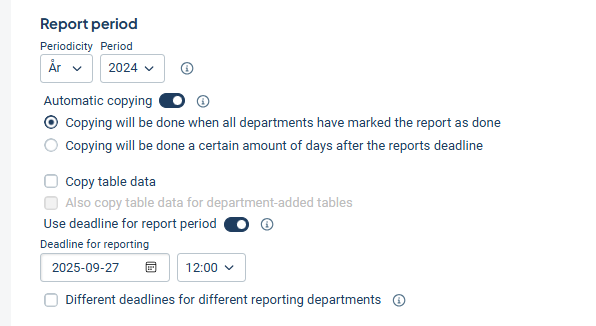
Reporting period
The reporting period controls which period data values and comments are retrieved from in report sections. For example, if you specify Year, data will be fetched from the latest period with a value or comment within the specified year, even if the object itself has a different periodicity. This may mean that the December value is fetched for a monthly metric.
Note that the entire period you want to fetch from must fit within the reporting period.
If the reporting period is Half year 1 (Jan 1–Jun 30), then information from Quarter 1 (Jan 1–Apr 30) will be fetched from an object with quarterly periodicity, but not from Quarter 2 (May 1–Aug 31), since the whole Q2 does not fit within Half year 1.
Select Automatic copy if you want the report to be copied automatically to the next period. You can choose whether this should happen when the report is marked as complete, or after a certain number of days after the deadline. You can also decide if manually reported data in tables should carry over to the next copy by checking the options for Copy table data.
Choose whether you want the report to have a reporting deadline. You can also activate reminders. If the report has no deadline, reminders cannot be activated and the report will not appear as overdue on the report page.
If you select Different deadlines for different units, you can then configure this from the report page. See the section Deadlines for reporting units below.
Reminders
If you have set a deadline for the report, you can enable reminders to be generated. Reminders will then appear in the To-do list for users who are reporters for a reporting unit.

Link report to
For customers who have activated product-specific reports, you can link the report to a product. Then the report will only appear on the report page for the selected product. Existing historical versions of the report will also automatically be linked to the product if you choose this, ensuring consistent behavior.
You can specify a category. When linked to a category, the report is placed under this category on the report page. If no category is selected, the report appears at the bottom of the report page. Learn more about Report categories.
Here you also select a contact person for the report. You choose one of your existing users. The information will be visible on the report page, where the contact person’s email address will also be shown.

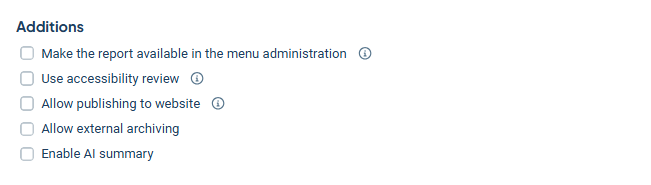
Add-ons
In Add-ons you can make the report available from menu administration, which means it can be added as a tab in the menu. Learn how to do this in the article How do I change a report in a menu?
If the report’s content requires accessibility adaptation, you can activate accessibility review. Users will then be able to enable a review mode in the reporting interface when all reporting is complete. In review mode, alternative texts can be added for images and charts. If accessibility review is used, we recommend only enabling export to Word and converting to PDF from Word afterwards. Learn more: Make your reports accessible.
If you want report content to be publishable externally, for example on your intranet or an external website, you can allow publication on a web page. This function is part of our Enterprise offering. The function only applies to completed reports, meaning no content will be displayed publicly unless the report is marked as complete. Learn more about publishing reports to the web.
AI summarization
Users at higher-level units can get help summarizing reports from lower-level units by activating AI summarization. This feature requires an AI license, and to activate it in a report you need to be a full administrator.
Learn more about Stratsys AI.
Advanced settings
Completion marking
Here you choose whether completion marking should be used for report sections. If you enable it, you can select completion marking only (one level), or completion marking and approval (two levels). Two levels are used if you want a higher-authority user to approve the sections marked as complete by lower-authority users.
You can also require the report to be fully reported before it can be marked as complete using the setting 100% required…

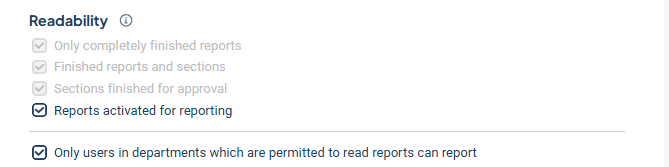
Readability
Here you set when the reported text should be readable by users in other units who do not themselves have reporting rights in the report. Users must still have read permissions for reports in the unit in order to read them at all.
Readability works like a “staircase”, where each level includes the levels above it. The checkbox Only fully completed reports is always checked, which provides the minimum access.
The setting also applies to Compile reports.
To restrict readability further, you can specify that users may only read reports in units where they themselves can report.
Preparation phase
Here you choose whether the shared template should have a preparation phase or not. Preparation phase means that when units approve the report, it enters a preparation stage where a committee, board, or other body must first write a formal decision, comment, or similar.
If you do not activate preparation phase, the report will go directly to Complete when approved. See the (i)-icon for more information about distributed and assigned reports. Learn more about Preparation.

Other
Activate The shared template goes directly to reporting if the report template should be automatically activated for all units when the template is activated for all units. If you do not select this, the report must be manually activated for each unit.
It is still possible to modify the unit-specific report template during reporting as usual if you choose The shared template goes directly to reporting.
Also choose whether reporting units should be able to customize their reports by adding elements to their reports.

Formatting
Export
Here you choose which layout template should be used when exporting. The template determines the layout for the report when exporting to Word, for example font, line spacing, and margins. Learn more about layout templates in Word and export settings for reports.
Also choose whether the report can be exported to Word and PDF, or only one of these. A content-related difference is that for Word export, you can choose whether to include a table of contents or not. For PDF export, the table of contents is always included.

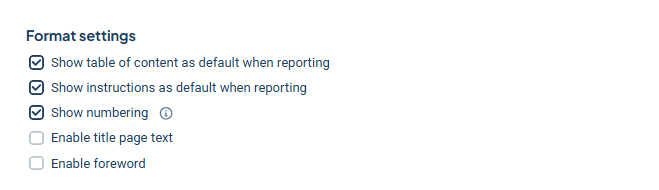
Formatting settings
Choose whether the table of contents and instructions should be displayed by default during reporting.
If all numbering for all heading levels should be displayed in the shared template, unit template, reporting, preview mode, and search engine, check this option. In export, however, Word’s template settings for numbering always apply.
You can also choose to use a preface on the cover page and to include a foreword.
Deadlines for reports
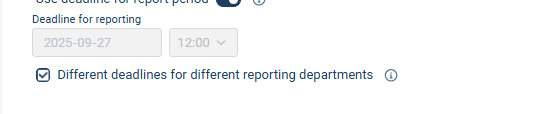
If shifts are used, reports in different units can have different deadlines. The automatically calculated deadlines can be adjusted afterwards for individual reports from the report page.
Selecting Different deadlines for different reporting units makes it possible for different reporting units in a report to have different deadlines. For organizations with multiple organizational levels, this makes it easier to ensure lower-level units complete their reports early, so their reporting can be used as input for higher-level analysis.
Go back to the report home page. There you can adjust the deadline date for the current unit, and for lower units by clicking the Deadline link for each unit.
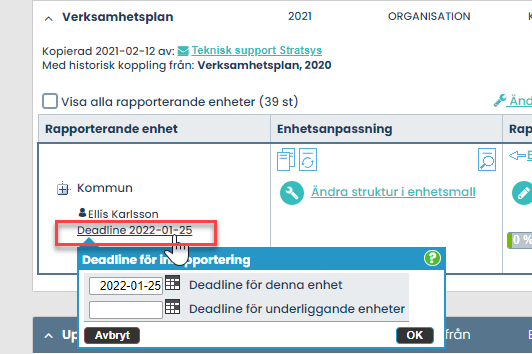
When you change deadlines for lower-level units, any new units added will also get the new deadline.
Note that lower units’ deadlines are overwritten when you adjust lower units. This also applies if the units themselves set a specific date.
Users who are reporters on a report, or who may customize the report, are also allowed to change the report’s deadline.
When one or more deadlines have been changed manually, an option will appear in the report settings to restore all deadlines. Check the box and save to reset to the report’s reporting period for all units. This action cannot be undone.
Table appearance
If you want all tables in the report to have a certain layout, you can change it for the whole report under settings. You can also change it for each individual table inside the shared template.
Learn more about Table layout templates in reports.

Reporting units
Under Reporting units you select which units the report should be distributed to. All selected units will be able to report into the report for their unit.
Click the Edit button and select the units that should have the report. If many units should receive the report, you can click one unit and then choose to select all units one to three levels below that unit, or simply all underlying units.

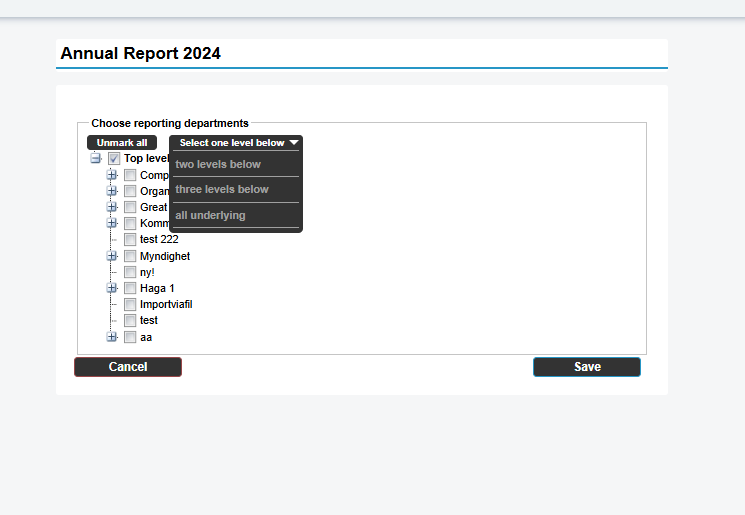
Change reporting units
You can add reporting units afterwards without any problem, and they will also get the report in their unit.
If you remove a unit, its report disappears, even if it has been started. You can add it again, but the reported text/data is lost and cannot be restored! You may also need to redo completions of report headings and customizations in the report itself.
If, however, you made a copy of the report while a unit was removed, and then re-added the removed unit, the removed unit’s history cannot be seen. However, you can still view parts of the history by opening the latest archived report where the unit was still a reporter.
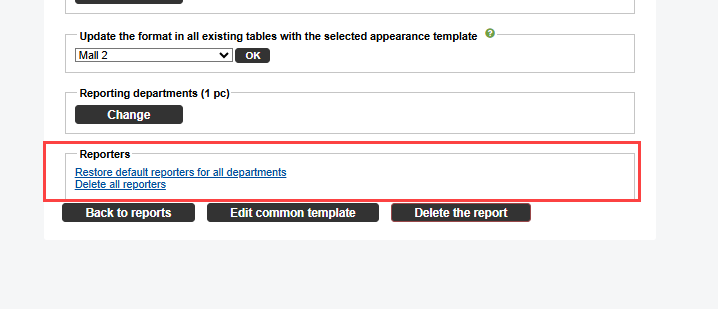
Reporters
Here you can:
-
Restore standard reporters on all units
Updates according to the standard reporters set for each unit. Manually added reporters are not affected. -
Remove all reporters
Clears both manually added reporters and standard reporters.
See also Administer reporters for a report.