Description
In the common report template, you describe how the reports from different units should look and what elements they should contain.
You can also customize the content for separate units, which you do in the unit template.
You build the report with the following elements:
-
Headings - these create structure, and you can choose which units should see and report on each heading.
-
Text Sections - here, text is reported directly in the report, similar to writing in a regular text document. You can paste images and format the text in various ways.
-
Report Parts - here you retrieve already reported data, status, comments, and other information from the management models in Stratsys. The content is configured via node properties and filters in a similar way to views.
-
Tables - you can use simple tables where users can directly report data. You can also use formulas and paste data from other spreadsheet systems like Excel.
Note: The information retrieved in "Change Structure" in the common template comes from the top reporting department, that is, the department level where the report is created. To see which information will be retrieved for the specific department , you must be on "Edit structure of department template" in the report. This also means that you will see any department customizations that have been made by the department for the report.
Find the Common Template
When all the steps required to create the report are completed, you will arrive at the common template for the report.
If you are instead in reporting mode, you can find the common template via the buttons at the bottom - these will be displayed if you have permission to change the structure of the report.
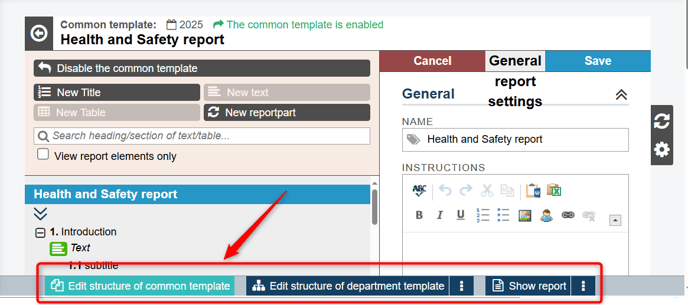
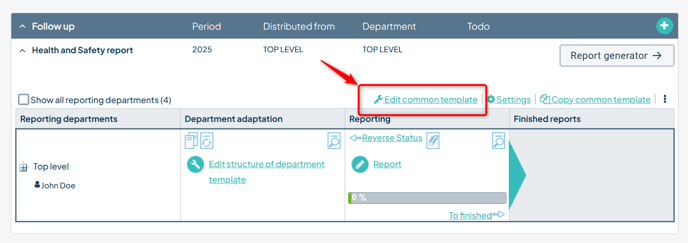
You can also access the template from the report page - you find the common template by expanding the report and then clicking on "Edit common template".
Build the Report's Content
Depending on whether you have created a new blank report or copied an existing report, it will look different when you start. We will base this on a blank report, but the principle remains the same.
Tip! If you already have content or after you have created content according to the guide below, the common template will be displayed with the table of contents collapsed as the starting point. If you want to expand it, you can click on the plus sign in front of the heading or on the double arrows above the table of contents. If you hold down the CTRL key while clicking on the arrow, only the first sub-level of all headings will expand.
Name of the Report and Report Instructions
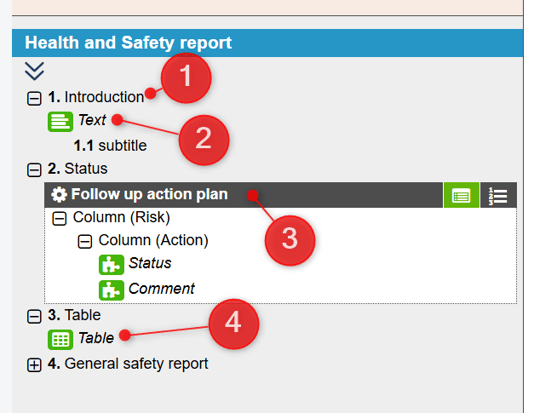
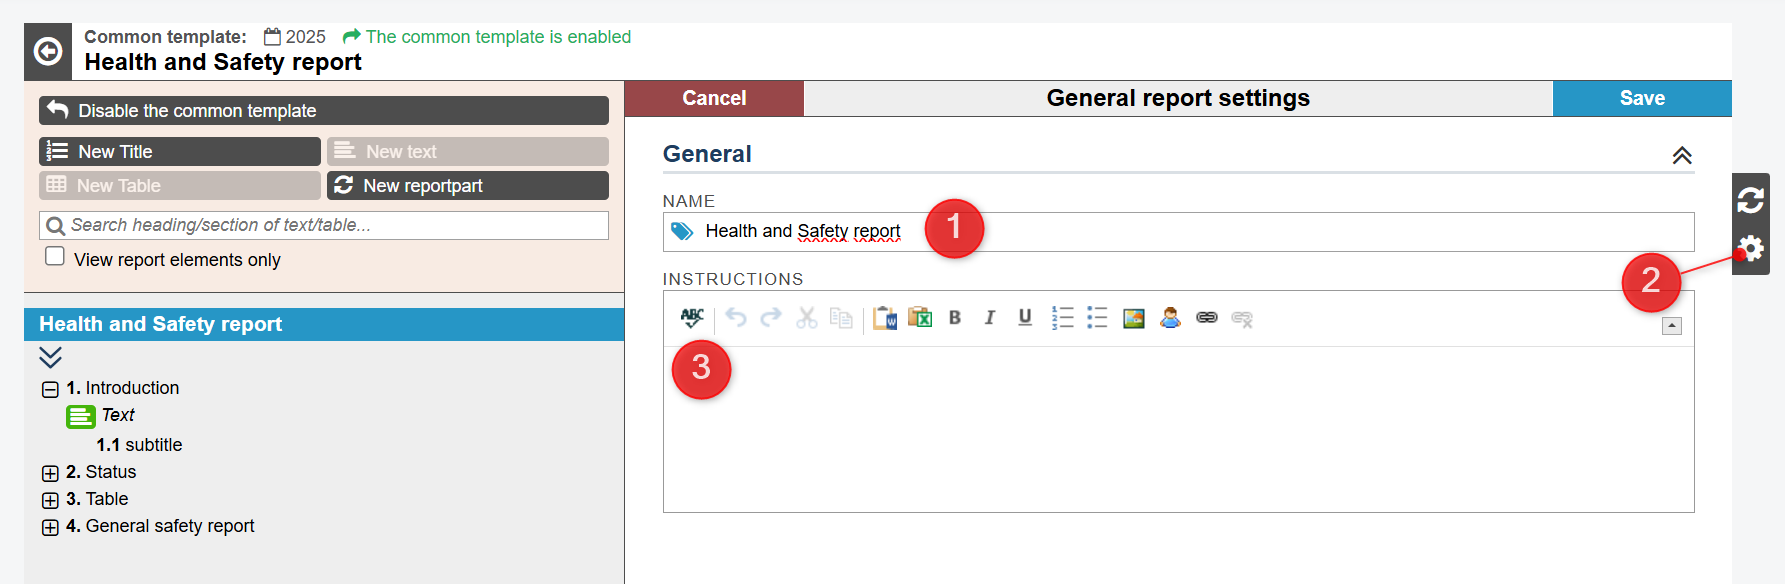
In the name field of the top heading (1), the name you have given to the report template is displayed. If you change the name here, it will only change on the front page of the report. To change the name in the system as well, you must go back to Report Settings (2). In the Instructions field (3), you can write an overall instruction that applies to the entire report.
Buildning the report
You build the report template by using the following elements - if one or more options are grayed out, you need to create a new heading first (or use an existing heading in the table of contents). Position yourself on the heading to create the other elements.
You build the report template by using four buttons:
- New title
- New text
- New Table
- New report part (structure in a common template that is automatically generated based on the contents of a control model or from an external system)

Obs! The information collected in the Change structure in common template is from the top reporting unit, that is, the unit level at which the report is created. To see what information will be collected for that particular unit, you must be on the Change structure in unit template. This also means that you will then see any unit customizations that are made by the unit for the report.
Click to access the preview report. You can access the preview from the report template, the entity template, the reporting mode, and the report list.
New title
Tip: It is not possible to report anything under the headlines. In order to be able to report, you must add a text section or table. Under each heading, you can add arbitrary number of text sections and headings.
Add fixed text to the report
Here you can click to enter a text that will be present in all the finished reports that are based on the report template. The fixed text will not be editable in inrapporteringsläget.
Note: The difference between the fixed text and the instruction is that an instruction is something that the rapporteur relates to when writing their text and the instructions themselves are not visible in the finished reports. Fixed text appears in the finished reports and can be written already in the report template
Placement
The title you add automatically falls under the heading that's selected. The selected title appears in red text on the left. If you want the title to be repositioned, you can use Rullistorna Parent And Place before.
Dölj Categories
Select the check box to hide a title when reporting. The function is used when a template should serve as a template over multiple reporting periods, but not all headers should be reported at all calender. It is therefore possible to hide or choose to display a particular title depending on the reporting you are in.
A hidden title remains in the content structure of the report template but is displayed in gray color. The unit-size templates displays the hidden headings as strikethrough. In the reporting, however, they will not be visible at all. Then, when you copy the report template to use at the next reporting date, you can choose to show/hide the heading again.
Allow units to hide the title
If some units don't have to report on a particular heading, you can choose to have the units hide the title. This allows the unit administrator to choose whether to show or hide the title. If a heading is hidden, it will appear in gray in the content structure of the unit-size report template. In the reporting it will not appear at all.
Select reporting Units
Here you can select which units you want to distribute the heading to. The setting is fine to change afterwards. You can choose to display the title for all units that are at a specific level in your organization or for all entities in an organizational branch.
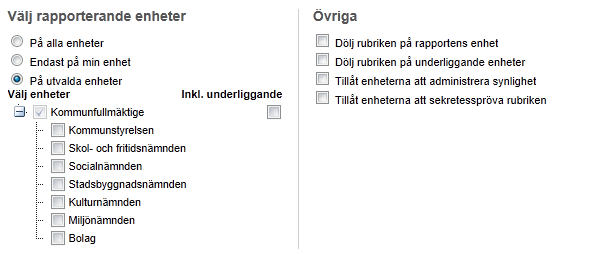
Dölj Categories On the report's unit or on the underlying units
It is possible to hide the header of the top drive or all underlying.
Administering visibility
You can give unit permission to self-administer visibility from their own organization and down on their branch.
Allow the units to sekretesspröva the header
If it is considered that the reported text on the title may contain confidential information that not everyone should be able to access, you can allow the entities to sekretesspröva the title. If they do, only people with permission to read the reportable will be allowed.
Click on the button Shoot At the bottom left when you're done with your settings.
Ny text
Title
If you want, you can enter a title for the text section. The title you enter will appear as a heading above the text section of the finished report. However, the title will not appear in the TOC. Using a title above a section of text can be a good way to control your reporting because it becomes extra clear to users what they are expected to report in the section.
Instruction
The instruction you enter here is directly connected to the text section when reporting.
Teckenbegränsning
If you wish, you can set the maximum number of characters that can be reported in the text section. (typically contains a range of 80-100 characters.)
Placement
The text section you add automatically falls under the title that is selected. The title that is selected appears in blue on the left. If you want the text section to be repositioned, you can use the Rullgardinslistorna Parent And Place before.
Click on the button Shoot At the top right when you're done with your settings.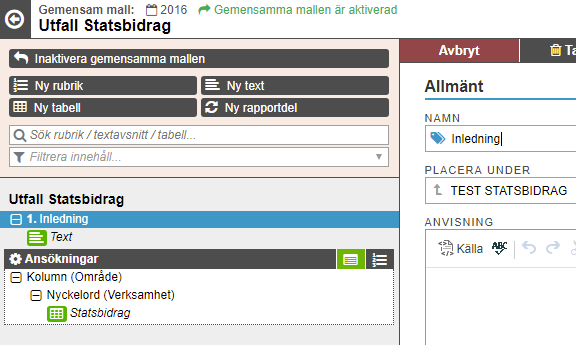
Then you go through two parts in any order:
- General Settings
- Tabellformatering
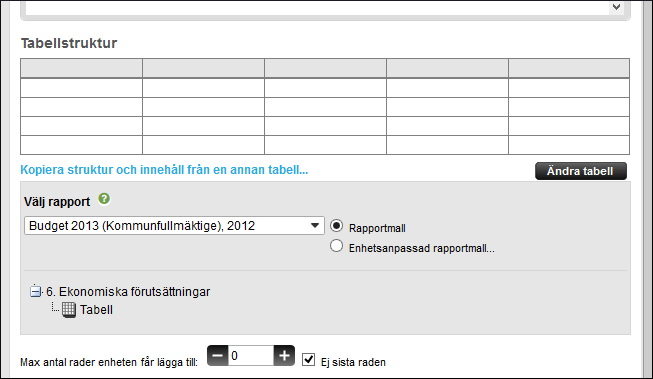
Copy structure and content from another table...
This feature makes it possible to copy tables with table structure and content from an optional report.
To achieve this function, in Rapportmallstrukturen or unit customization, choose to create a table. Here you can now by clicking on the blue text "copy structure and content from another tabelll..." Choose between existing reports and its tables.
After you select an existing table, you can see it, with headings and each table, underneath. You can refine your search by switching between tables created in Rapportmallstrukturen and in unit customization. The table is copied with the existing structure and content such as layout and formulas.
Title
If you want, you can enter a title for the table. The title you enter will appear as a heading above the table in the finished report. However, the title will not appear in the TOC.
Instruction
The instruction you enter here is directly connected to the table when reporting.
The maximum number of lines the unit can add
Here you can specify whether the units should be allowed to add their own rows to the table. It may be that it is not always overall indicators that should be reported, but that the units should also report a few of their own key figures. If this is the case, specify how many lines they can be added to.
Supplementary text and footnotes
By default, it is chosen that the reporter should be able to add a supplementary text to the table and footnotes if necessary. But if, for example, it is a limited space in the report, you can choose to remove the possibility of adding such additional information. The setting is also available for tables that are created as report parts, click the table and you will have the option to edit these settings.
Repeat top row as header row at page break
This setting causes the header row of a table to repeat on each page that tables span.
Placement
A new table that is added automatically falls under the title that is selected (shown in red text on the left). If you want the table to be relocated, you can use Rullgardinslistorna Parent And Place before.
Start by clicking Change table. Many of the options you get when you format a table work the same way as the options for tables associated with Reportsections. This article only addresses additional settings that are specific to this kind of table.
Change table
By default, the table contains five rows and five columns. To increase/decrease the number and to enter column and row headings and format how the data in the table cells should be presented, click on the button Change table.
You increase or decrease the number of rows/columns by using the +/-characters. Click "Plus" to add a row or column to the desired location in the table, and click "Minus" to remove.
Hänglåset -Locks the formatting of selected cells so that they cannot be formatted by the units
Merge cells -Allows you to merge cells in horizontal direction. Unfortunately, we do not support merged cells in a vertical direction.
Number of decimal places -Lets you specify the maximum number of decimal places to display in selected cells
Indikatorgrupp -Allows you to select fixed values from a drop. See indicator groups.
Features -Here you specify functions to use in the desired (e) cell (s). See description of the various functions.
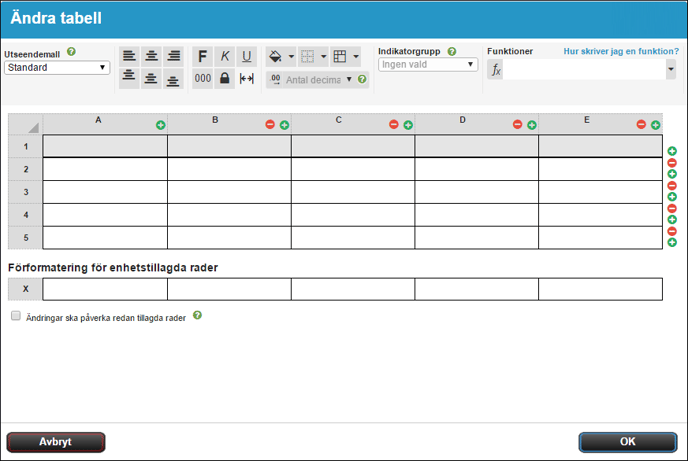
If you have set up so that the units can add custom rows to the table, you have the option to preformat the added lines so that each unit does not have to do this themselves.
The content is the text that you type into the cells. The text is usually headers on rows and columns. It is only in empty cells that it will then be going to report information.
The appearance of the table can be controlled by formatting the cells. Use the following procedure:
(1) Select the cells you want to change by clicking the checkboxes that are in the cells. You can check an entire row or column consumption by clicking the headings on the table edge. To select all cells in the table, click the button in the upper-right corner of the table.
(2) Then use the buttons above the table to make your formatting choices.
(3) Click on the button OK Along the bottom right.
Obs!
It is important to also format the empty cells because it has an effect on how the reported text/data is then presented. However, All table formatting can be adjusted retrospectively, even if the units have already started reporting.
If you have set up to allow your units to add their own rows to the table, it is also important that you also format these lines so that each unit does not have to do this themselves.
It is possible to specify that some cells in the table should contain calculated values. You can choose to write your own formulas or use predefined functions.
Write your own formula:
Select the cell that will contain the sum of the calculation. Start with = then enter the references to the cells you want the formula to contain in the formula bar in the upper-right corner of the screenshot. e.g. "= (A1 + B1)/2". The formulas are written in the same way as for example, Excel.
Use the predefined functions:
Select the cell that will contain the sum of the function. Click in the function bar at the top right of the screen. Choose from below. This function is written in the function field. You specify which cells to refer to. Be sure to end parentheses and use the correct cell references.
- Summarize cells above except first
Sums everything in the column above the selected cell except the top row. - INRESUMMA(B1:B5)
Sums the values in B2, B3, and B4. - B4+C4
Summing the values in B4 and C4 - SUMMA(B1:B5)
Sums the values in B1, B2, B3, B4 and B5 - Average (C1: C3)
Takes the mean from C1, C2 and C3
Cells that contain functions or formulas are locked to users during reporting.
Obs! All intervals also include unit added rows within the range. So A1: A5 includes, for example, a 1.1 and a 3.1.