Attach links as attachments to your objects and choose which departments should have access to them.
Enable the Ability to Add Attachments
Visibility Settings for Attachments
Choose Whether Attachments Should Be Visible Downward
Display Attachments in Views- Add Attachments in the Follow-up Window (separate article)
- Add Attachments in the Object Window
- Add Attachments in the Classic Edit Window
Why aren't documents displayed / why can't I upload documents?
Description
You can attach attachments such as links or documents to objects/nodes to support users. These could include links to regulations for processes or internal documents that describe a measurement method.
This article explains how to administer the settings for these attachments. To configure these settings, you need to be an administrator.
We recommend attaching links to your documents rather than uploading copies. This provides a more flexible solution within our system.
By linking to documents, you can also use shared documents, reducing the need to upload updated versions. Instead, you simply update your internal document in your document management system.
Additionally, it provides an extra layer of control to ensure that the user opening the document is authorized to access it.
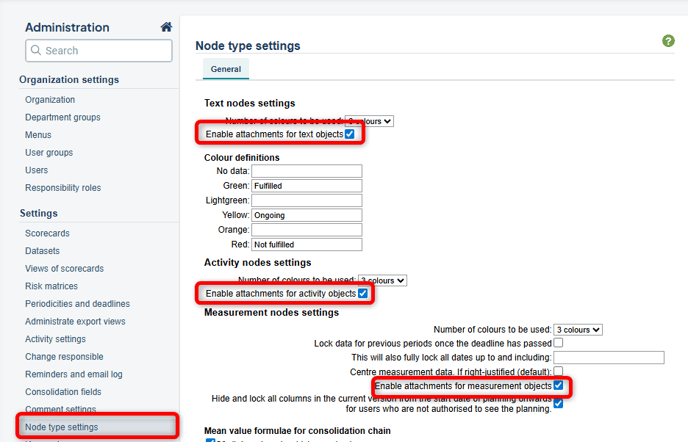
Enable the Ability to Add Attachments
To allow users to add documents and links to different object types, this must be enabled in the Node Type Settings in the administration section. You can control this setting per object type.
Go to this administration page, check the box “Enable attachments for...” for the node types you want to allow attachments for, and save.
Visibility Settings for Attachments
The behavior differs slightly between various object types and is described here in two separate sections.
Text Objects
For text objects:
-
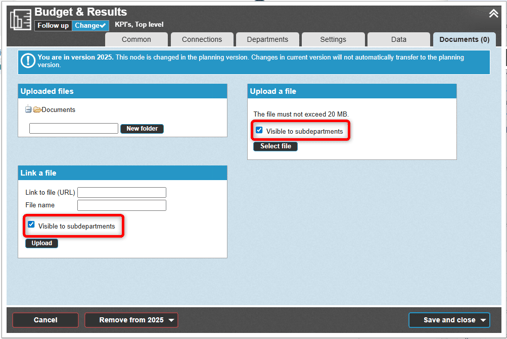
You can upload files at the department level where the object was created (typically the top level), and choose whether to make them visible to underlying departments.
-
You can upload links at all department levels and choose whether to make them visible to underlying departments.
Measure and Activity Objects
With Consolidation
For measure and activity objects, there is a global setting to restrict the addition of links and documents to the top level only. These attachments will then always be visible on all underlying levels. With this setting enabled, the ability to individually manage the downward visibility of documents and links is removed.
Refer to the settings for documents as consolidation fields to understand how this works.
Without Consolidation
If the overarching consolidation property is not used, the following applies for measure and activity objects:
-
You can upload files at all department levels.
-
If a file is uploaded from the top-level department, you can choose whether to make it visible to underlying departments. Files uploaded at other levels are only visible at the current department.
-
You can upload links at all department levels and choose whether to make them visible to underlying departments.
Choose Whether Attachments Should Be Visible Downward
For files and links that are uploaded, you can choose whether they should also be visible to underlying departments. If the property is not visible, it is not possible to enable downward visibility—see the sections above for applicable rules.
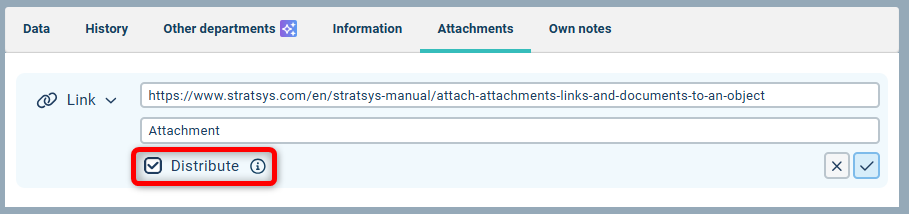
By default, this property is pre-selected when adding a file or link, but you can deselect it if you want the attached material to be available only at the department level currently selected in the organization selector.
In the follow-up window and the object window, this property is labeled “Distribute”.
In the classic edit window, the same property is labeled “Visible Downward”.
Once you have attached a link or file, you can see in the follow-up window whether it is distributed downward via the distribution icon. However, you cannot change the distribution afterward; instead, you need to re-add the link or file and distribute it at that time.
Note that a document or link can only be deleted at the department level where it was originally added.

Display Attachments in Views
Attached materials are always accessible from the follow-up window and the classic edit window.
In the new view types, a paperclip icon is displayed if one or more attachments are linked to the object. This occurs automatically, and no additional node property is required in the view settings.
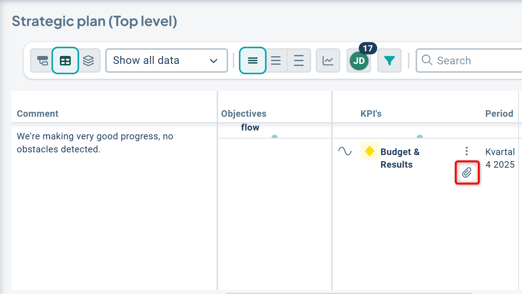
By clicking the paperclip icon, you can go directly to the link or download the document.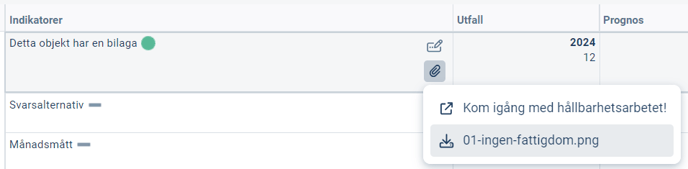
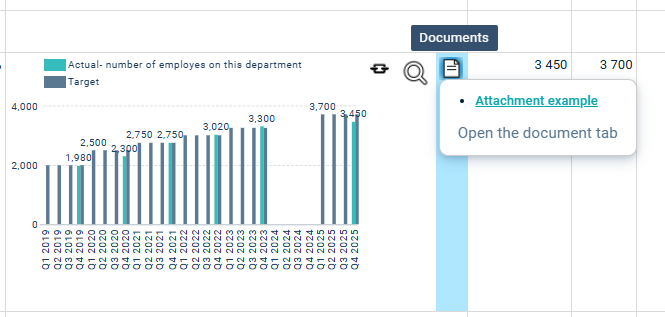
In classic views, you add the node property “Document Icon” to display attachments. It is available in two sizes: normal and small.
 Below is the standard-sized icon as it appears in a classic view.
Add Attachments in the Follow-up Window
From the follow-up window, you can add documents and links via the tab on the right. See a description here: Attachments in the Follow-up Window
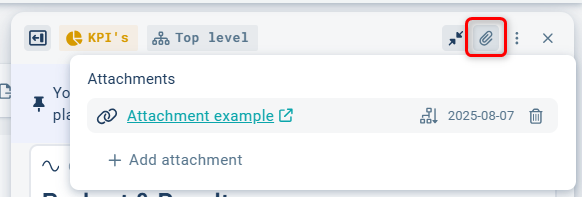
Add Attachments in the Object Window
In the object window, you can add attachments by selecting this menu option from the three-dot menu in the top right corner.

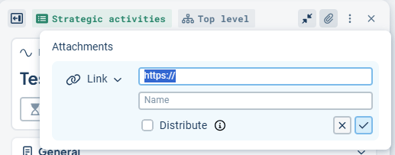
Choose whether you want to add a link or a file from the dropdown menu:
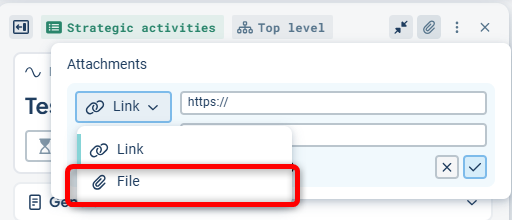
When adding an attachment, you can choose whether underlying departments should have access to it using the “Distribute” property.
Once an attachment has been added to the object, a paperclip icon appears at the top of the window on the levels where the attachment is available.
You can add more attachments, delete current ones using the trash can icon, and access the link or download the file via the paperclip icon.
Add Attachments in the Classic Edit Window
From the classic edit window, you can add attachments via the “Documents” tab. However, we recommend doing this via the follow-up window, which offers a more modern interface with better support for this functionality.
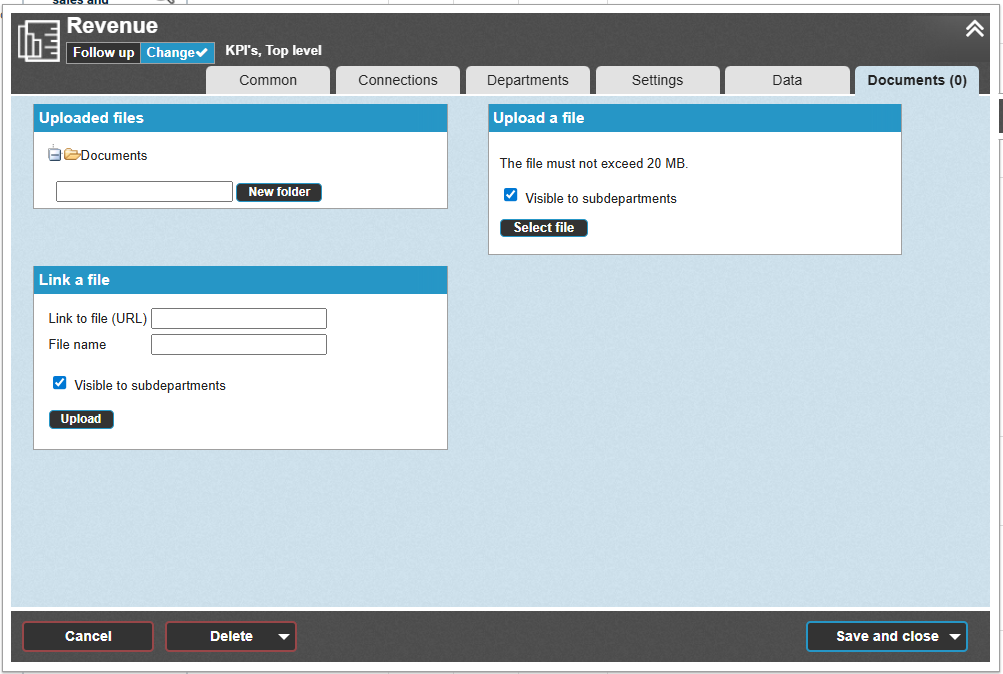
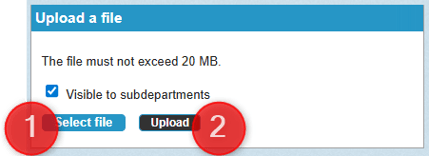
To upload a document, follow these steps:
-
Click “Select File” – select a file from your file management system.
-
Then click “Upload”, which appears after selecting the file. Note that the selected file name is not displayed in this dialog.