A planning version usually plans for the following year. When the time comes for a new year, the planning version will be updated to the current version. This step is always made by someone who works on the Stratsys for the database needs to be copied and only we at Stratsys access the function to copy the database.
In Stratsys, we call it versioning when we change so that the planning version becomes the current version. When are we ready to do the version management?
When the current year is completly Finished reporting all the reports drawn from the current year are completed.
Contact your consultant when you are ready and reconcile a good opportunity. The consultant will conduct a dialogue on completed activities. Consider whether you want to delete the activities that have been completed during the current year. How did you do last year? Note! If you have several control models, you have the possibility to do different ways for each control model.
Finishing work
Depending on the changes you have made to the plan, you may need to customize the views and menus so that they are displayed correctly. For example, have you added new views, control model columns, measure columns, or new keywords/description fields for the planning year, the views and/or menus need to be updated.
Switch between current and planning version
A certain privilege is required to switch to and work in the planning version. If you have such permissions, two buttons appear in the upper-right corner-one with the name of the current version and one with the name of the planning version. By clicking these buttons, you can navigate between versions.
You can read more about the current version and the planning version in Planning And User groups.
Change the planning version
To make a change to the planning version, click the node you want to change in. In the window that opens, click on the button "Delink to YYYY". The system will ask you if you are sure you want to change. Press Ok It is changing the way to make changes to the planning version and nothing that you should be right to do.
When you make a change to the planning version, the node that you changed in is marked with the planning icon. This is for you to know what separates the planning version from the current. The change in the planning version will not be visible in the current version. Changes made to the current version are visible in the planning version of the nodes that are not delinked in the planning version.
Comments and numbers in measures are shared between the current and the planning version even for Losskopplade nodes, except if you have made changes so that the numbers are no longer compatible between the versions (for example, changed on formulas or periodicity).
To change something in the current version that has already been modified in the planning version
If a node (such as goal, measure, or activity) changes in the planning version, the connection to the current version is broken. A change made to a node in the current version does not pass through the corresponding node in the planning in case the node is Losskopplad there. The nodes that are losskopplade in the planning are given information on this when making changes to the current version. If you want the changes to take place even in the planning, you must manually go in there and make the corresponding changes. If you don't have planning permissions, you'll need to contact someone who has it and ask that person to make the change for you.
However, there are some exceptions to the above:
Comments shared between versions
Number data is divided between versions as long as no changes are made to the measure columns or consolidation formulas so that the versions are no longer compatible.
Separate the planning from the current version
 Separate the planning from the current version
If the planning version has been determined and no longer wants changes on the nodes made in the current version to affect the planning version, you can turn this setting on.
The effect is therefore that new nodes that are created do not show up in the planning version. Changes to existing nodes also do not affect the planning version, except for comments and measure values.
Planning Administration Settings
There is a limitation of which administration settings can be made when you have planning mode enabled. The settings supported by the planning are Organization users And Change the main unit of nodes. You also have the opportunity to see Views of control Models And Planning However, changes to these two always turn through both the current version and the planning version.
Organization
Organization settings are Åtkombara from planning, which aims to make organizational changes to planning that do not affect the current version. The following can be done:
- You can create a new organizational unit that is visible only in the planning, by clicking Add i enhetsstrukturen.
- You can change the name of a device. Click the device, and then type the new name in the text box Name. The new name will only be visible in the planning version.
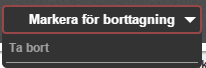
- By clicking on the button Mark for deletion , you can set the device to be deleted when the planning version is redesigned to the current version. (Only devices that do not have any other devices under them can be marked for deletion.)
- You can move a drive or an entire device tree by clicking the device you want to move, and then pressing the button Move Device/device tree. You make the move in three steps:
- Placement -Selects the device under which the removal device will be placed.
- Content -Selects the information to be moved with the device. By selecting the checkboxes, you can choose to move with all nodes on the device, all users who have permissions on the device, all reports that are archived on the device, and all comments that are written on the device.
- Confirm -Here you get a beräftelse of the selections you made and to complete the move, click on the button Move device.
To read about other settings on the Organization page, see Organization.
Users
The user settings are accesable from the planning, which aims to enable user settings for devices that are only set up in the planning.
The only thing that differs from the user page in the current version is that there are additional search options for searching out users belonging to devices that are marked for deletion. Such a search might be useful for relocating users belonging to devices that are to be deleted when a version change is made.
To read about other settings on the user page, see Users.
Views of control Models
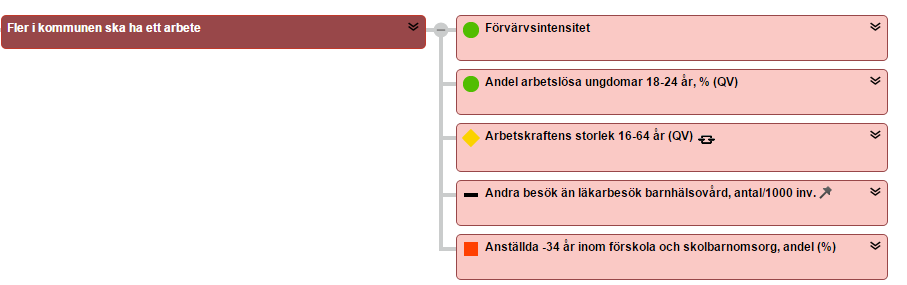
A view is something you use to visualize all or part of one or more of the Scorecards (If nodes are selected from another control model). The control model is a type of information container that needs at least one view or report associated with it to enable you to view and modify the information. The view illustrates selected Scorecard columns And those Node properties You think is most important to show for this particular basic application area. For example, the Be a summary of a unit and the mission statement of its underlying entities with the current values of the merged measures or a list of activities and the comments written in them over a selected period of time. Views can be specially set up for use in planning, execution, or for analysis.
The views are grouped into different Menus. Which users can see the respective menu is controlled by the User groups The users belong to and which menus are visible to these permission sets. In this way, you can create custom views for different audiences in your organization.
The content displayed in a view depends on the device that the user is on in the organization tree, and the Control model columns and Node properties selected in the view. It is then possible to filter out portions of this or make special preselected filtering depending on which user sees the view and what device that user is on. The view is also filtered based on different types Standard filter.
Obs! The name of the view will contain the period if the columns in the view have the same periodicity, if any control model column in the view deviates in periodicity from the other, the period is not visible.
Automatic copying to new devices
You can set up to automatically copy measures and tasks to new units that are added to the Stratsys. To do this, you set up per measure or activity if they are to be copied automatically or not.
Click the Open Change window (top right) of the measure or activity that you want to make the setting in.
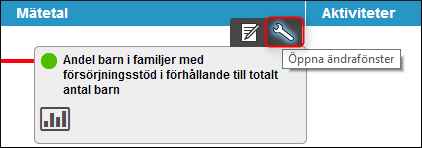
Then click the tab Devices.

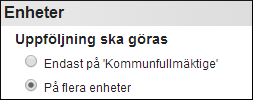
Here you then check that follow-up should be on multiple devices.
When you have checked it, you can then choose to organizational units. Here you have the opportunity to add Automatic copying For the units you want the measure or activity to be copied to.
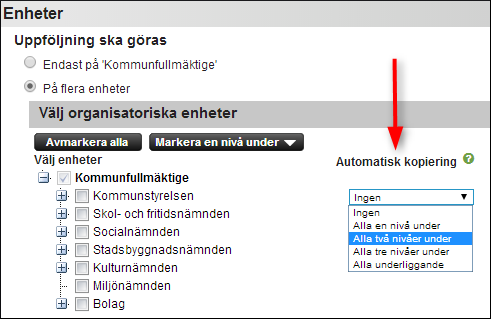
This feature saves a lot of time as it replaces the work of manually entering all the measures and activities to copy them down to newly added devices.
Planning
Obs! Administrationsalternativet Planning Must be activated by the Stratsys. If you do not see it and have a need to make changes here, please contact your consultant. See Contacts. If you see the option Planning However, there is no information in the manual on how to administer it, this means that we recommend Not change these settings without consulting contact.
Planning handles different versions of the tool. You have a current version and often also a planning version where you manage the planning for the next year. When reporting begins to be ready for the year, contact your consultant to help you make the planning version up to date.
For further information on how you can work with different versions, see Menus (tab: Menus).
Change the main unit for nodes from the planning version
The setting for switching the main unit of nodes works the same in the scheduling as in the current state. The only difference is that in planning, you have the planning organization to choose from when you move a node.
KPI data regardless of version
In Stratsys, you can now add måttdata to either the current version or the planning version so that the KPI data is automatically updated in both versions. For example, if you Updating a measure in the planning version (2015), this measure should be automatically updated in the current version (2014) and vice versa.
Even if you break the correlation between the versions of a measure by, for example, Reassign the measure or change a beskrivninsfält in the planning version, and the data will still be updated in both versions.
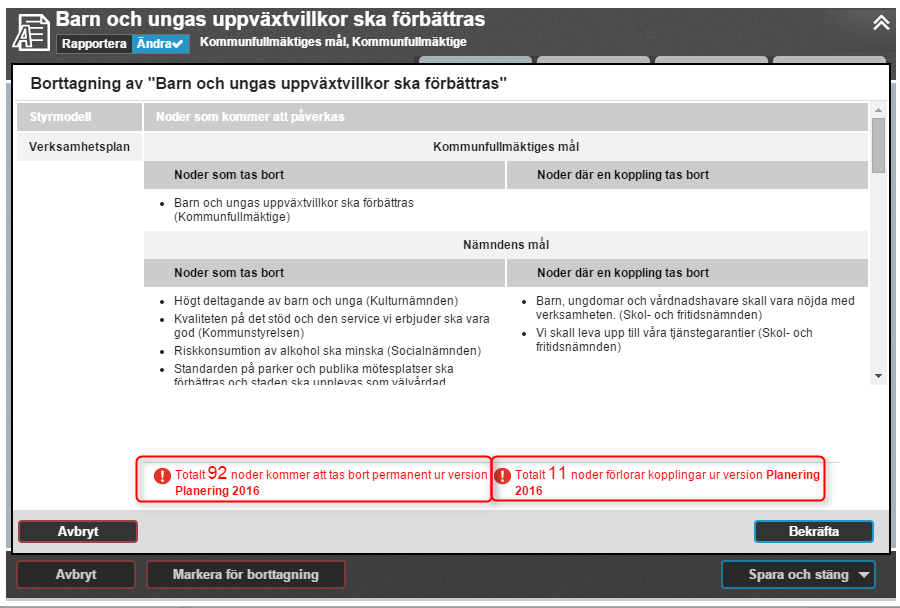
Remove planning version Nodes
In the first place, we recommend that you select the nodes that you want to delete for deletion. This feature is useful if you are unsure whether you really want to remove all nodes, or do not know that the underlying devices have nodes that they want to keep associated with this target. You choose to Select the node for deletion.


The node that is marked for deletion will then appear as red, and anything associated with the red node on all devices will appear as pink. Any device that has a goal, measure, or activity associated with the node that will be removed now has the opportunity to see this in the tools and choose to reconnect them to something else that will remain (assuming that coupeling rules and Settings for the user's user groups Allow this).
Obs! Any goals, measures, or activities associated with something marked for deletion will be automatically deleted when scheduling is made up to date. There is no need to manually remove these nodes!
In reports or views, you can easily choose to Filter Remove all targets, measures, and activities that are marked for deletion if desired.
If you want to remove nodes in the planning version, select the option Remove from planning. It is important to note that nodes removed from the planning version are not currently available for recovery by Event history. However, it is possible to select nodes from the current version, or from one of the gross lists. However, this can be quite extensive if nodes have tagisted away from multiple devices.
After you click Remove out of planning, you will be taken to a confirmation wizard. If the node has multiple connectors, you must first choose whether it is the connector you are currently seeing that you want to delete, or if you want to remove the node for all the control models at the same time, which results in the node completely disappearing when planning is done. Here you also have the option to unlink the entire consolidation chain (default option). Do you wish to only remove the Kopplinen on the current drive for the underlying devices to continue working on the node so just tick the checkbox.

The next step shows what will be removed. In some cases, the number of nodes or connectors that will be removed is very high and it is because there are many things connected to the node. It is not only the nodes that appear on the device that you are on that will disappear when the node is deleted. This applies even if other devices have nodes attached to the node, if there are more nodes in a consolidation chain, or if there are columns that do not appear in the view you are viewing.