Get a clear overview of responsibilities and related items by working with the object window.
Access requirements and activation
Description
From the view type "New Table-Tree Structure View", you create and edit items in the object window that expands to the right in the view when you click on the object. You can also report data directly in the window for indicators and risks.
Note: There is no save button, as the objects are saved automatically when you fill in or change information.
To create a new object, you must select "Create" after entering the name.
Access requirements and activation
To access the new creation and object window, a product license for one of our standard products is currently required.
In the new view type, the new object window is included by default, but it can also be activated for some of the classic view types if you have a product license.
See the following article for how to activate it in this case: Views and view settings, activate the new creation and editing window.
Managing the Object Window
The object window expands on the right side of the system at its default width. To work efficiently and access the necessary information in the view—or to gain more workspace—you as a user can adjust the size and placement of the window in the following ways:
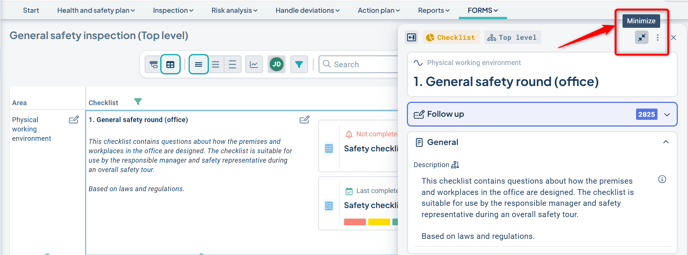
Minimize/Expand
Minimize the window by clicking the "diagonal arrows icon" in the top right corner of the window. This reveals all information in the underlying view. Expand the window again when you want to continue working.
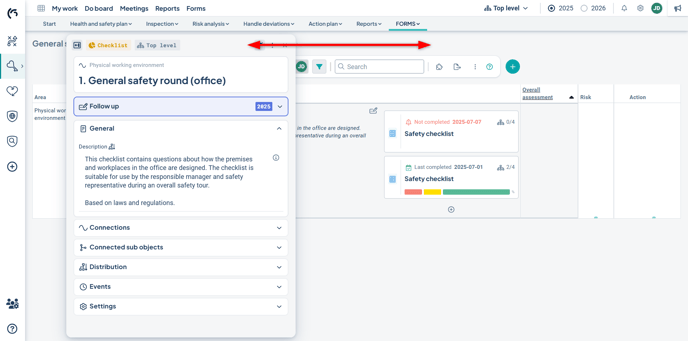
Move Sideways
You can move the window sideways. Grab the header (the grey area at the top) by holding down the left mouse button. Then drag and drop it to the desired position.
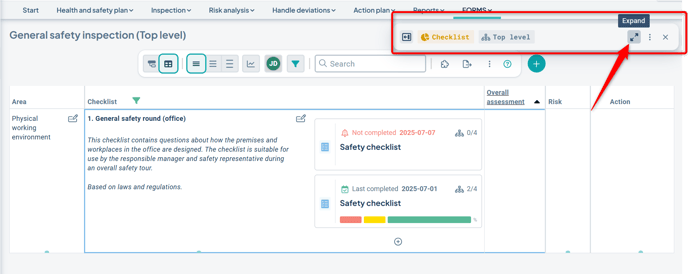
Widen the Window
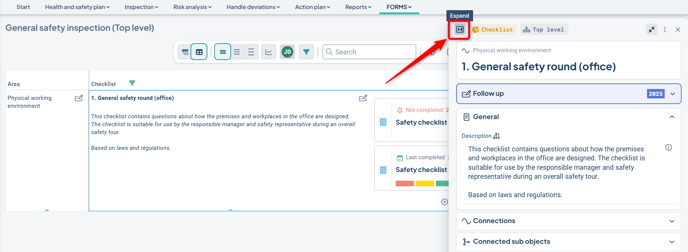
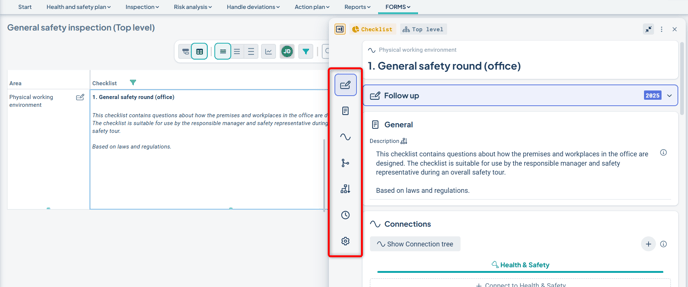
You can widen the window using the “Expand” icon in the top left corner. In the wide mode, you’ll have shortcuts to the different sections of the window on the left-hand side, allowing you to quickly jump to the desired part without scrolling. Return to standard width by clicking the same icon again.
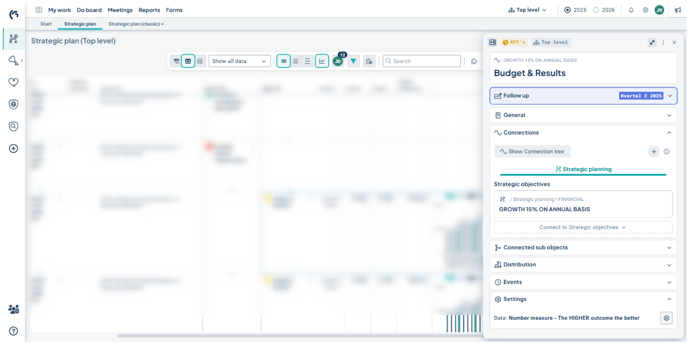
Quick Follow-up
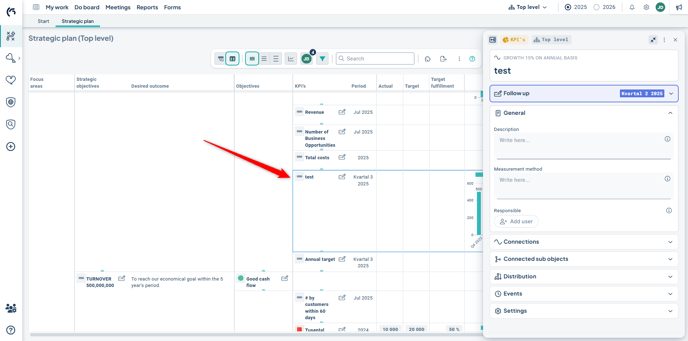
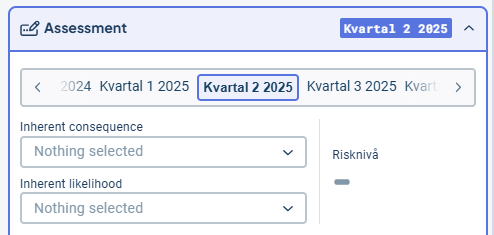
You can report data for indicators and risks directly from the object window. When you click on this type of object, a purple box will appear at the top with the text “Follow up” for indicators and “Assessment” for risks.
Click the box to enter the quick follow-up mode.
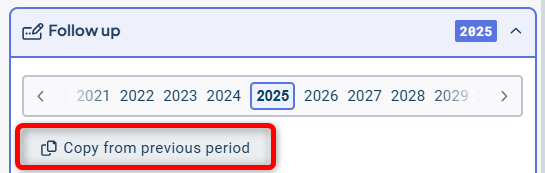
The default follow-up period is determined by the view settings, but you can manually change the follow-up period if needed (1).
The relevant data columns for follow-up are displayed below the period selector. Here you report the outcome of the indicator or risk (2).
If you also need to write a comment, you can open the follow-up window directly from here (3).
When you're done with this indicator, you can click "Next" to access the next indicator currently displayed in the view and continue reporting in the same way (4). If you don’t want to follow up on more indicators, simply close the window as usual.
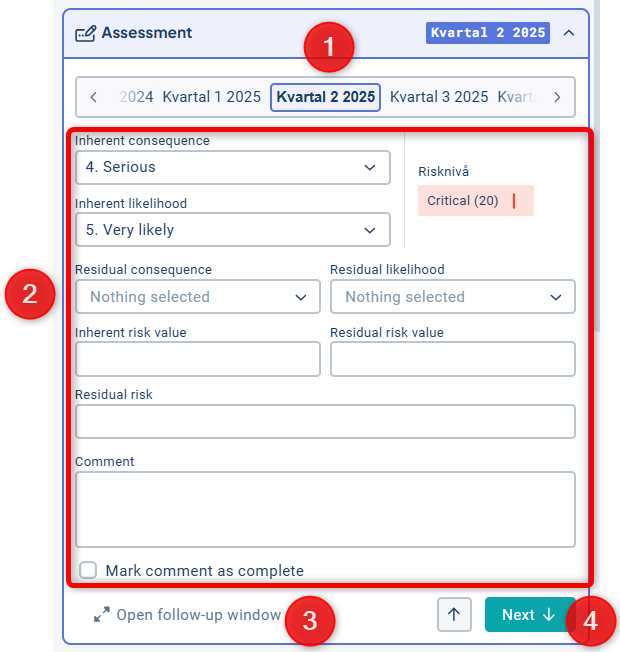
If you are working with our Sustainability product, there is also an option to "Copy from previous period."
When you select this option, the system copies as much as possible from the previous period in terms of outcomes, targets, and comments. Please note that you must always verify that all the desired data is in place before proceeding!
Create New Objects
You can choose from several ways to create new objects. From the view, there are two options:
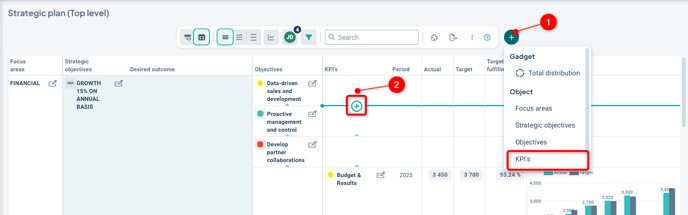
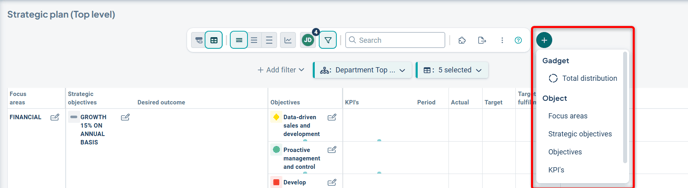
Either click the plus sign to the right of the toolbar and then select the type of object you want to create (1).
Or, find a green crescent at the exact spot where you want to create your object. When you hover over the crescent, it expands into a plus sign (2).
If the crescent icons are missing, it means that objects cannot be created at this location—this may be due to your permissions, the selected organizational level, or that object creation is not intended in this particular view.
If the plus button to the right of the toolbar is also missing, it could be for the same reasons. If an object type is missing from the list, it might be because the column associated with that object type is currently filtered out from the view, or because the only column to which the objects can be linked is filtered out.
See the help article Why can't I add objects in the view?
Add directly in the view
When you hover the mouse pointer over the symbol, the button to add an object appears. The existing object that your new object will be linked to is highlighted in blue.
Click the plus sign.
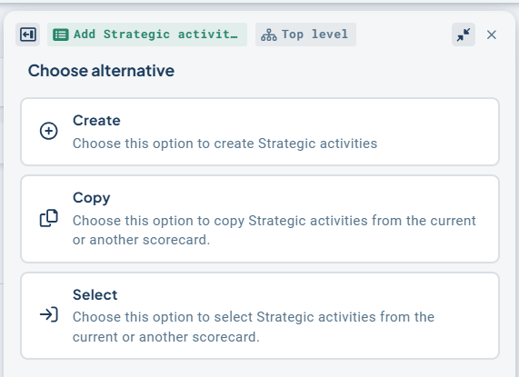
Depending on your configuration, you may get different options for creating your new object. In the simplest case, you only need to enter a name for your new object:

In some cases, you may also have options to select and copy existing objects from other products. Read about how to proceed to copy and select objects.
Read more about how to administer these settings: Allow selecting nodes in views.
To create a new object, enter a name for your new object and click Create.
If you have the function to generate suggestions via AI, see the following article: Stratsys AI.
As before, you can name the object, assign a responsible person, add a description, set periodicity, set status, and distribute the object within the organization.
For other settings, follow the instructions under Edit object.
Add via the plus button
You can add any new object by clicking the plus button to the right of the toolbar.
This also allows you to add new grouping objects without needing to switch to the table view.
Click the plus button and then select object type. You can only choose columns that are currently visible in the view. In the example below, you can add a new Focus Area directly from the grouped view.
Depending on other settings, you can add an object directly with a connection to the correct object, or add it without a connection and select one later.
In cases where a connection must be chosen immediately, it will appear as a mandatory field, and the connection selector will open automatically. Read more about how to select a connection in Add Connection.
Unlinked Objects
If you choose to create the connection later, you can find these unlinked objects in the grouping views. They will appear in a separate group called “Unlinked.” Expand this group to link the objects that are missing a connection.
Footnote: Technically, an object without a connection is still linked to the base object of the scorecard, formerly called the “vision.” Measures and activities also automatically receive a connection to their respective gross list.
To allow creation of unlinked objects, the settings must permit the object type to establish a direct connection to the scorecard / vision.
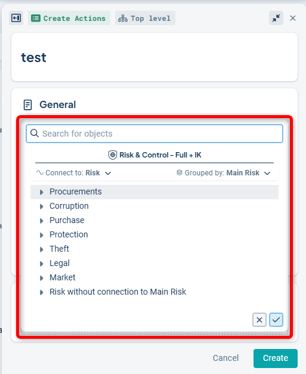
Select and Copy Object
If you have the option to select and/or copy existing objects, a dialog will appear to help you find the object you want to link to this product.
-
You can search by the object’s name if you know what it is.
-
You can choose which product to search in. If there are many available products, you can scroll through them using the arrow keys on the sides.
-
You can group the objects by the different columns they are linked to for easier navigation.
-
Once you find the object(s) you want to select or copy, check the box to the left. If you need more information about an object, hover your mouse over it for additional details.
-
Confirm your selections in the lower right corner.
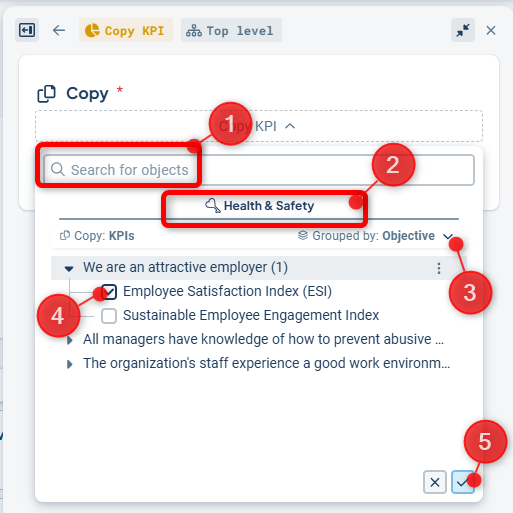
In the next step, choose how you want to handle any objects already connected to the object you are selecting. The default setting is to include linked objects as well and to select them if possible—note that this may not work if the structures between the products differ. (1)
For the “Select” function, you can also choose whether to include the object only at the department level you are currently on, or to include department distribution—that is, to bring the object in at all levels where it exists in the source product. Here too, the default is to include. (2)
For the “Copy” function, the object is only included at your current level, and you’ll need to distribute it afterward.
Finally, confirm that you wish to select or copy these objects in the lower right corner.

Edit Object
To edit an object from the new view, simply click directly on the object. The object window will then expand on the right side of the view. Depending on where you click in the view, different sections of the object window may open initially, but all settings are accessible regardless of what is shown first.
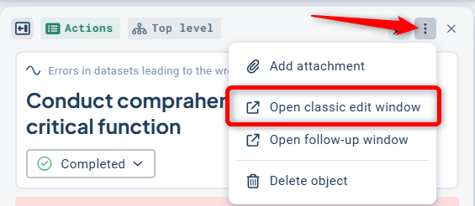
If you are still missing a specific setting (some limitations apply), you can switch to the old object window via the three-dot menu.
The object you are editing is indicated by a blue border in the view while the object window is open:
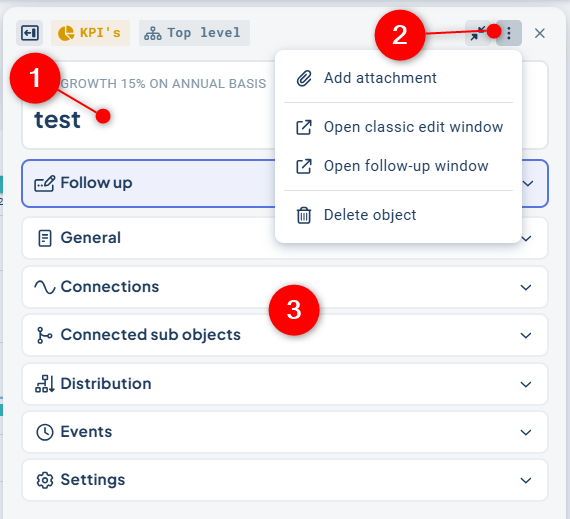
1) At the top of the object window, you can change the name.
2) Via the three-dot menu in the upper right corner, you can access the classic edit window, the follow-up window, and delete the object.
3) The information in the object window is divided into the sections General, Connections, Linked Sub-objects, Distribution, Events and Settings. Click on a section to expand or collapse it.
General
In the General section, you can make the following settings (depending on the object type you are editing):
All object types:
- Edit text in description fields
-
Change responsibility roles
-
Edit keywords
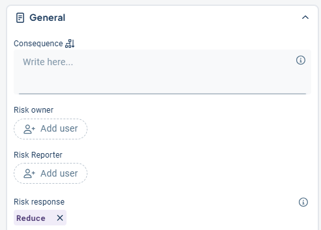
Measure and risk objects:
For measure objects, you can also:
-
Change periodicity
-
Modify measure settings – read more here: Measure settings in the object window
-
Report measure data, for example conduct a risk assessment
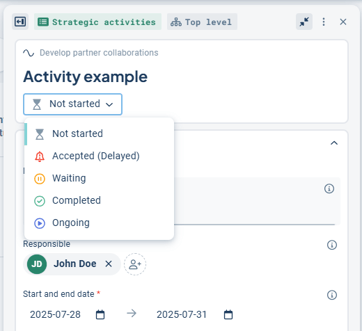
Action and activity objects:
For actions and activities, you can change the status, which is located above the General section, as well as modify the start and end dates.
Connections
See separate article: Object Window: Connections
Linked Sub-Objects
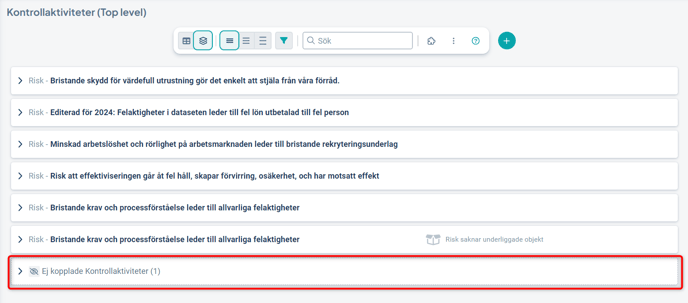
Under "Linked Sub-Objects", you can get an overview of the objects that are linked to the object you are working with.
Which objects are displayed?
As there may be many linked objects, a relevant selection is made in the object window.
The sub-objects that are displayed are those that can be filtered in the current view. This means that there may be more linked objects than those shown, but these are not as relevant for the current view. For the same reason, only objects that exist at the currently selected department level are displayed.
Create linked objects in the edit window
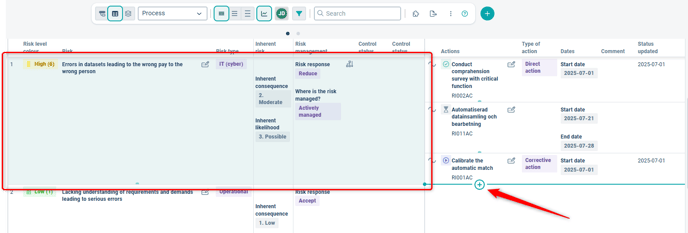
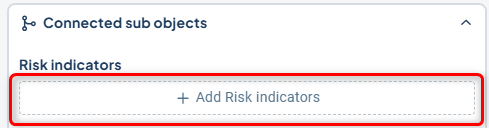
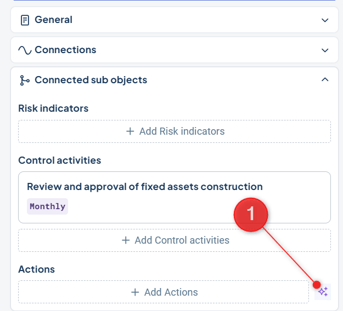
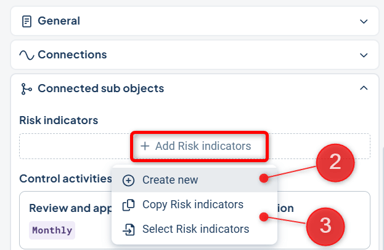
If the view is structured in a way that allows it, you can directly create linked sub-objects in the object window, such as Risk Indicators.
Depending on your setup, you can do this in different ways.
1) If you have support from Stratsys AI, click the purple icon to the right of the "+Add" button to quickly get relevant suggestions. See also the following article: Stratsys AI.![]()
2) If you want to create a new custom object, first click "+Add" and then "Create new".
3) If you want to select or copy an existing object, first click "+Add" and then choose the desired option. Read more about how to copy and select objects.
If you already have existing linked objects, you can click on these objects to open the object window for that object.

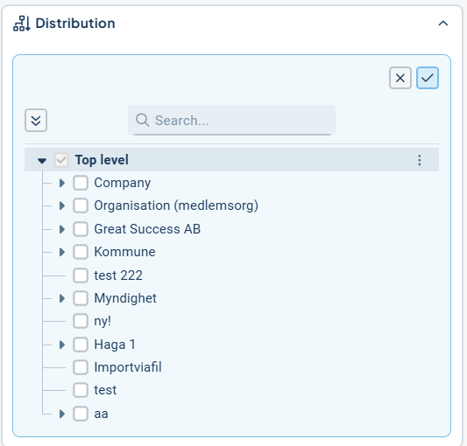
Distribution
In the Distribution section, you copy or make the object visible to other departments within the organization that should follow up on the object.
Change the distribution by clicking "change distribution" in the top right corner.
To ensure that a measure or activity is automatically distributed even when a new department is added to the organization, read the article on automatic copying.
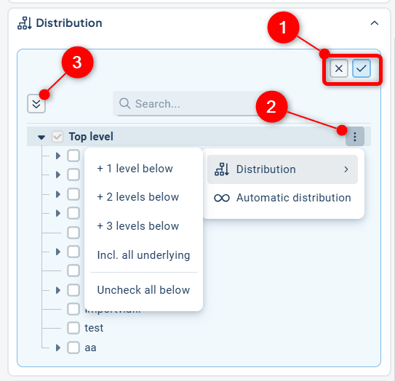
Edit mode
In edit mode, you confirm or cancel your changes to the distribution using the "check mark" and "cross" icons in the upper right corner (1).
When you hover the mouse over a department, a context menu (three dots) appears on the right. Here you can manage the distribution for the underlying departments (2).
You can expand the entire organizational tree by clicking the "double downward arrow" in the upper left to get an overview of the entire distribution (3).
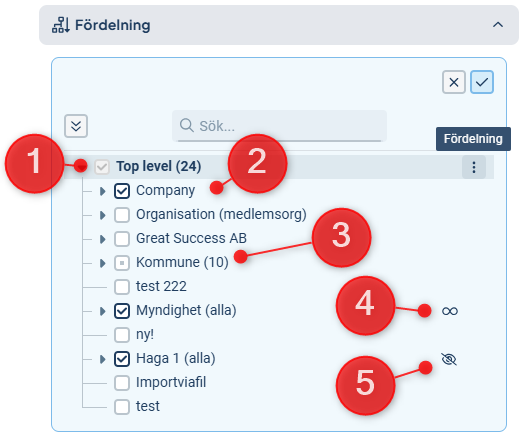
Symbols in the distribution view
1) The object's main department cannot be unchecked and is therefore grayed out. Remove the object instead if you no longer want to keep it. The number after the department indicates how many underlying departments the object is distributed to.
2) If underlying departments are not distributed, only the department name is displayed.
3) If the box is gray with a dot, it means that this department is not distributed, but there are distributed departments at lower levels. You can see how many departments this applies to after the department name (10 in this example).
4) The infinity symbol means that all underlying departments are automatically distributed, even if new departments are added to the organization.
5) A crossed-out eye means that the object is distributed to the department but will still not be visible because the object it is linked to is not distributed to the same department.
Why can't I distribute my object?
There can be several reasons why an object cannot be distributed as desired. Here are the most common ones:
-
The object is not distributed to the object it is linked to.
Solution: First distribute the object to the parent object to the left. -
You lack permission to modify the object.
Solution: Contact your local administrator for assistance. -
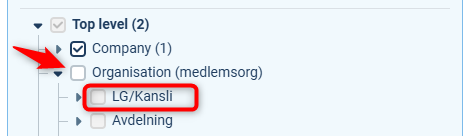
You are working with activities or measures that require an unbroken chain.
Solution: Also distribute the object to intermediate departments. In the example below, it is not possible to distribute to "LG/Kansli" before distributing to "Organisation".
Attachments and Links
Add attachments and links in the object window by clicking the three dots in the upper right corner and selecting "Add attachment."
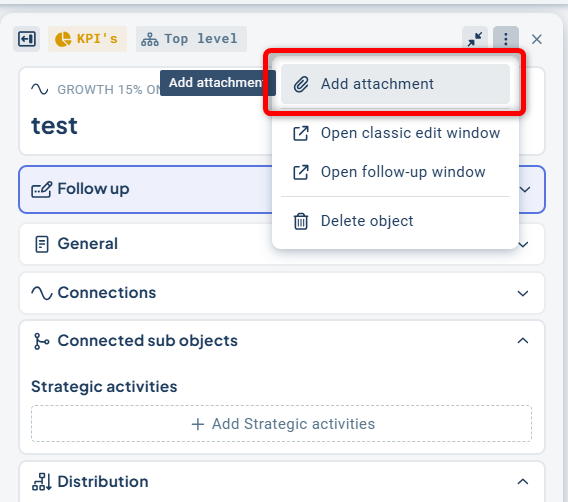
Then choose whether you want to add a link or a file.

You can choose whether the attached material should be distributed, that is, accessible to the subdepartments that can view this object. In that case, check the box. You can only choose "none" or "all" subdepartments for the distribution of the attachment.

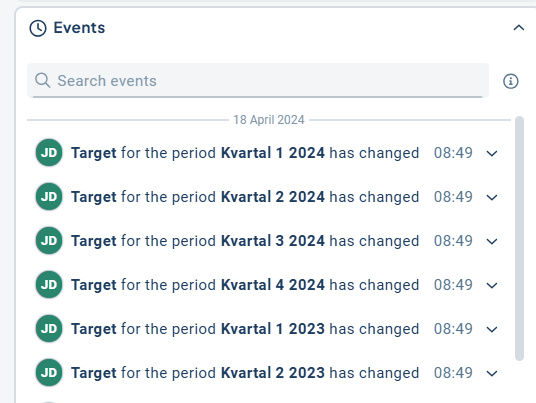
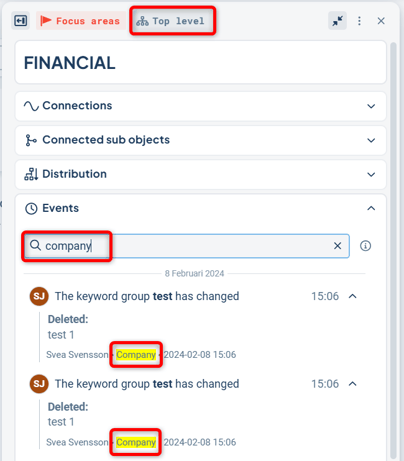
Events / History
In the Events section, you can view the historical changes that have been made to the object.
You can search for specific events using the search bar, and you can search by username, text content, date, or time of the event. The format for date and time should be YYYY-MM-DD and HH\:mm respectively, for example 2025-11-04 or 13:08.
By default, the most recent 100 events are displayed, with the option to load more if needed.
For text objects, you can also view events related to comments and responsibility roles that apply to underlying levels. You can also search by organizational level to find changes in these.
For activity objects and measurement objects that are distributed or copied to other departments, however, you need to be on the department for which you want to view the events.
Limitations
Not everything is supported in the new object window—however, you can easily switch to the old edit window if needed. Examples of unsupported features include:
-
Removing from the current department
-
Marking an object as "confidential"
-
Activity interval
-
Priority (operations)
-
Hours and budget
-
Reconciliation date
-
Sign with role
- Measurement settings:
-
Create custom consolidation
-
Set start period for reporting
-