Filter the new workspace so that only the desired objects are displayed for you.
Description
Filtering in the new workspace is controlled by two underlying administrator-managed settings—Filter Settings and Default Filters—as well as how the user configures filters via the filter funnel and/or column filters.

Filter Settings determine what can be filtered, such as keywords or start dates for activities. They also control some filter logic, including how filters behave when multiple filters are active simultaneously.
Filter Settings function the same way across the new workspace, classic views, and report parts. Learn more here: Filter Settings
The Default Filter is used to pre-filter the workspace to give users the best possible experience. For example, the administrator can choose to filter out certain objects or entire columns so that only relevant information is displayed from the start. Default Filters also function the same way across the new workspace, classic views, and report parts. Learn more here: Default Filters
The rest of this article describes how you as a user can filter the new workspace using the toolbar.
Filter and Reset Filters
Using the filter funnel in the toolbar, you can apply general filters to the entire workspace, such as selecting the period to display. Your filter settings are saved via browser cookies and will remain even if you switch to another view or report. This is a difference compared to classic view types, where filters are reset as soon as the page is reloaded.
Show Filters
Click the filter funnel in the toolbar to view the current filters and adjust the filtering yourself.

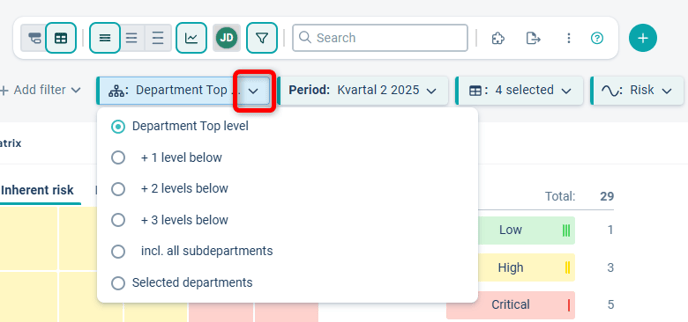
Adjust Existing Filter
Click the "down arrow" on an existing filter to expand it. Make the adjustments you want. The workspace will update its filtering immediately. You are only changing the filter for your own user.
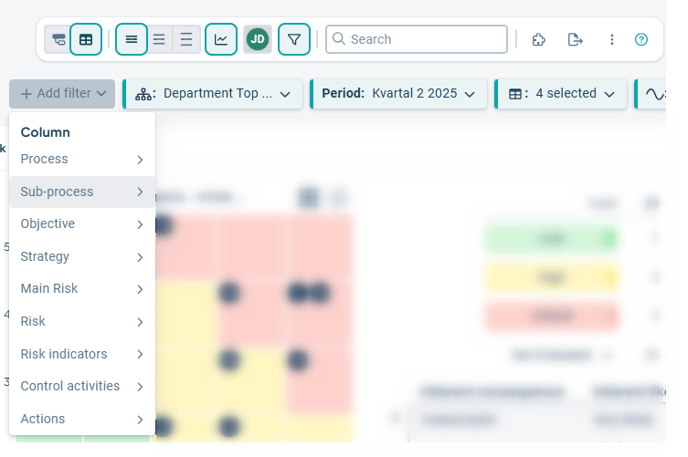
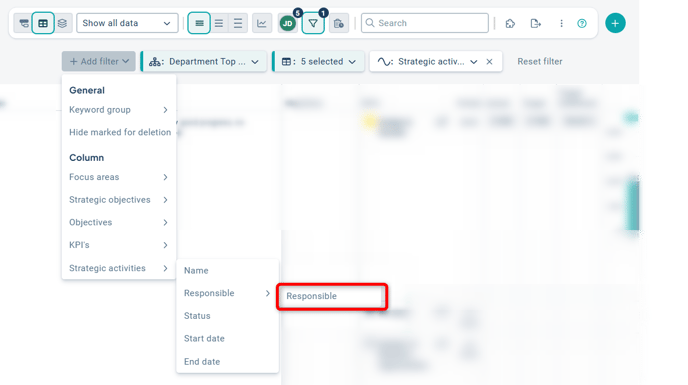
Add Custom Filters
Click the "Add Filter" button if the filter you want to use isn’t already visible. The filters available to you are determined by the administrator via the filter settings. If a filter is missing, contact your administrator.
Filters under “General” will apply to all columns, while those under “Column” will filter a specific column. Click the filter you want to add. The workspace will update its filtering immediately. You are only changing the filtering for your own user.
Once you've added more filters, this is indicated in the filter funnel. Your custom filters have a white background, and you can remove them by clicking the X to the right in the filter box.

Filter directly on column
If column filters are available, you can also add them directly in the column header. Hover over the header and click the filter funnel that appears. Set your filter for the column.
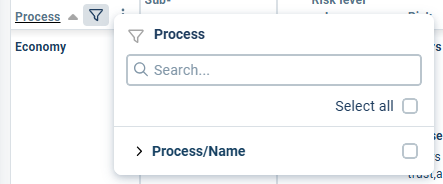
When a filter is active for a specific column, this is indicated by a turquoise filter funnel in the column header.

Reset filtering
As soon as you modify the filter from the standard filtering, the "Reset filter" button will appear. At any time, you can restore the filter to the settings defined in the standard filter by using this button.

If you have reset your filtering but still feel that the expected data is not visible, it may be because the workspace has an active grouping. In that case, switch to the desired grouping or select "Show all data".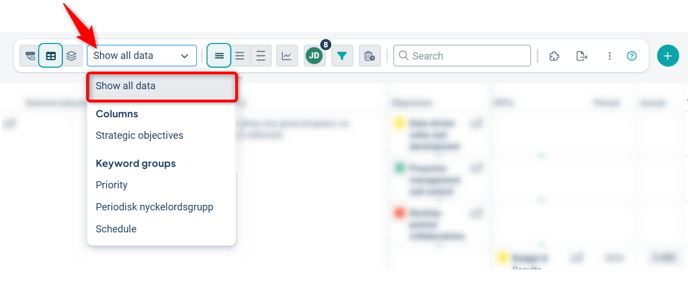
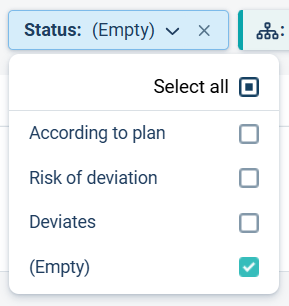
Keyword Filter
For keyword filters, there is an option to display “empty.” This filters for objects that do not have the specific keyword set. This can be useful if you want to ensure that all objects have a value for a certain keyword, or if you want to identify objects missing the keyword for other reasons.

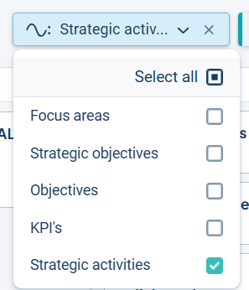
Connection Focus
If the Connection Focus filter is activated, you can configure it to display only rows that have a connection to a specific object type. For example, if you only want to see the indicators that have an activity connected to them, you can apply the Connection Focus filter.
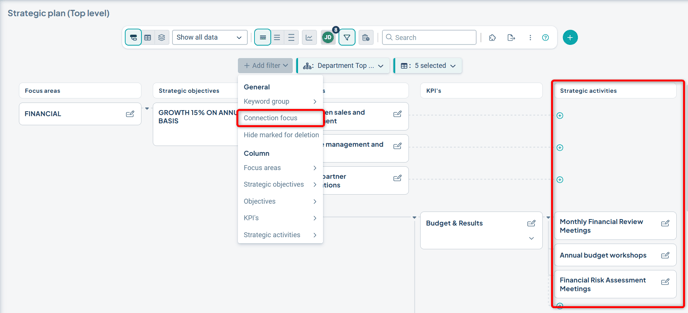
Set "Strategic activities" to display only rows that contain a strategic activity.
Show your own responsibility
If you are responsible for one or more items, you can visualize these by clicking "Show your responsibility." The button is located to the left of the filter icon and will display either your profile picture or your initials.
If you have responsibility within the current filtering, the number of items you are responsible for is shown as a number.

If you do not have any responsibilities, the number will not be shown.

When you click "Show your responsibilities," all rows without responsibilities are filtered out, and only rows containing at least one object you are responsible for will remain. The objects you are responsible for will also be highlighted in a light blue color.
To display all objects again, click "Show your responsibilities" once more or click "Reset filters." If you navigate away from the workspace, you will need to activate the filter again when you return.
The "Show your responsibilities" button is a default feature in the new workspace and is therefore always visible to all users.
Responsibility filter
If the responsibility filter is activated, you can filter for objects that are assigned to a specific responsible user:
Then select a user – the top option is always yourself:
