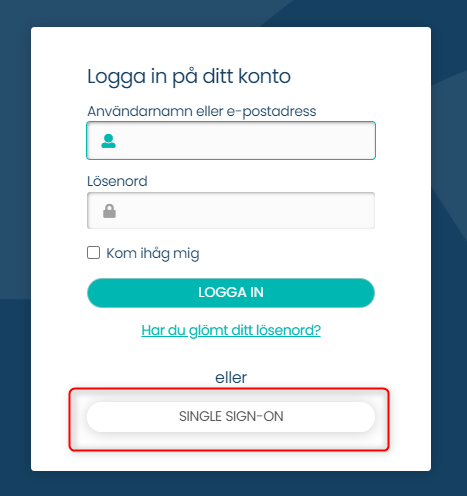
Single Sign-On (SSO) means that users are automatically logged into the system without having to use a separate username and password.
The advantages of SSO are that users get a better experience with automatic login and that they don't have to remember login information. Authentication occurs against the customer's IdP, which means that the customer has full control over who can log into Stratsys. There are also benefits for the entire organization in the form of:
- Passwords are managed centrally (not in Stratsys). If the user forgets their password, it only needs to be changed in one place (in the organization's directory service, usually Active Directory). This reduces the support handling.
- With Single Sign-On (SSO), users can access Stratsys directly from their organization's intranet without having to log in every time. For instance, if the Yearly Plan is linked to the intranet, users can simply click on the actions in the plan and access Stratsys to follow up without any additional login steps. This makes the user experience smoother and more efficient.
The article consists of the following parts:
User provisioning (SAML2, O365, OIDC)
Technical prerequisites
For the implementation of SSO, Stratsys uses federated identity methodology against the customer's IdP (Identity Provider). The user is authenticated against Stratsys via their own IdP, and exactly how the user experiences the login procedure depends on the customer's infrastructure. To be able to set up SSO, the customer must meet the following prerequisites:
- The customer has an Identity Provider (IdP) that supports federation via SAML 2.0 (only HTTP POST Binding), Office 365 or OpenID Connect. All users who should be able to log in with SSO in Stratsys need to be in the customer's directory service.
- A Stratsys database can only handle one IdP.
- Mapping needs to be set up between usernames in Stratsys and the corresponding attribute in your SAML response (this does not apply to SSO O365 - as the mapping happens automatically with claim "email")
- You choose which attribute you want to use for usernames.
- When SSO is activated, users' usernames need to correspond to the selected attribute that you map to usernames.
- For SLO to work, NameId must be sent as a claim at login.
After SSO is activated, we recommend that:
- Enable SSO login as Standard login
- Activate the setting Require SSO at login
- When activating the requirement for login with SSO, there is the opportunity to define a specific selection of users who should be able to log in with username and password via a direct link.
Before we start
Here is a glossary of terms that you might encounter when working with Single Sign-On (SSO) in Stratsys:
- SSO: Single Sign-On. This is a login method that automatically logs users into the system without requiring them to enter a separate username and password.
- SLO: Single Log-Out. This is a logout method that automatically logs users out of the system when they close their browser or navigate away from Stratsys.
- SP: Service Provider. This is Stratsys, as it is the service that users are trying to access.
- IdP: Identity Provider. This is the service that authorizes users and grants them access. Stratsys uses federated identity methodology against the customer's IdP.
- ADFS: Active Directory Federation Services. This is Microsoft's federated identity service for those who have a local installation of Active Directory.
- AD: Active Directory. This is the most common directory service used by our customers. It keeps track of an organization's users.
- Provisioning: The process of creating users.
- Claim: Information about a specific attribute for a user.
- Attribute: An information carrier used in SSO login. It has a name and a value, such as OrganizationName => Stratsys.
Checklist for implementation
- You meet the technical prerequisites.
- The user who configures SSO must be a super administrator in Stratsys Platform Center.
- You have updated users' usernames to match the attribute in the SAML response that you are mapping to usernames (this does not apply to SSO with O365).
Configure SSO
You can find configuration guides for all SSO technologies below.
SSO with SAML2
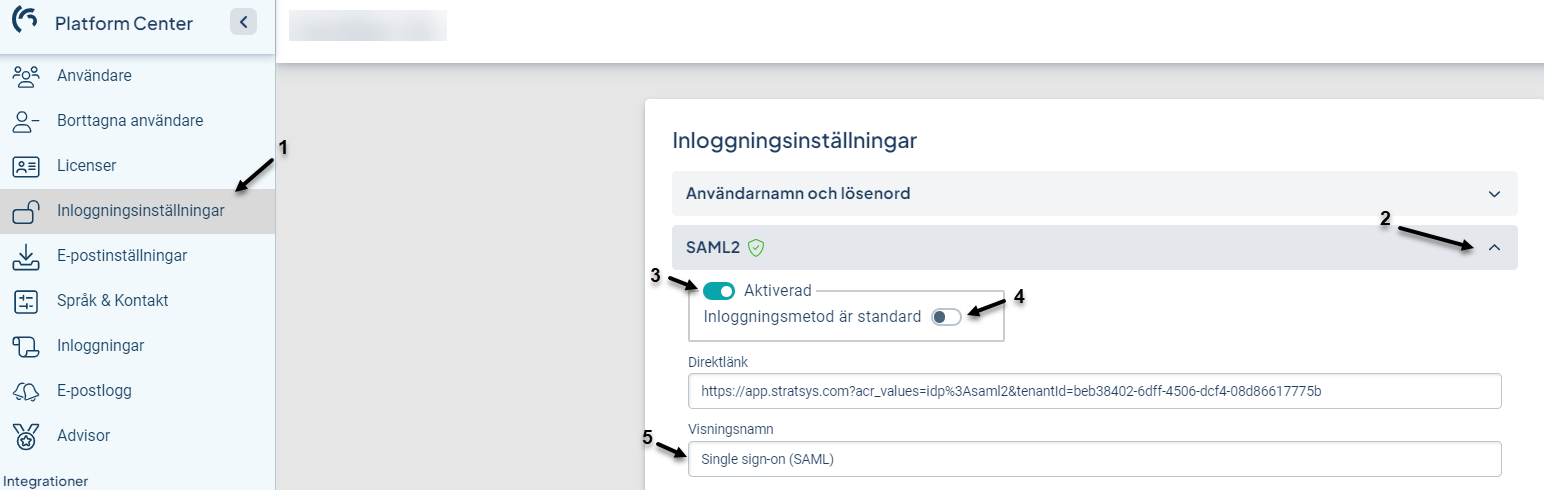
- Navigate to the Single sign-on option in the Platform Administration section.
- Expand the SAML2 option under Login Settings.
- Enable the login option by toggling the switch.
- It is recommended to choose SSO as the default login option, but this is optional. You can read more about it under the "Before we start" section - "SSO as Standard login".
- You can change the display name to your preference, such as SSO.
- Update the Metadata version to the latest named version (v4 in the screenshot below).
- Single log-out can be disabled if desired.
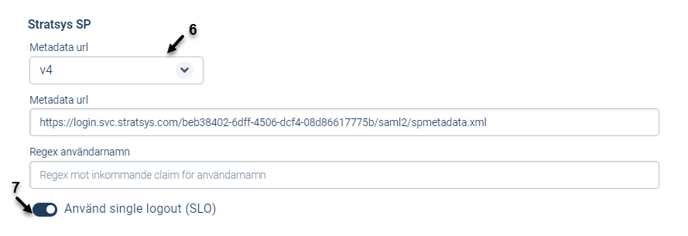
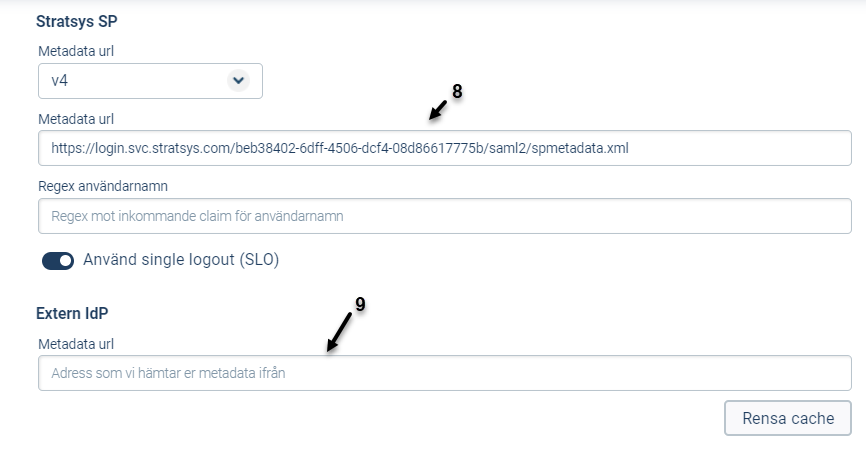
- Copy the Stratsys SP-metadata and configure it in your environment. We also need your IdP-metadata for the setup to work.
- Insert the IdP metadata from your external identity provider (IdP) under the "External IdP" section and then select "Metadata URL".
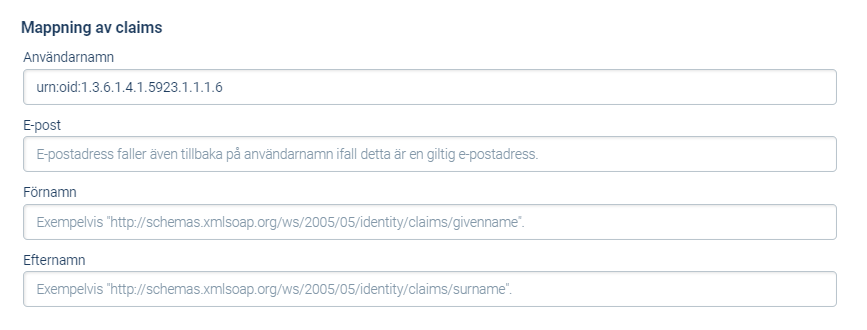
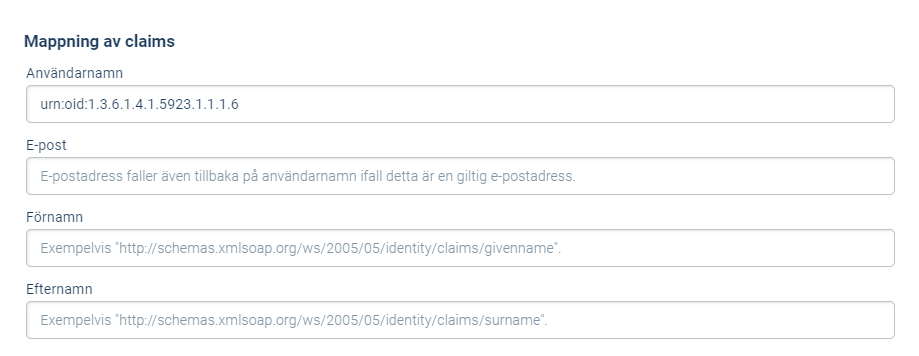
- Scroll down to Attribute Mapping.
- Add the corresponding claim that exists in your Active Directory for usernames. You can use the suggested attribute for usernames (urn:oid:1.3.6.1.4.1.5923.1.1.1.6) to make it easier.
To test the Single Sign-On (SSO) configuration, visit https://[customername].app.stratsys.com and click on the Single Sign-On option or its corresponding display name. If SSO is set as the default login option, this step is not necessary as you will be directed straight to the SSO login page.
From here, you will be redirected to your IdP and authentication will take place, logging in the authorized user.
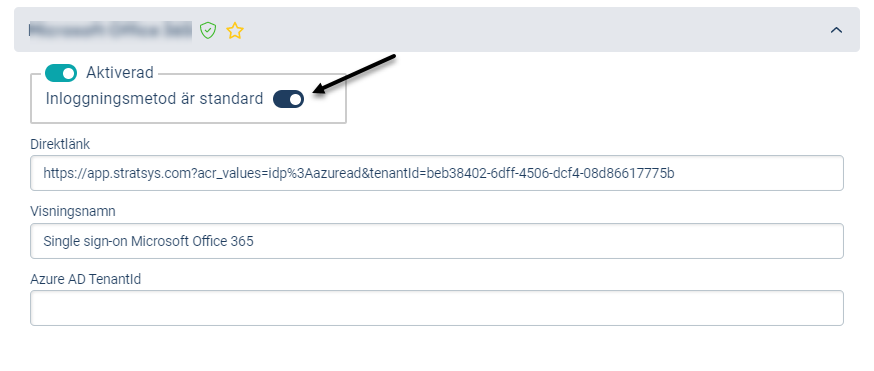
SSO with Office 365 (Azure AD)
- Click on Single sign-on in the Platform Administration
- Expand Microsoft Office 365 under Login Settings.
- Activate the login option by clicking on the toggle
- Preferably choose SSO as the default login, this is an optional option, read more about it under Before we start.
- Change the display name if you want
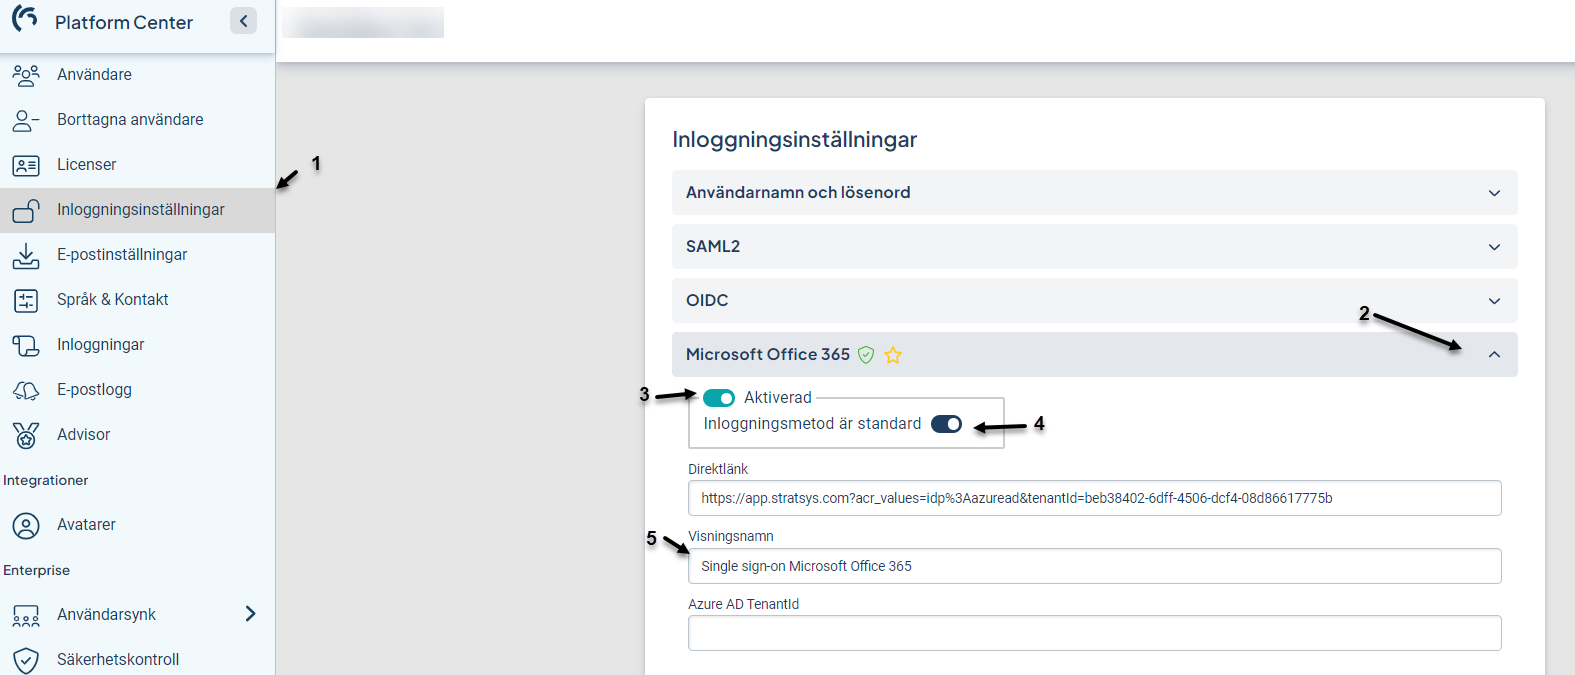
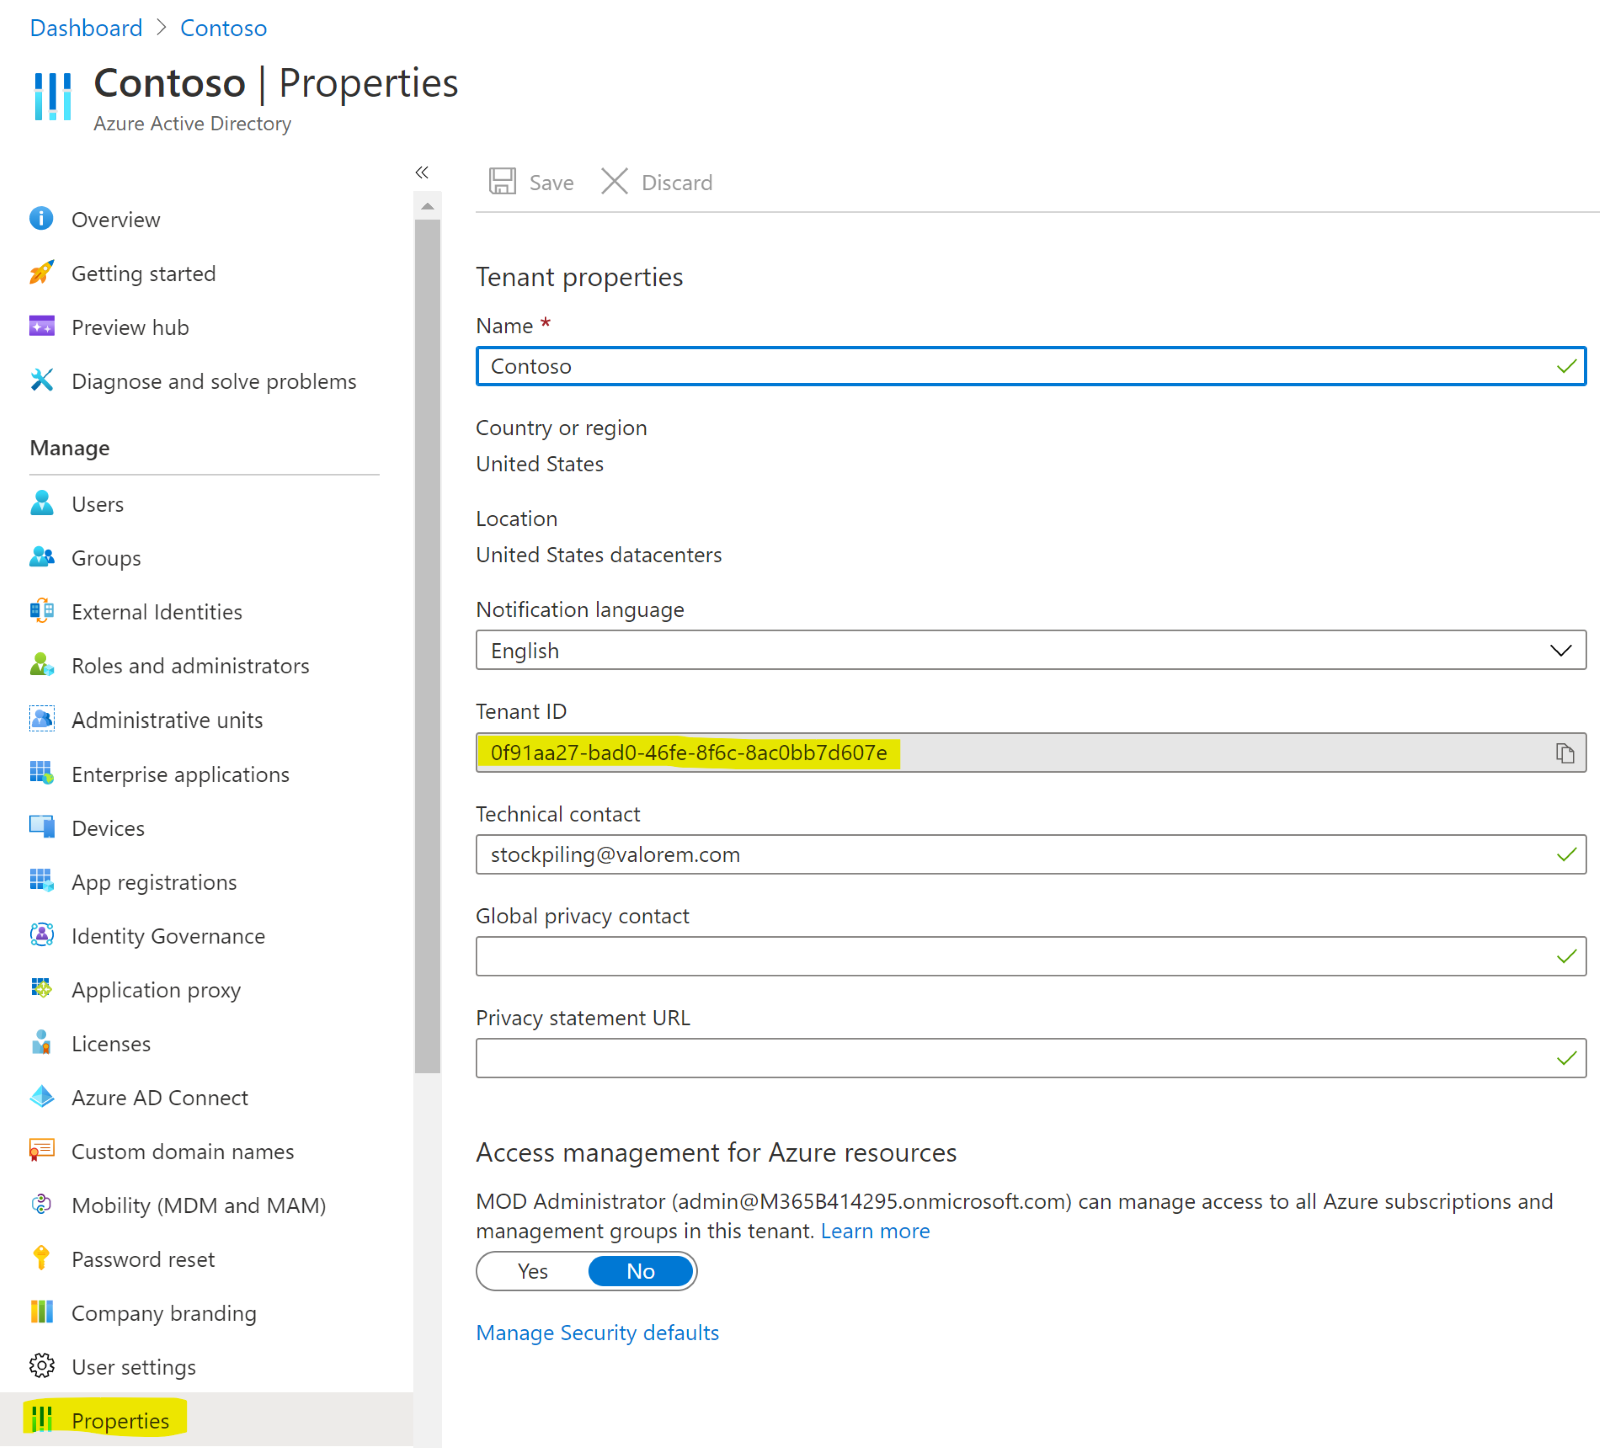
- Copy your Tenant ID from o365. Your Tenant ID can be found under Azure Active directory > Properties > Tenant ID.
- Enter the TenantId in the Azure AD Tenant Id field in the Stratsys Platform Center.
Then test logging in by going to https://www.stratsys.se/[customer name] or https://[customer name].app.stratsys.com and click on Microsoft Office 365 (the display name for the login option) to test the login.
Here, users need to approve Stratsys as a service for the first time. Sometimes it may also require an administrator of their O365 to approve Stratsys as a service. See more about this in the troubleshooting section below.

SSO with OpenID Connect
These steps demonstrate how to set up OpenID Connect in Azure, but you can use any IdP you prefer. The steps remain the same.
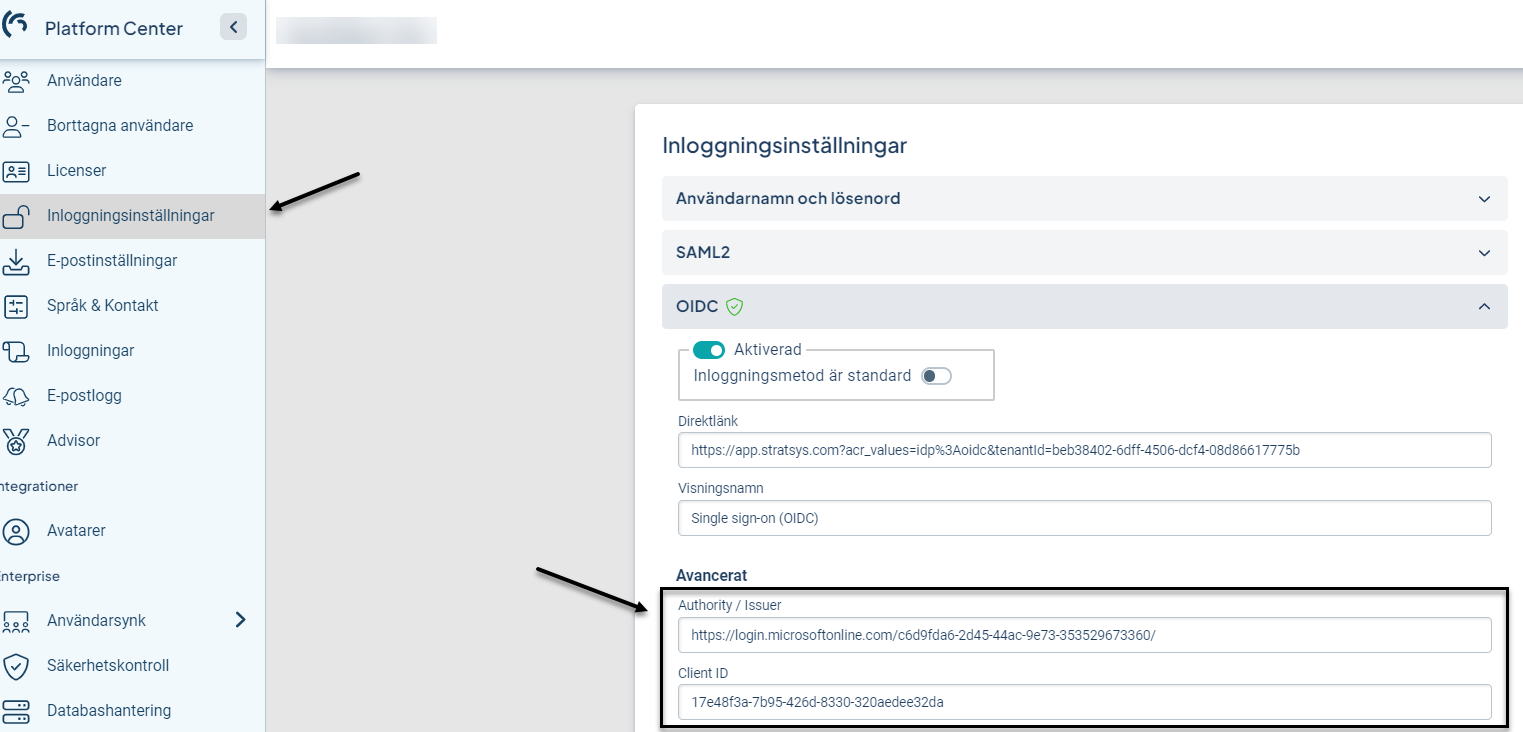
- Click on Single sign-on in the Platform Administration section.
- Expand the OpenID Connect (OIDC) option under Login Settings.
Step by step guide:
- Navigate to https://portal.azure.com to proceed.
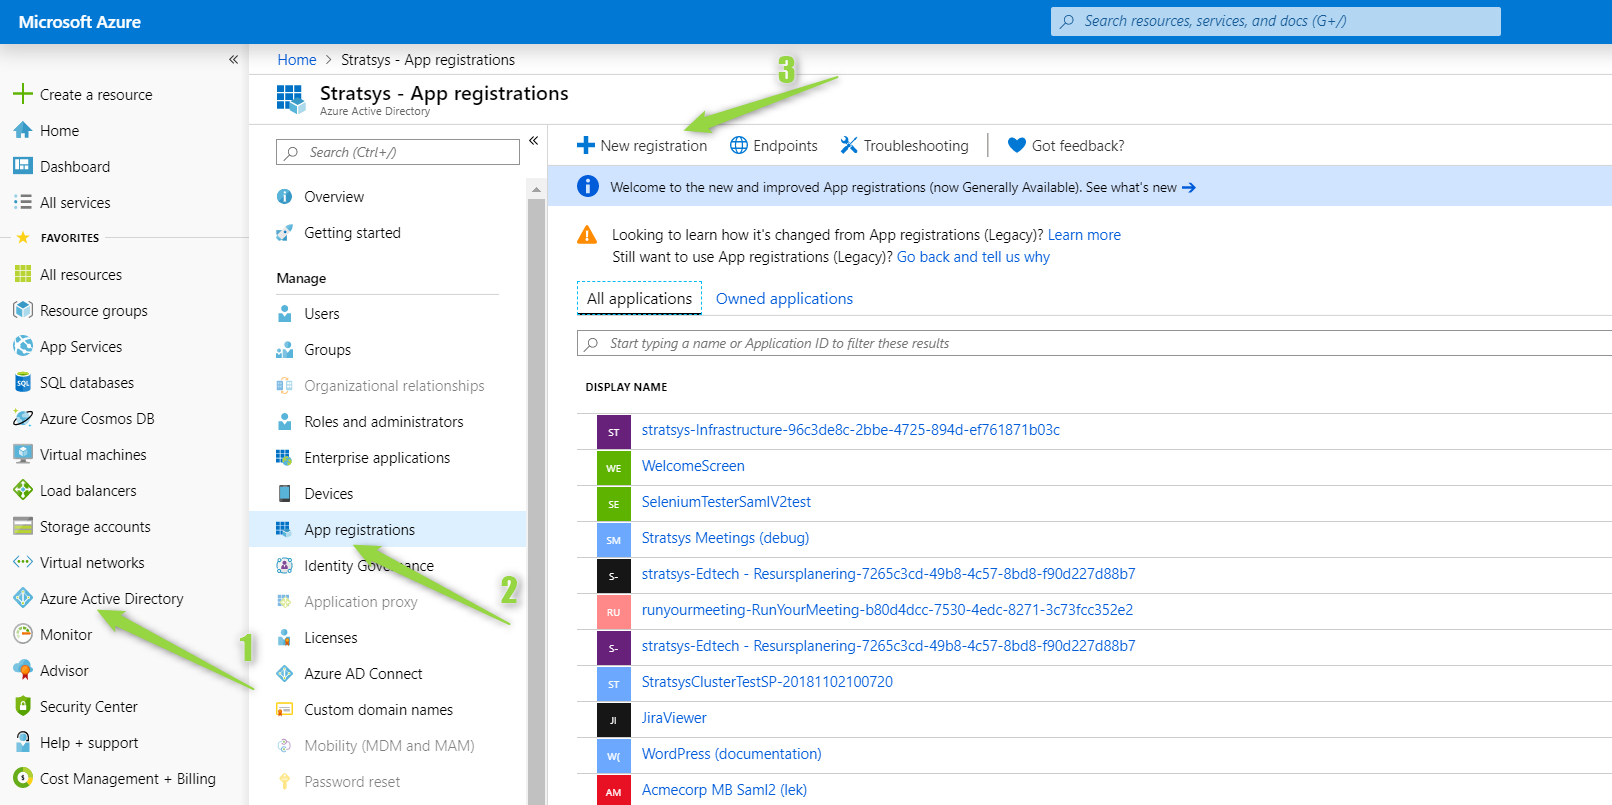
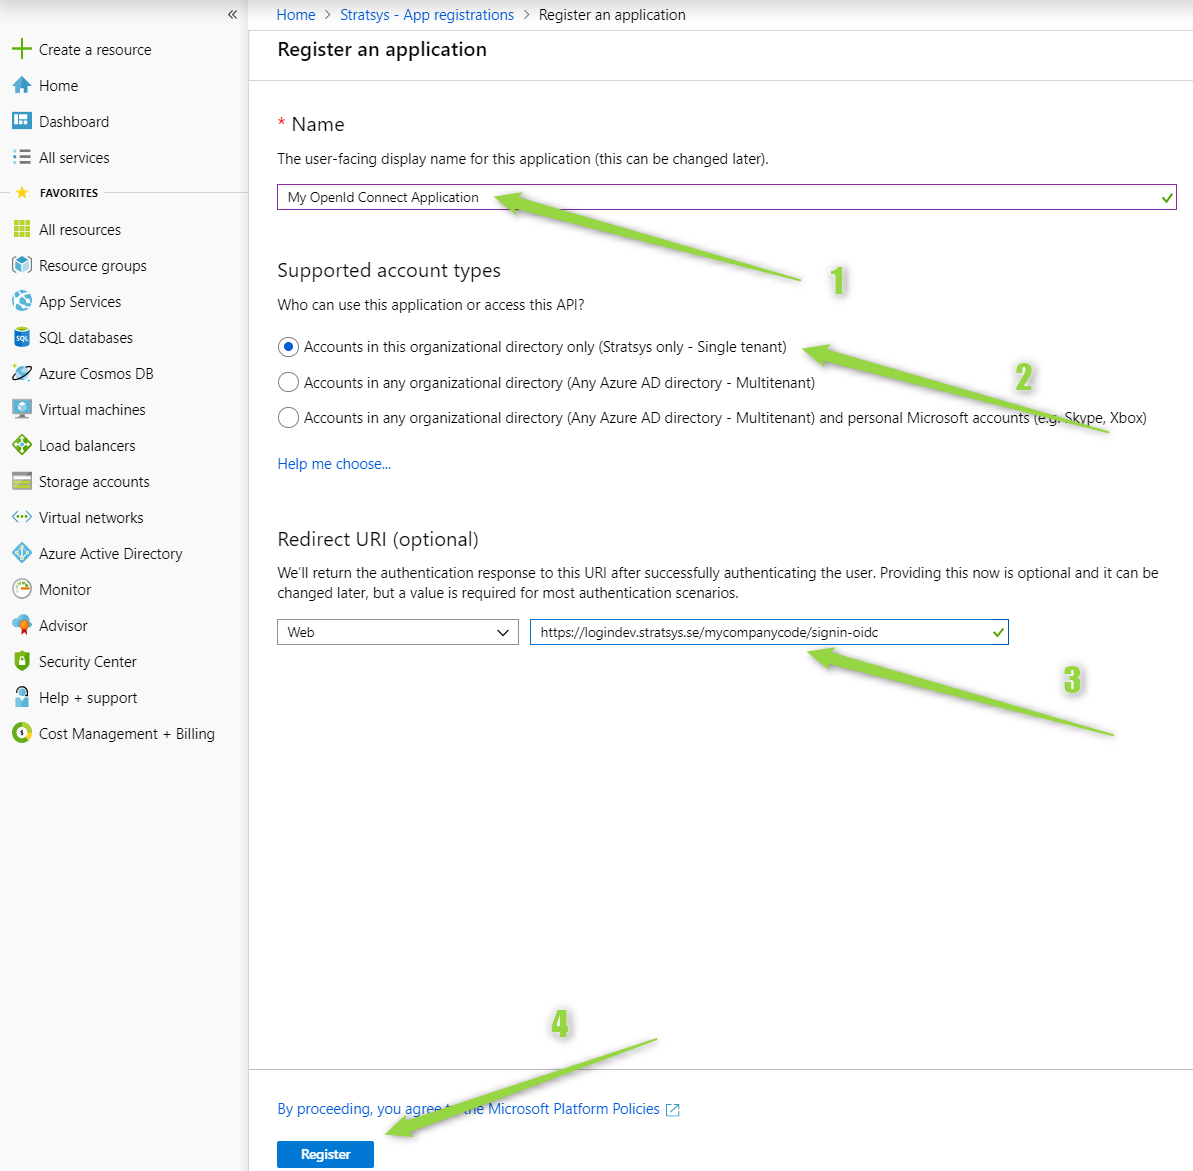
- Create an application and set the Redirect URI to the "callback path" (the path the user is redirected to after successfully logging in to the Identity Provider). You can find the Redirect URI in the Platform Administration section of Stratsys
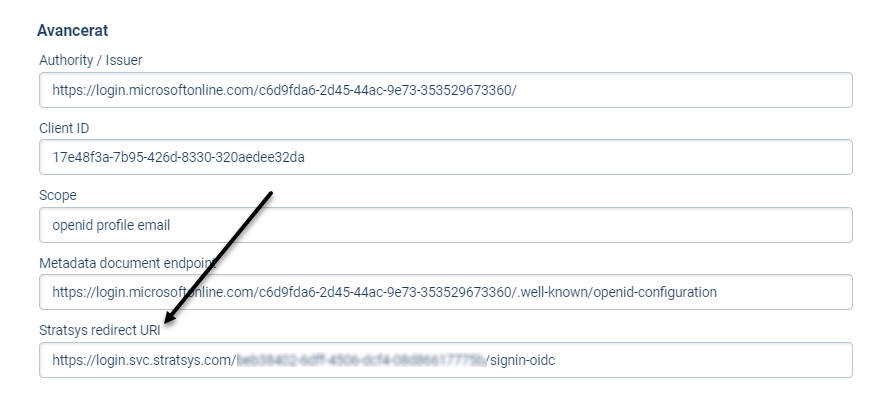
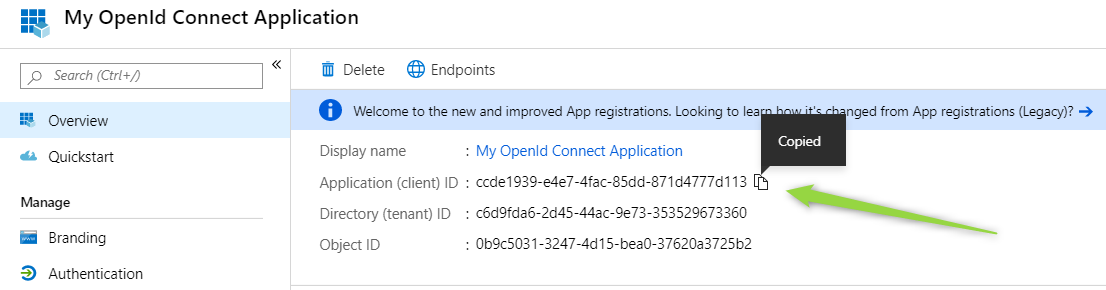
- Copy the Application's Client ID and paste it into the Client ID field in the Platform Administration section of Stratsys.
- You also need to enable permission for ID tokens to be issued by the authorization endpoint.

- Specify the claim mappings with the following names for them to function properly: sub, email, given_name, and family_name. Note that these names are case-sensitive and must be mapped accordingly.
IdP Stratsys Plattform UserName sub Email email First Name given_name Last Name family_name 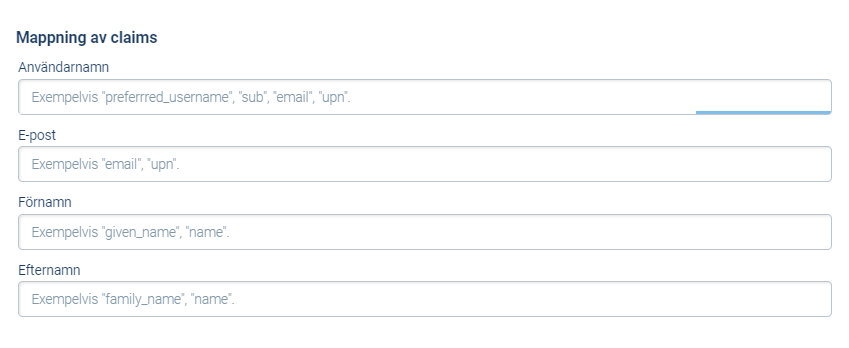
Optional SSO settings
Default Login
If any of the SSO solutions are set as the default login, it will be selected when the customer navigates to https://[customername].app.stratsys.com. If none of the SSO options are set as default, the login page will be displayed.
We always recommend setting your SSO option as the default login as soon as possible after verifying that it works. You can then further increase security by also turning off the possibility of form login - see Require SSO at login below.
You can find the default login in the Platform Administration under Single Sign-On for migrated customers. For non-migrated customers, you can find the default login in the administration under Login Options >  .
.
Platform Administration
Single Log-out (SAML2)
This functionality only applies to SAML2. It means that if a user logs out of Stratsys, they will also be logged out of the customer's IdP and prompted to log in again if they want to access resources within the customer's domain. To enable SLO, a claim for NameID must be sent to Stratsys during the login process.
Single Log Out means that Stratsys sends a logout signal to the customer's IdP to try to log the user out of other services that use the same IdP. However, most customers do not want this, so the standard recommendation is to have it turned off by default.
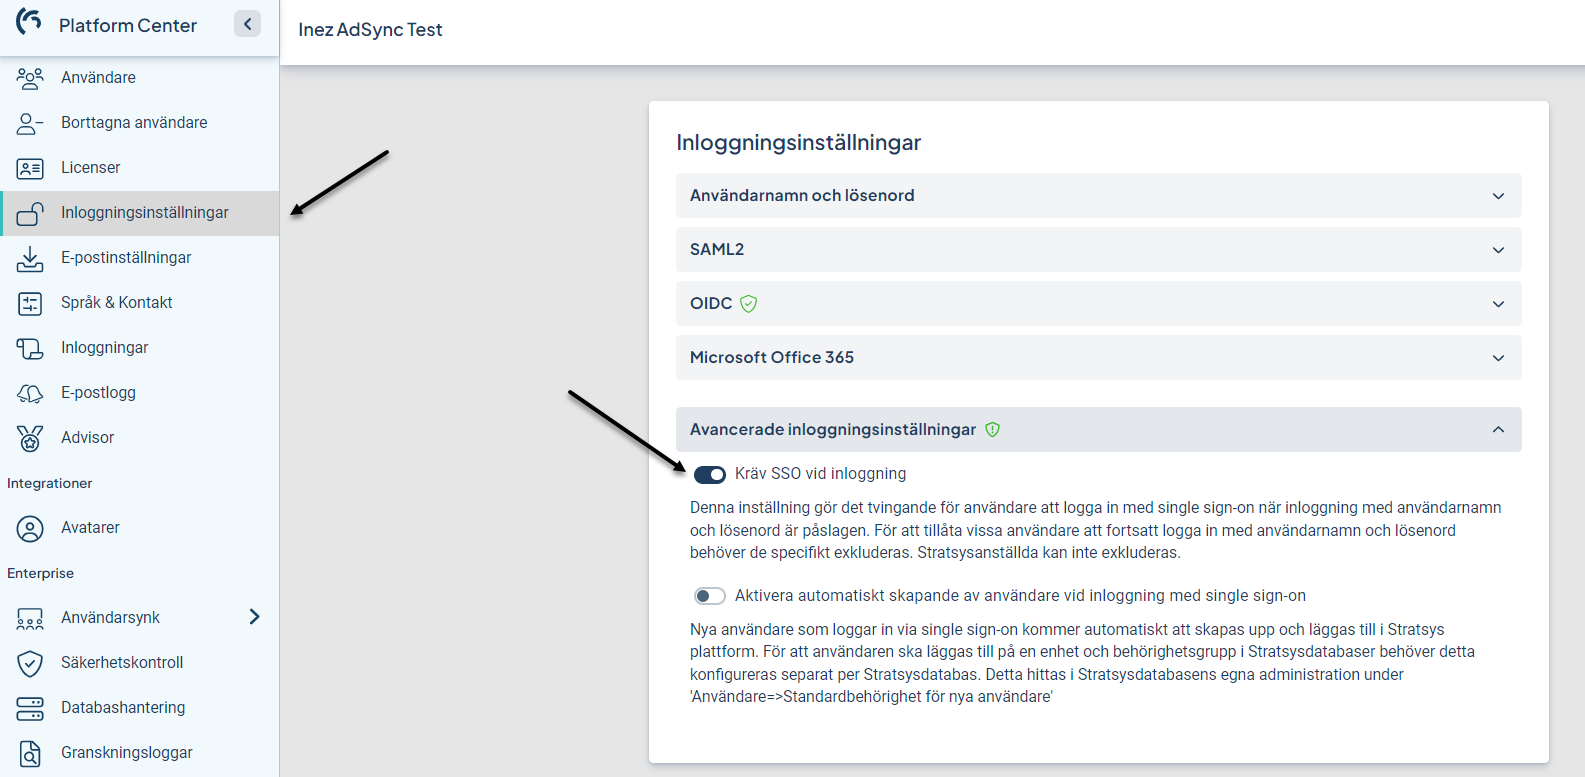
Require SSO at login
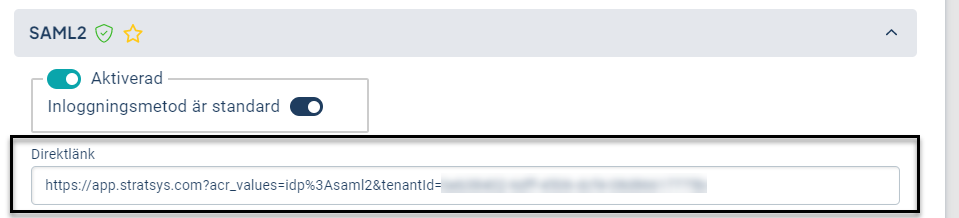
If the "Require SSO at login" feature is activated, all users must log in using Single Sign-On. To allow certain users to continue logging in with their username and password, they must be specifically excluded. Stratsys employees cannot be excluded. Excluded users must use the direct link to log in with their username and password.
Activate "Require SSO at login"
- Go to the platform administration and "Login settings"
- Expand Advanced Login Settings
- Activate the toggle
Exclude users.
- Go to the Platform Administration and select Users.
- Select the user you want to exclude from the SSO requirement.
- Expand the Settings section.
- Activate the toggle to exclude users from the SSO requirement.
- Save.
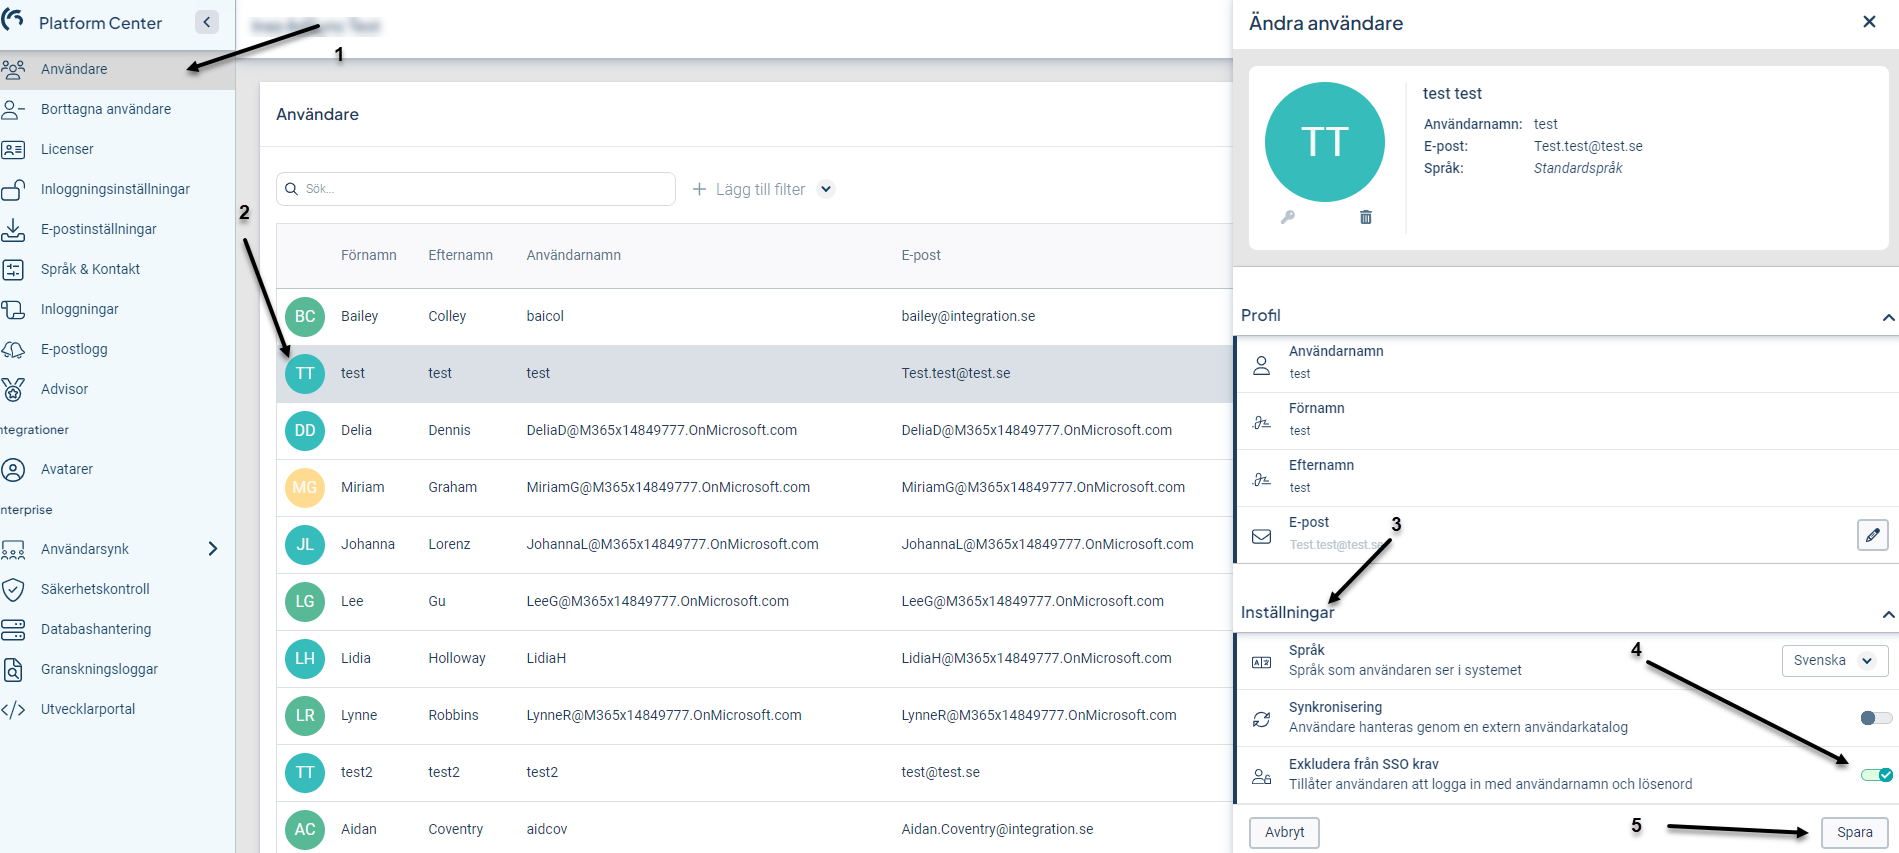
6. Advise the user to utilize the direct link for logging in to Stratsys, which can be found in the login settings under the respective SSO login method.
User provisioning (SAML2, O365, OIDC)
Note! User provisioning should never be used in combination with AD sync, as these settings are not compatible with each other.
User provisioning means that users who have not been added to Stratsys before will be automatically added if they go to https://[customername].app.stratsys.com.
For user provisioning to work, attribute mapping is necessary.
- Go to Platform Administration and Login Settings.
- Expand Advanced Login Settings.
- Activate the toggle for automatic user provisioning when logging in with Single Sign-On.
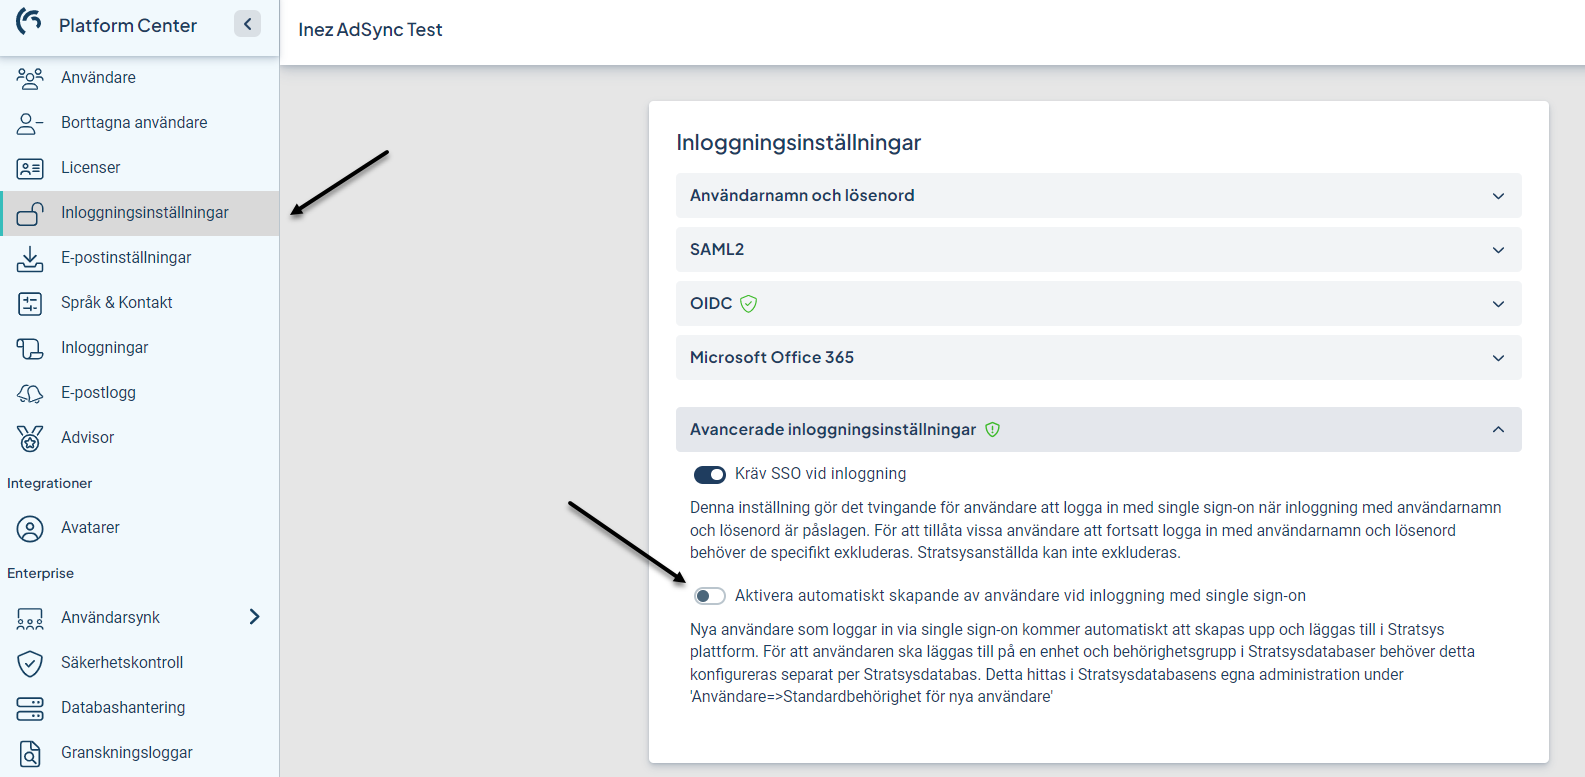
- Map the attributes according to the instructions provided later in this article.
- In order for the user to be created in Stratsys, the setting for Default Permissions for new users in Stratsys also needs to be enabled. See below for instructions.
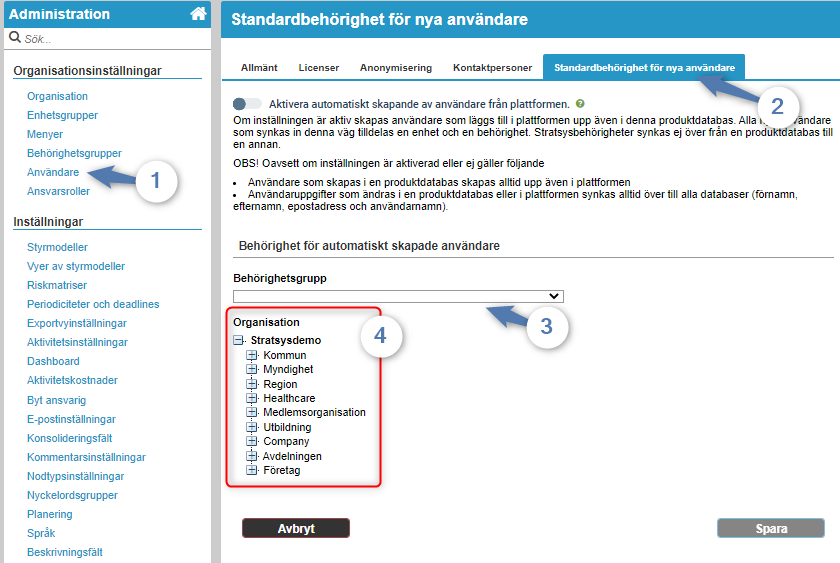
- Here, you need to choose which permission group the newly created users will be assigned as their primary access level upon provisioning. Typically, a new group is created for this purpose, named something like Provisioning Access or SSO Access. We recommend setting the lowest possible level of access (such as read-only access) for this group.
- You also need to select a primary unit for new users when they are provisioned. To ensure that sensitive information is not accidentally accessed, it is recommended to create a new unit without any information for this purpose.
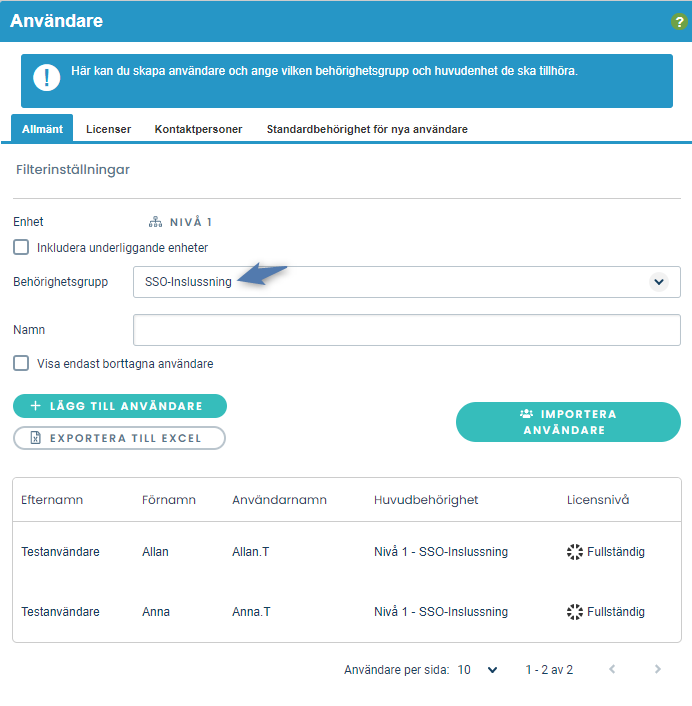
- After user provisioning, the permissions for each user can be changed manually. To make this process easier, users can be sorted based on their specific permission level. See the image below for an example.
- There is currently no notification or alert when a new user is provisioned in the system.
- If user provisioning is enabled but not activated in Stratsys, an error message will be displayed.
- However, the user will be added to the Platform Administration, but they will not be automatically sent to the Stratsys database. In that case, the user must be added manually. Note that even if the above steps are resolved later, the user who attempted provisioning and failed will still need to be added manually to the database.
Attribute mapping in O365 and OIDC
For O365 and OIDC, the user's first name, last name, email address, and username are automatically configured. Therefore, there is no need to set them up manually.
Attribute mapping in SAML2
For SAML2, you need to configure which claims from your IdP should be mapped to specific fields in Stratsys.
Note that the claims listed below are just examples, and customers can send other claims as well. For those using Azure AD with SAML2, it is possible to have the same username as the email address.
Troubleshooting
Below are some common errors that may occur and how to resolve them.
SAML2 Azure AD
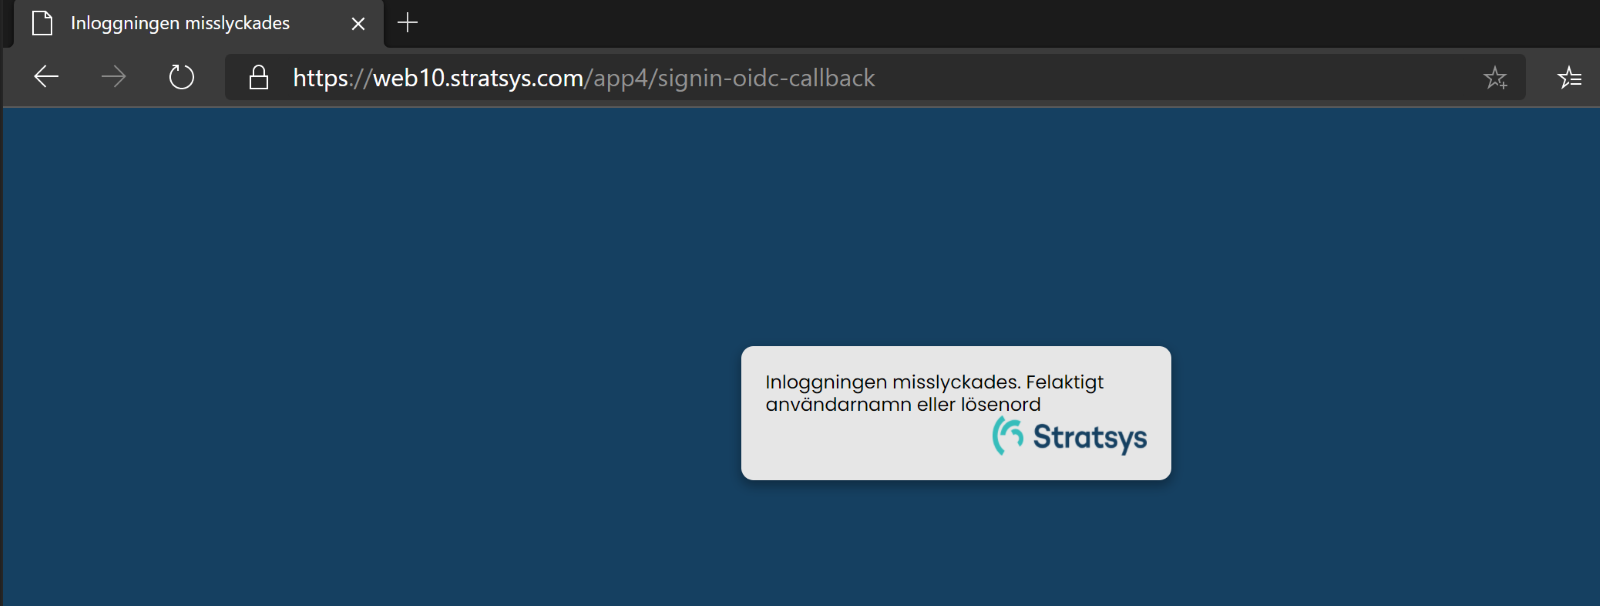
AADSTS50105 The signed in user xxx is not assigned to a role for the application…

Solution: The user needs to be given permission to access Stratsys.
AADSTS7000112 Application ’XXXXXXX’ is disabled

Solution: The Stratsys application in your Azure AD needs to be activated by a user with administrative privileges in your Azure AD. You can find the application under Enterprise Applications in Azure AD.
O365 Azure AD
If users are unable to log in and are redirected to an error page in Office 365, they should take a screenshot of the error message and send it to their Azure administrator with support@stratsys.se on CC. This error is likely due to a configuration issue on the customer's end, where Stratsys needs to be allowed in their Azure settings. For helpful tips on how to resolve this issue, refer to this resource: http://blog.schertz.name/2020/04/enterprise-application-consent-requests-in-azure/
Q&A
We have SSO with O365 and are wondering why our users with O365 guest accounts can't log in with SSO in Stratsys?
Solution: For guest accounts in O365, the UPN email address includes #EXT, which causes the username in Stratsys to not match the email address in the SAML ticket. To fix this, adjust Azure to send the UPN based on the type of O365 account the user has. You can find more information on how to do this here.