To open the filter, click on the button show filter in the toolbar On the right side of the view. The filter will then appear with the various options that the system administrator has chosen to display. The filtering options are divided into different fields. At the top, general filtering options for the view are displayed. The other filtering options appear under the heading of the column in the view that the filtering option refers to.
Instruction:
- Press the button show filter On the toolbar of the view
- Make your filter settings to get the information you want in the view
- Click on the button Filter

After filtering, the view is reloaded and adapted to your filtering settings. At the top of the view, you'll get a confirmation of what you've filtered on. To remove the filtering, click on the button Reset.
Favorite filtrering
As a user, you can choose to create your own favorite filtering based on the filter settings you find after clicking Filter icon  .
.
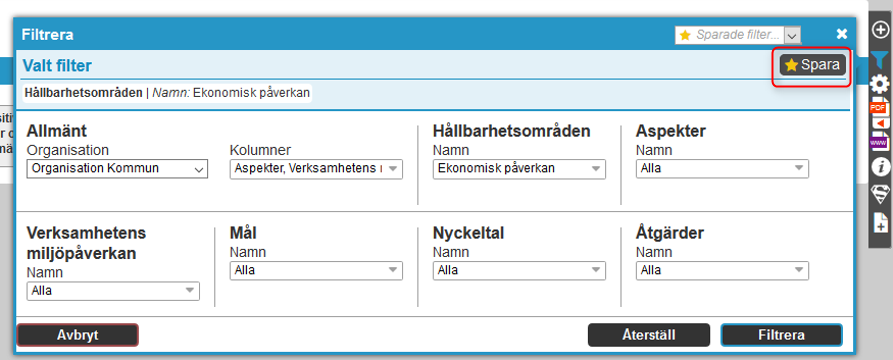
Select the settings you want to make and click filter. When the filter is complete, click the Filter icon again. Now you have the option to save the selected filter as a Favorite filter. You do this by clicking on the save button with a star in front. See examples below.
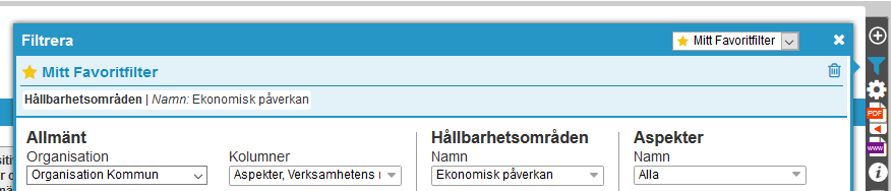
Name your filter and confirm via the checkmark.

Your favorite filter is now displayed in the bar above the Filteralternatives. You can click the name of the favorite filter to change it, or click Dust bin  To completely remove it.
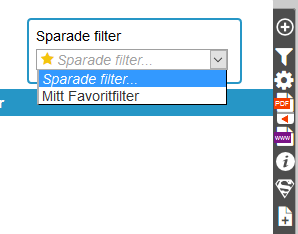
When you reload the view or get to the view again, your favorite filters are available in Saved filters. When you select a filter, this view is filtered immediately.
Columns
Here you can select which columns to show in the view. In the drop-down list, you can select multiple columns at once. To confirm, press the button Filter.
Unit
Here you can filter to see information from underlying units. Select which units you want to filter out information from and confirm by clicking the Filter.
Name
Here you can filter out individual, or a selection of nodes below each level. To filter out a selection of nodes, the system administrator is required to set the filter setting that allows multiple names to be selected in the name filter. Select which nodes you want to filter forward and confirm by clicking the button Filter.
Free text
Type the text you want to filter forward and confirm by clicking the button Filter.
Own
Filter on Own , you can identify which nodes within the specific you are responsible for. Confirm by clicking the button Filter.
Copied
Filter on Only copied , you can determine which nodes have been copied to the view. Confirm by clicking the button Filter.
key words filtrering
To filter on keywords, select among the keywords in the dropdown lists that have the keyword groups name as the title. To filter multiple keywords at the same time, your system administrator must have allowed this. If this is the case, you can select multiple keywords at the same time in the list by checking the checkboxes to the left of the keywords. Confirm by clicking the button Filter.
Responsible
Through accountability filtering, you can filter out the nodes for which a given user is responsible. Type the name of the person you want to filter on. As you enter letters, you will be presented with a suggested name to choose from. Select a name and confirm by clicking the button Filter.
Status
Through status filtering, you can filter for tasks that have a specific status. Confirm by clicking the button Filter. It is also possible to filter on the status directly visible in the view in the same way as color filtering. See below.
Priority
Priority filtering always refers to tasks and is done in the drop-down list where it is in initial mode Priority for tasks. Priority filtering allows you to filter out the tasks that have a specific priority. Confirm by clicking the button Filter.
Filtering on start and end dates
Filtering on start and end dates refers to activities. By selecting a start date, you can filter out all tasks with an earlier start date than the one you specified. By selecting an end date, you can filter out all tasks with a later end date than the one you specified.
Obs! In some cases, filtering on start and end dates is set to not filter activities that cross the start and end date ranges. Because of this, a task may appear even though it would normally be bortfiltrerat by the start or finish date.
Period Date filtering
With date filtering for period, you can filter out the activities that are/were current for the selected period.
Färgfiltrering
If the color filter is turned on, it will appear at the top of the page without having to open the filter. Color filtering always refers to the nodes of only one level. You can use color filtering to filter a view based on the color of the nodes in the level that the color filtering refers to. For example, you can filter out all nodes that have the color green. To filter out a specific color, press one of the color icons. You do not need to confirm with the Filter.
Filters on measurement values
You can filter on KIP-data. Filtering can be done in the measure columns in which values are selected in a drop, such as yes/no measures.
To get to filters on measurement values, click under current view on Settings then filter settings And KPI filter. The list then selects which filters to activate.
Filter on periodicity
Filter on periodicity means that it is possible to filter out all measurements with a certain periodicity. For example, the To show only the monthly measurements in a view. The filter is enabled under Measure filters in the filter settings.
or filter on responsibility roles
It is now possible to filter with or logic on responsibility roles, which means that, for example, you can Can bring out the metrics where a user is "comment Manager" or "data reporter" (responsibility roles can have different names and purposes for different organizations).
To get to the setting or filter, under Akutell View, click Settings, then filter settings and Responsibility roles filter. In the list, you choose to turn on the setting for or logic. After that, you choose which responsibility roles to filter on for each column. Then you choose if you want to enable the filter for the operators with the following main unit.
Standard filters
The default filter Settings page displays a flag indicating which filter is current. The flag makes it easier for you as an administrator when there are multiple filters created in the view, thanks to the flag, you can see directly which filter applies to the unit you are in.

Filter node properties
Under generaltab for filter settings, there is a section called Property filters. Displays a list of all the columns that are in the current view. Activating the function allows you to filter out the Nodegenskaper for the selected column. For example, you can set up comments to be displayed for different target levels depending on which unit is selected in the organization tree.
Filters on measurement values
Under Settings-Filter Settings-measure filters, it is now possible to set filters for measurement values. You choose which measure column the filter should listen to and name the measure column. This name will then show in the Viewfiler where you can set the min and max value for the measurements to be displayed.