This article describes how web-published reports work
💡If you are not currently using Web Publishing of Reports, please contact your Stratsys Account Manager for further discussion, as it is an Enterprise/add-on service.
To follow all the steps in this manual article, the following two competencies are required:
Stratsys Administrator with developer permissions in the Stratsys platform to modify reports and report templates, as well as to create a client authorized to consume Stratsys Web-Published Reports.
Web Editor/Web Developer/HTML-CSS Proficient Person who can create and modify pages on the website where the content is to be embedded.
Quick links
Frequently Asked Questions (FAQ)
Web Publishing of Reports enables the publication of selected reports from Stratsys on a website—either internally on an intranet or on a public website. The reports become interactive while retaining their original appearance and content. With the integration, you can allow more people to access your reports and choose which reports from Stratsys to publish.
The interactive reports are easily accessible and much easier to digest than, for example, a static PDF. You also avoid manual processing when publishing reports thanks to direct synchronization with Stratsys.
There are several technical advantages to web-published reports:
-
Plug and play – insert Stratsys script tags into any page template on your website and you're ready to go!
-
Ability to customize the appearance using CSS to match your website.
-
Support for displaying selected departments’ reports on specific parts of your website.
-
Easy control over which reports you want to publish.
-
Accessibility-compliant at level AA. However, this requires your report content to be accessibility-compliant.
The reports published from Stratsys are interactive and directly linked to Stratsys. If you wish to make changes to the report, you can click through to Stratsys directly from the published report. You have the option to adjust the design to match your website, but the content remains unchanged.
Setup
Step 1. Create a client authorized to consume the published reports
Send information about which CORS origins (the addresses of the websites where the reports should be embedded) you want to have added to support@stratsys.se. We will get back to you shortly once the underlying client configuration is complete, providing you with the Client ID, which you will need in the later steps.
Step 2. Publishing reports in Stratsys
Reports can only be published if they are marked as completed, to prevent publishing in-progress reports by mistake.
To select which reports should be available for publishing on your website, go to the report's "Settings" (gear icon) and then choose "Edit".
 Check "Allow publishing on website" found under the "Add-ons" section to mark the report as available for web publishing.
 Reports that are available for web publishing and marked as completed will display an additional icon on the report page indicating this.
Step 3. Insert script tags on your website according to the technical configuration
Embed one of the three code blocks shown under Technical Configuration on your website, and configure the styling to match your graphic profile if desired.
Example of the simplest possible setup (where company, client-id and tenant-id are replaced with your own configuration):
<!DOCTYPE html>
<html>
<head>
<meta charset="utf-8" />
<title></title>
</head>
<body>
<div>
<script src="https://stratsys-runtime.svc.stratsys.com"></script>
<stratsys-public-runtime company="democompany" client-id="0000-1111-2222-33" tenant-id="8a40c34e-001c-4523-ecd9-08da38b2f88f">
<stratsys-public-reports show-overview="true" responsive="auto" custom-styling="false"></stratsys-public-reports>
</stratsys-public-runtime>
</div>
</body>
</html>
Frequently Asked Questions (FAQ)
- Is the solution based on embedding in an IFrame?
- No, the solution is not based on IFrames.
- Are CSS templates available?
- Yes, there are two CSS files available at the bottom of this manual article that you can use to restyle the reports.
- Do you support screen reader tool “X”?
- We offer general support and adhere to standards for screen readers, so it should work, provided that the tool you are using also follows these standards. We aim to comply with WCAG 2.1 and the requirements governed by LoU (EN 301 549 V2.1.2).
- Is it possible to have different styles/templates for different parts of the organization
- Yes, but this requires using different publishing locations/sites and specifying which reports/departments should be displayed on each, so that each site's CSS is applied accordingly.
- Can all reports be published?
- Most reports can be published, but they must be marked as completed in order to be published.
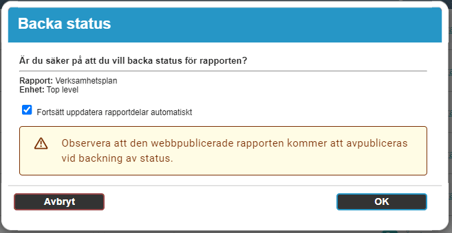
- What happens if I revert a completed report that is published?
- In this case, the report will be unpublished. You will receive a warning about this when reverting the report.
- In this case, the report will be unpublished. You will receive a warning about this when reverting the report.
- Are there any known limitations in the web publishing functionality regarding the report content?
- Yes. The following features are currently not available for web-published reports and therefore will not be displayed in the published interface:
-
Uploaded attachments
-
Indicator groups in tables
-
- Yes. The following features are currently not available for web-published reports and therefore will not be displayed in the published interface:
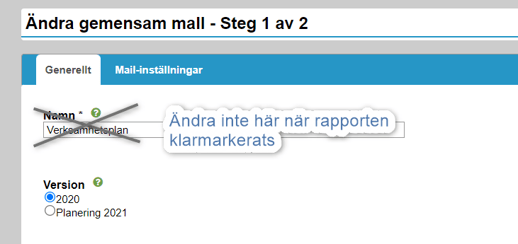
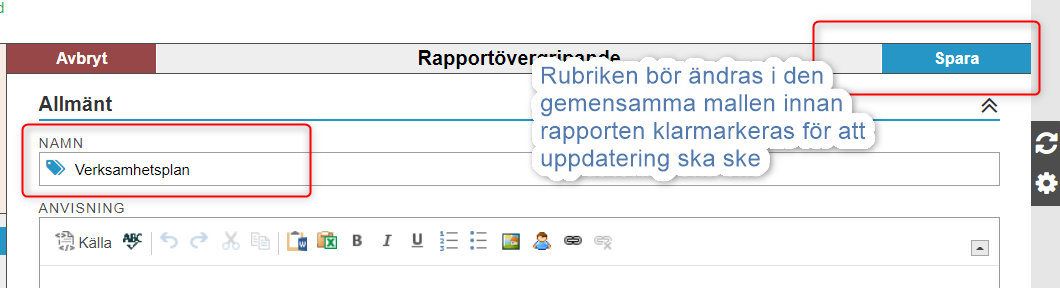
- I have changed the title, but it is not updated in the web publication
- This is because you changed the title after the report was marked as completed. The title change needs to be saved within the shared template.
- This is because you changed the title after the report was marked as completed. The title change needs to be saved within the shared template.
- How do I make sure only one specific report is displayed?
- Add 'report-id"="XXXX"' as an attribute in the script on the page where you want to publish the report. Add 'show-overview="false"' to exclude the overview section.
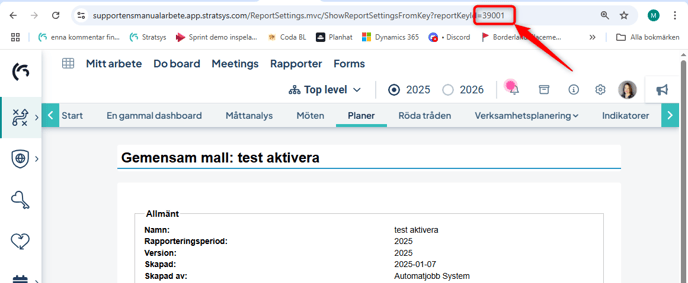
- You can find the report ID by going to the report's settings and copying the numbers after "reportKeyId=" in the browser’s address bar.
Example code:
<stratsys-public-reports
 show-overview="false"
 responsive="auto"
 custom-styling="false"
 report-id="24485"
 </stratsys-public-reports>
-
How do I limit which departments are displayed?
-
Add allowed-department-ids ="2, 5" to display reports from departments 2 and 5.
-
<stratsys-public-reports
show-overview="true"
responsive="auto"
custom-styling="false"
allowed-department-ids="2, 5"
</stratsys-public-reports>
-
Where can I find the department IDs?
-
Click on the relevant department in the organization tree, and look under External codes.

-
- Where can I find a report’s unique ID for a given department?
- In the report list in Stratsys, hover over the department name. The value shown in the reportId field is the one to use in the report-id attribute in the HTML configuration.

Technical Configuration
Configurable attributes for the <stratsys-public-runtime> element
| Attribute | Description | Allowed values |
|---|---|---|
| company | Customer code | Lowercase text string. This should match the part shown in Location when logging into Stratsys (the part before .app.stratsys.com). |
| client-id | Client ID | Text string generated in the Developer Portal (Step 1 in the Setup section above). |
| tenant-id | Customer ID | Text string generated in the platform administration. |
Configurable attributes for the <stratsys-public-reports> element
|
Attribut |
Description | Allowed values |
|---|---|---|
|
report-id |
Id of the report to be initially displayed. Can be combined with show-overview="false" if only the specific report should be available. Do not use this attribute if the landing page should be the list of published reports (requires show-overview ="true"). |
integers |
|
show-navigation |
Enables or disables navigation to the report overview and other departments |
true / false |
|
custom-styling |
If custom styling should be used instead ["true" | "false" (default)] |
true / false |
|
show-departments-in-report |
Whether it should be possible to select between different reporting departments within a report ["true" (default) | "false"] |
true / false |
|
show-overview |
Whether the overview page should be available ["true" (default) | "false"] |
true / false |
|
max-table-of-contents-depth |
Maximum number of heading levels shown in the table of contents (at least one level is always shown). Default is 2. A value of 0 shows all levels. |
integers |
|
allowed-department-ids |
If set, only departments with matching IDs will be shown in the overview and department selector |
comma-separated list of integers |
|
show-report-period |
Enables or disables display of the report period on the overview page |
true / false |
|
responsive |
Controls the responsive mode of the application. With "Auto", it breaks at 1024px screen width. For other breakpoints, use a custom script that sets "True" dynamically. |
true / false / auto |
|
debug |
Displays technical information to assist with troubleshooting and setup |
true / false
|
Script and HTML tags
The following script tag must always be included first in all setups for the embedding to work properly:
<script src="https://stratsys-runtime.svc.stratsys.com"></script>
After that, you choose which optional attributes you want to use to control the embedding’s functionality and appearance.
Minimal configuration with HTML only:
<stratsys-public-runtime
  company="Lägg in company"
  client-id="Lägg in client-id"
  tenant-id="Lägg in tenant-id">
  <stratsys-public-reports></stratsys-public-reports>
</stratsys-public-runtime>
Extended configuration using HTML only:
<stratsys-public-runtime
  company="Lägg in company"
  client-id="Lägg in client-id"
  tenant-id="Lägg in tenant-id">
  <stratsys-public-reports
    custom-styling="false"
    responsive="auto"
    show-overview="true"
    show-departments-in-report="true"
    allowed-department-ids="1,8"
    report-id="10471" >
  </stratsys-public-reports>
</stratsys-public-runtime>
Example configuration using HTML and JavaScript
<div id="target-element-for-stratsys-public-reports"></div>

<script>
    !function () {
        var $runtime = document.createElement('stratsys-public-runtime')
        $runtime.setAttribute('client-id', 'Lägg in company')
        $runtime.setAttribute('company', 'Lägg in client-id')
        $runtime.setAttribute('tenant-id', 'Lägg in tenant-id')
        var $reports = document.createElement('stratsys-public-reports')
        // VALFRITT ATT LÄGGA TILL:
        // $reports.setAttribute('custom-styling', 'false')
        // $reports.setAttribute(‘responsive', 'auto')
        // $reports.setAttribute('show-overview', 'true')
        // $reports.setAttribute('show-departments-in-report', 'true')
        // $reports.setAttribute('allowed-department-ids', '1,8')
        // $reports.setAttribute('report-id', '10471')

        $runtime.appendChild($reports)
        document.querySelector('#target-element-for-stratsys-public-reports').appendChild($runtime)
    }()
</script>
Ability to customize styling via CSS classes
- The root element serves as the starting point for all styling
stratsys-public-reports {}
- Overview Page
stratsys-public-reports .stratsys-reports-overview {} -
Navigation area on the left (base class)
stratsys-public-reports .stratsys-report-navigation {}
⚠️Important! Styling the base class of the navigation area may impair the sticky functionality. Prefer using ".stratsys-report-navigation-content" instead, as shown below.
- The content within the navigation area on the left, located inside the sticky functionality.
stratsys-public-reports .stratsys-report-navigation-content {}
- The section that contains all report content. It can also be used to control the maximum width of the content.
stratsys-public-reports .stratsys-report-content {} -
Offset the table of contents and heading navigation so they don't end up beneath a fixed page header or footer already present on the site.
For example, if there is an existing page header that is 60 pixels high, you can set the value of "top" to "-60px".stratsys-public-reports dynamic-layout-sticky-screen-offsets,
stratsys-public-reports .stratsys-report-heading-scroll-offset
{ top: -0px; bottom: -0px; }CSS-example:
stratsys-public-reports .stratsys-report-navigation {

  background: red;

}

stratsys-public-reports .stratsys-report-navigation-content a {

  color: blue;

}

stratsys-public-reports .stratsys-report-content h1 {

  color: green;

}

stratsys-public-reports .stratsys-report-content th:not(:nth-child(1)):not(:nth-child(2)),

stratsys-public-reports .stratsys-report-content td:not(:nth-child(1)):not(:nth-child(2)) {

  text-align: right !important;

}
CSS files to override base functionality
To use the CSS override files, the attribute custom-styling must be set to FALSE above.
If you want to use the CSS files below, both must be loaded on the page where the Stratsys report is embedded. The variable file contains the variables that can be styled, and the implementation file contains the styling for the elements.