With our table integration, you can easily import tables from Qlik Sense into Stratsys reports. This article explains how to set up and manage the integration.
💡If you are not currently using the table integration feature, please contact your Stratsys Account Manager for further discussion, as it is an add-on service.
The article consists of the following sections:
Solution Description
The solution enables retrieval of table data from Qlik Sense for embedding and automatic updates in Stratsys reports. The data is updated in real time when a user accesses a report and scrolls to the table element containing the integrated data.
Stratsys' integration has access to a specific application in Qlik Sense, where we can retrieve all tables defined in the application and select which ones to import into the report. Multiple tables from Qlik Sense can be included in the same report if desired.
Tables are linked to the report by their names, and both the name and ID of the table are sent to Stratsys to ensure the correct data is retrieved.
The retrieved data is dynamically filtered based on the organizational unit for which the report is being viewed and the reporting period the report refers to.
Before Getting Started
To ensure an efficient project implementation, it is helpful to consider the following before starting:
-
Do you have all the data you want to transfer to Stratsys available in Qlik Sense?
-
Do you have the access and expertise to manage your tables in Qlik Sense, or is additional training needed?
-
Are the receiving reports already set up in Stratsys, or will they need to be developed during the project?
-
Do you meet the necessary technical requirements? Review the prerequisites and coordinate with your IT department and Stratsys Account Manager before getting started.
-
Create a user in the Qlik Sense Administrators group with the right permissions to make calls to the Qlik Sense Server.
-
Open inbound traffic on port 443 (https/ssl) from Stratsys' production server: 217.28.207.155 to the Qlik Sense Server.
Requirements
-
You must allow incoming traffic via port 443 (https/ssl) from Stratsys' production server: 217.28.207.155 to the Qlik Sense Server.
-
An SSL certificate is required on the Qlik Sense Server. The certificate must not be self-signed. Wildcard certificates are acceptable. If using a wildcard certificate, a DNS name must be configured for the adapter (for example, stratsysproxy.kund.se).
-
The Qlik Sense server must be configured for WebTicket authentication.
-
Clustered Qlik Sense environments are not supported.
-
A user in the customer’s environment must be created with permission to access the Qlik Sense Server. This user must be added to the Qlik Sense Administrators group on the server.
Setup Guide
Terminology Note
In external systems, a “report” often refers to what we call a table. However, in this guide, we use the following terminology:
Table = External system
Report = Stratsys
Configuration in Qlik Sense
For any questions regarding the configuration in this section, please contact your Qlik Sense provider.
We strongly recommend creating a separate application in Qlik Sense for the data to be retrieved by Stratsys. This allows you to grant access only to that specific application for our external account.
Create a User
Set up a user with User Access who has permission to read from the relevant application. Communicate the username and directory to Stratsys.
Note that the username is case-sensitive—always communicate the exact username and domain, including correct use of uppercase and lowercase letters.
Set Up a Virtual Proxy
Create a dedicated virtual proxy in QMC to allow access for the user. Name it "Stratsys" or something equivalent. Authentication must be configured via JWT certificate. The public key for the certificate is included at the end of this document.
In the User field, specify the property that identifies the user’s identity.
Link the Virtual Proxy to the Relevant Proxy Service in QMC
An example setup is shown in the image below:

Our production servers must be whitelisted in the proxy to allow external access. Traffic will be SSL/TLS-signed and transmitted over HTTPS on port 443. The following IP address must be added to the whitelist:
-
217.28.207.155
-
The host itself must also be added (for example, qliksense.stratsys.com)
Additionally, load balancing to the Central node must be configured in the virtual proxy for the setup to function properly.

Create an Application
If one does not already exist, set up a dedicated application for the data that will be accessible to Stratsys. The app must be published to a dedicated stream to which the user has access. Communicate the name of the application to Stratsys.
Add Field for Stratsys Department
If no suitable field exists, ensure the application's data model includes a field containing the department code in the format agreed upon at the beginning of the project. The field values must not include Å, Ä, or Ö. Communicate the field name to Stratsys.
Suggested name: Stratsys_id
Add Field for Stratsys Date
The application's data model must include a field that handles dates in the format 2019-01-31 (YYYY-MM-DD) so that Stratsys can filter by time. Communicate the field name to Stratsys.
Suggested name: Stratsys_date
Add Field for Row Type
Stratsys supports styling of tables imported from Qlik Sense based on the following row types:
| Row Type | RowStyle |
|---|---|
| Other ("Regular Row") | 0 |
| Header | 1 |
| Subheader | 2 |
| Total | 3 |
| Subtotal | 5 |
To implement this, add a column to the table in Qlik Sense containing one of the numeric values listed above in each cell. The column can be either a dimension or a measure, but it must be named RowStyle for the styling to be applied. This column will not be displayed when the table is rendered in the Stratsys follow-up report.
Public Key for JWT Certificate
The key below must be copied in its entirety when setting up the certificate.
-----BEGIN CERTIFICATE-----

MIIDYjCCAkqgAwIBAgIQW5qwfny3lpNEby7unDXB5DANBgkqhkiG9w0BAQsFADBJ

MRQwEgYDVQQKDAtTdHJhdHN5cyBBQjExMC8GA1UEAwwocWxpa3NlbnNlLnJlcG9y

dGludGVncmF0aW9ucy5zdHJhdHN5cy5zZTAeFw0xOTA1MjgwOTE0MzFaFw0yOTA1

MjgwOTI0MzFaMEkxFDASBgNVBAoMC1N0cmF0c3lzIEFCMTEwLwYDVQQDDChxbGlr

c2Vuc2UucmVwb3J0aW50ZWdyYXRpb25zLnN0cmF0c3lzLnNlMIIBIjANBgkqhkiG

9w0BAQEFAAOCAQ8AMIIBCgKCAQEAovcu+xIWKXx/XAP2/+ktNpjQO4dwo9ZQUmI1

jE/xT4oknixxPQoDg+UORsZGj0jW/QjZpdPt5CyzAc0IgJyt5iyou9MWKT06V8XZ

4YUniXBZ7O0xMNbHKnJMD9wzvOZug/r0mYAK+4nwpaJ+xYE+ZsR2Eu6SmpZwF6g5

UIG4Unn0AeM49JJhBUnMULXel2TN7ALM0c9CVX7emO8tBiiIARFb9aowZtyIwcBp

APFevAlZs/XKexFgOBoELxE8dwAMtiXt6uInYZ+almrcM1A+VQadfqvoYCuclu3Z

fSpsX/NnOKW6+v6jYQc8A0OiYnuQPpA/nzC4vt0pKe1/KwOveQIDAQABo0YwRDAO

BgNVHQ8BAf8EBAMCB4AwEwYDVR0lBAwwCgYIKwYBBQUHAwMwHQYDVR0OBBYEFPY9

ng+4guu/FMPxDD4ChmJaTmxYMA0GCSqGSIb3DQEBCwUAA4IBAQB3WVAu6mV4AXxi

8Jb8C3X/gsYBOr+GdgUyW0eNkJP+agQJtBLt0W0F0TQXft4FWm+Y/BpTrItPjVt3

PgTpRzBa4ymAz0Dbmlojo2MIBSMxDy3XceV5bx0GjqvPZfiTesM+AXtcBWpKm76l

xeo6sExq62zE6Ybfwp2kU7sgy2GeEWtPdimW3nAomcCqwtReM3p+VsLSPBkXbb3r

Lgx3gKAHA5rZGuS7f0F6JbbdXncAAn7Cgvt9SBxt6YnLNBMngtE0ZBUgNlBhVYRB

KKgJMqudqY8gSCn9O1RpDsuL5xMdjT6TU9bO61twXn9yfWrdOg3+0PIwvXbJGvtN

F4synfbE

-----END CERTIFICATE-----
Configuration in Stratsys
1. Create a Source System
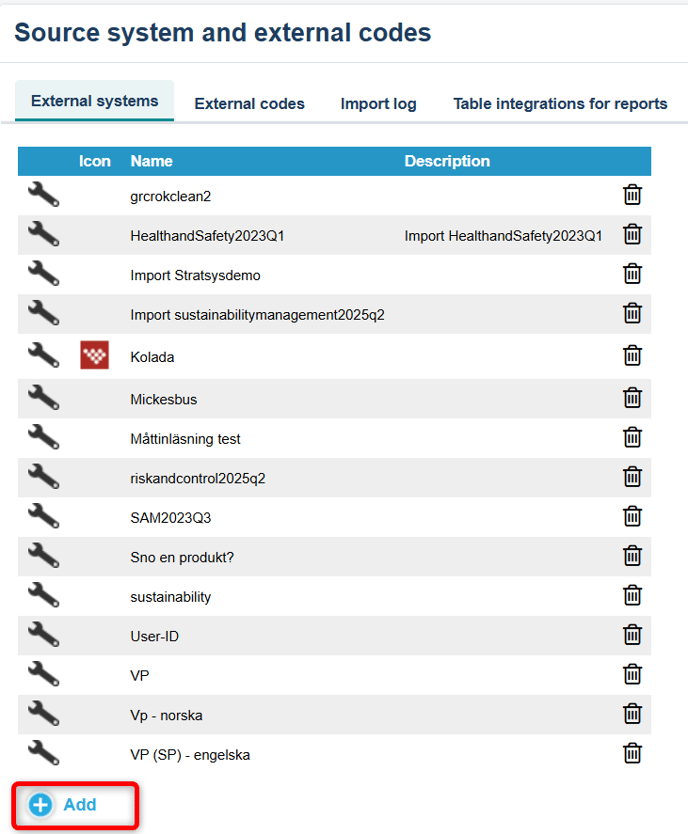
Navigate to Platform Administration and go to Source Systems and External Codes.
Create a source system under the External Systems tab by clicking Add. Enter a name—Qlik Sense is recommended—and optionally add a description and icon. Then click Save.
2. Set Up the Connection to Qlik Sense
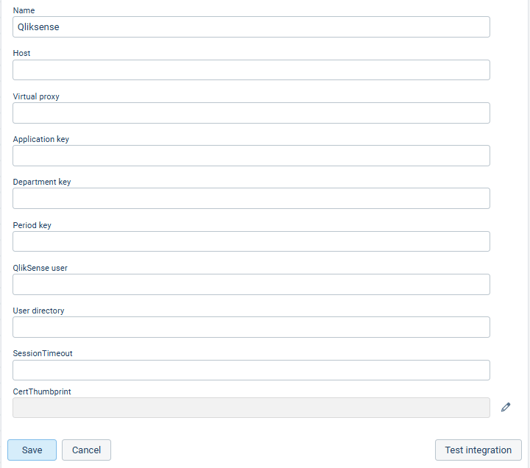
Go to the Table Integration for Reports tab and click Add Integration.

Select Qlik Sense from the drop-down list and fill in the details obtained from the previous step "Configuration in Qlik Sense."
Field Descriptions:
-
Name: Free-text field for what the table integration is called in Stratsys.
-
Host: The address of the server where Qlik Sense is installed.
-
Application key: The application from which Stratsys will retrieve table data.
-
Department key: Field in Qlik Sense mapped to organizational units to enable department filtering.
-
Period key: Field in Qlik Sense mapped to date information for period filtering.
-
Qlik Sense user: The user account in Qlik Sense that Stratsys uses to connect.
-
User directory: The user directory in Qlik Sense where the Stratsys user is located.
-
Session Timeout: Corresponds to the “Session inactivity timeout (minutes)” setting in Qlik Sense. See Qlik settings here.
-
Certificate thumbprint: The private key of the certificate set up in Stratsys to enable user authentication and connection to Qlik Sense.
Map the Organizational Tree
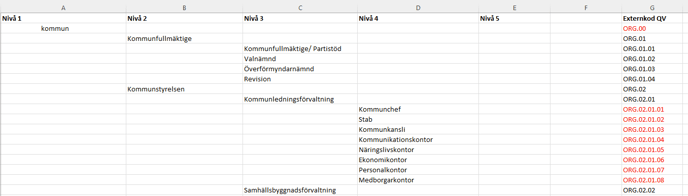
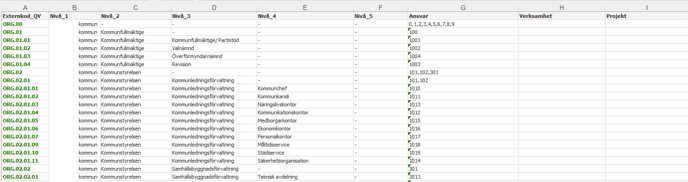
To ensure the correct data appears in the right place in the Stratsys tree, you must map it with the corresponding codes/unit identifiers from the source system—such as responsibility codes or HSA IDs. In Stratsys, these are referred to as external codes.
Your Stratsys consultant will export your organizational tree from Stratsys into an Excel file, and you will be responsible for filling in the external codes from your source system.
When implementing Qlik Sense, you define your own external codes in the Excel file exported from Stratsys. These codes are then mapped to the corresponding dimension codes in Qlik. Most commonly, Responsibility and Operational codes are used, but Project codes can also be included.
Excel file with the organizational tree from Stratsys:
Mapping to Dimension Codes in Qlik:
Imported Mapping in Stratsys:

Importing External Tables into Stratsys Reports
Start by creating a heading to which you want to link the table, or select an existing heading. Then click New Reportpart.
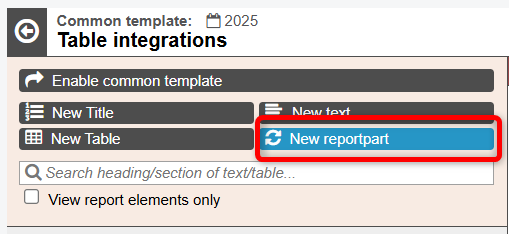
 Then select Create External Table:
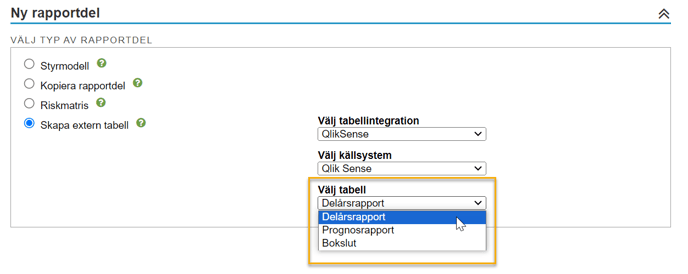
Choose the table integration and source system from which you want to retrieve your table. It is possible to integrate tables from different source systems into a single Stratsys report. In the drop-down menu Select table, you will see all the tables available (published) in the chosen source system. Select the table you want to insert under the current heading and then click Create.
Once you have clicked Create, the table will be placed under the heading you selected.

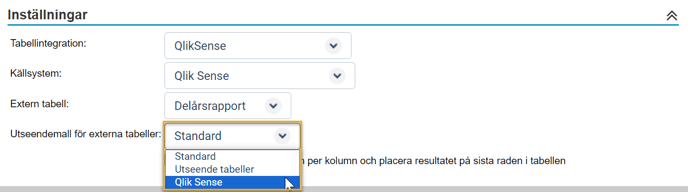
Modify the Appearance of an External Table
Here you can edit your external table by changing the table, removing it, applying a different style template, adjusting column widths, or adding a summary row if desired.
1. Select the table you want to edit:

Adjust Column Width
Click the Adjust column width button.
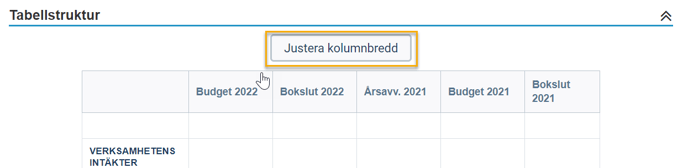
Then adjust the width of the table's columns by clicking and dragging the edge of the column to your desired size. Repeat this for all columns you wish to adjust, and then click Save.

Summary Row
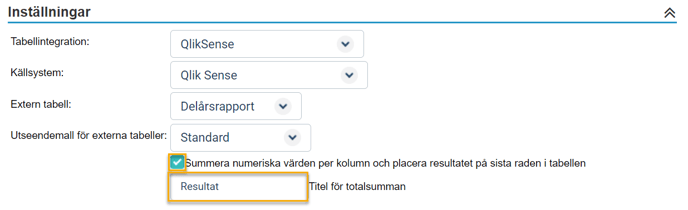
If the imported table does not include a summary row, you can add one in Stratsys. Be sure to check that you don’t end up with duplicate summaries!
Check the box for Summary Row, enter the label you want to appear in the summary row, and then click Save in the top right corner. The total will be added as the final row in the table using the label you specified.
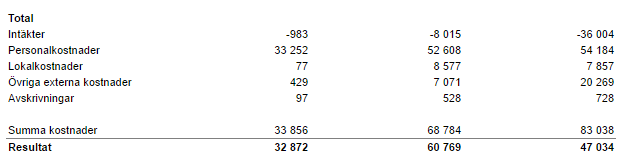
Result in the Stratsys Report:
Styling of Tables Using Style Templates
With the help of style templates, you can style your imported tables in Stratsys. You can create several different appearance templates if you want your tables to have different looks.
To add a new appearance template, go to Administration > Style template for tables and select the tab Style Template for External Tables:

Click on Edit Table Template and make the desired formatting changes. Select individual cells or entire rows/columns in the table below and apply your styling preferences using the toolbar buttons. Then click Save. If you need guidance, you can click on How do I format the table.

To apply the newly created style template, select the table you wish to modify and choose the desired template from the drop-down list. Don’t forget to save. You can use different style templates for different tables within the same report.
Styling of Tables from Qlik Sense
To style your tables from Qlik Sense as described above, you need to add a column named RowStyle in the table, which defines the row type for each row. This is done when building your tables in Qlik, as shown in the image below:

- 0 = Standard rows, corresponds to "other" in the styling configuration in Stratsys.
- 1 = Header rows
- 2 = Group header
- 3 = Summary rows
- 4 = Empty rows, not styled.
- 5 = Subtotal rows
Maintenance and Administration
To ensure the data retrieved from the external system is filtered correctly based on your position in the organizational hierarchy, external codes must be added to the units in Stratsys.
Depending on the system you're integrating from, the unit codes will vary. These may include dimension codes such as Responsibility and Activity, HSA-ID, OID codes, or similar. Consult your Stratsys consultant if you're unsure about the code structure you've set up.
Note: In the event of a reorganization, it is important to review your mapping of the organizational hierarchy. If new units are added or merged, they must be mapped to the corresponding unit codes from the system from which you are importing your tables.
How to add or adjust existing mappings can be found in this article – Source Systems and External Codes.
Troubleshooting
If the retrieval of table data does not work, you can troubleshoot in Stratsys in different ways depending on the type of error.
Incorrect data in the table – If the numbers in your tables are incorrect for a specific department, the first step is to verify that the unit mapping between the source system and Stratsys is correct. If the mapping is correct, check the figures in the table for the specific unit in the source system. If the figures are incorrect in the source, incorrect figures will also be displayed in Stratsys.
Error message in the blue box – If you receive an error message in the blue box above your tables, it is usually because Stratsys can no longer connect to the source system or the data returned from the source system is in the wrong format.
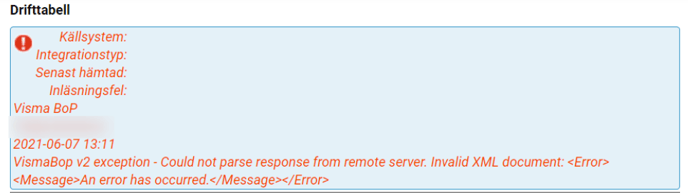
If this error occurs, you should first go to Administration > Source systems and external codes > Table integrations for reports. Click the "Test" button to test the connection. If the connection is successful, the following message will appear:

If the connection fails, the following error message will be displayed:

If the connection works but the error still appears, it may instead be due to an error during the table retrieval. Ensure that the table is published to the web so that Stratsys can access it.
If no table can be retrieved, the following error will be displayed:
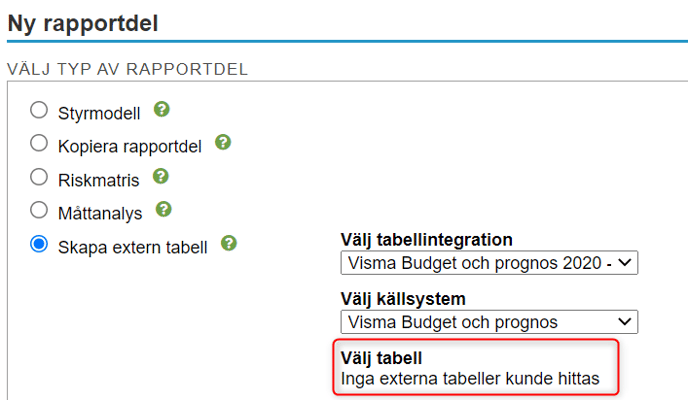
If you attempt to retrieve a table but receive this error, please contact integration@stratsys.se
 In case of the following error message regarding table structure formatting:
Ensure that the top-level unit in the organizational tree (the root unit) has an external code set for the source system. Stratsys sends the external code for the root level of the report to Qlik for selection in the review mode. If this parameter is empty, there is no value to interpret, and the above error message will be displayed.