This article covers user synchronization between Stratsys users and a Microsoft Entra ID (formerly Azure AD), and includes prerequisites for implementing the solution, a setup guide, and guidance for management and maintenance.
Note💡 If you are not currently using User Synchronization, please contact your Account Manager at Stratsys for further discussion, as it is an Enterprise/add-on service.
Tip! Feel free to open the images in a new tab to enlarge them. To do this, right-click on the image and select "Open image in new tab."
User Synchronization from Microsoft Entra ID enables automatic creation, updating, and deletion of users in Stratsys based on changes made in your Microsoft Entra ID. With User Synchronization, you save considerable time on user and permission administration in Stratsys. Since read-only access in Stratsys is free of charge, user synchronization can also be an efficient way to open up Stratsys to your entire organization.
This article focuses on user synchronization with a Microsoft Entra ID. If you wish to set up synchronization with a local user directory, please refer to this [LINK] article.
Please note that Azure Active Directory (Azure AD) has been renamed to Microsoft Entra ID. This is only a name change—the same solution as before still applies. Customers who have already set up user synchronization in Stratsys with their Azure Active Directory do not need to take any action; the same functionality remains in effect. More information can be found here.
The article consists of the following sections:
Solution Description
In your Entra ID, you define which user groups should be synchronized with Stratsys, and only the users in the selected groups will be synced to Stratsys. In most cases, organizations create Stratsys-specific groups in their Entra ID—for example, one group for users who will be reporters, one for full users, and one for readers. A user can belong to multiple groups; in such cases, the user will receive multiple permissions in Stratsys.
The user information that is synchronized includes:
-
Metadata (first and last name, email address, username)
-
Organizational unit
-
Permission group (e.g., reader, reporter, full user)
Alias Mapping
The organizational tree in Stratsys and Entra ID may differ; therefore, alias mapping is used to ensure correct departmental affiliation for users in Stratsys. This means that the names of departments in Entra ID are mapped as aliases to corresponding departments in Stratsys.
The same approach is used for permission groups, where group names in Entra ID are mapped to corresponding groups in Stratsys using aliases. Unique aliases are required for both departments and permission groups in Stratsys, which prevents the use of the same alias for multiple departments or groups.
It is possible to link multiple aliases to a single department or permission group—this is referred to as many-to-one mapping. This can be useful if your organization has a deeper structure in Entra ID and needs to link multiple departments to the same department in Stratsys. It can also be used if you want users from several different groups in Entra ID to have the same permission group in Stratsys.
How the Synchronization Works
The user synchronization checks for changes in Entra ID every 40 minutes, which in turn triggers calls to Stratsys to carry out the updates.
Changes can include any of the following:
-
User has been added
-
User has been removed
-
User's name or email address has been changed
-
User has changed organizational unit
-
User has been removed from a group
-
User has been added to a group
Prerequisites
-
The majority of your users are located in your Entra ID.
-
You are able to create and configure an Enterprise application as well as create new groups in your Entra ID that reflect the groups in Stratsys.
-
Your Microsoft Entra ID licenses and groups comply with the requirements specified in the following link.
-
You are able to create new security groups in your Entra ID that can be mapped to Stratsys permission groups (existing groups can be used, but Stratsys-specific groups are preferred).
-
You have organizational unit information stored in a single attribute for all users in your Entra ID, typically found in the Department attribute.
-
You are able to set up a mapping of the organizational units in Entra ID to the organizational tree in Stratsys. The unit name does not need to match exactly, but a 1–1 or n–1 (many-to-one) mapping must be feasible.
-
Existing users in Stratsys have the same username and email address as the users in Entra ID, to avoid creating duplicate user accounts (it is possible to update the username and email address in Stratsys).
Setup Guide
Step 1 – Create an Organizational Tree
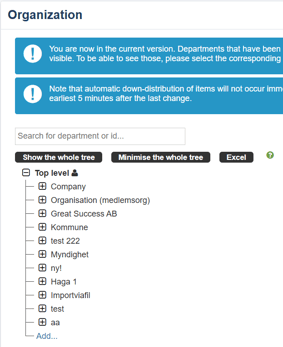
To enable synchronization, an organizational tree must be set up in Stratsys. If you already have an organizational tree in Stratsys, you can skip this part of the article and proceed to Step 2.
We recommend that you seek assistance from your Account Manager when creating the organizational tree, as its setup can be complex and needs to account for several aspects depending on how Stratsys will be used within your organization.
Step 2 – Ensure that "Default Permissions for New Users" is Disabled
To ensure that users are added to Stratsys with the permissions originating from Entra ID, the setting "Activate automatic creation of users on login with single sign-on" must be disabled. Please note that this needs to be done in all of the customer’s databases.
If the setting is already disabled, you may proceed to the next step.

-
Go to Stratsys Administration and then Users
-
Navigate to Standard Permissions for New Users
-
If the toggle Activate automatic creation of users on login with single sign-on is activated → Deactivate it
-
Click Save
Step 3 – Generate a Key
-
Go to Stratsys Platform Center and click on User Synchronization, then select SCIM (Entra ID)
-
Click the wrench icon in the upper right corner

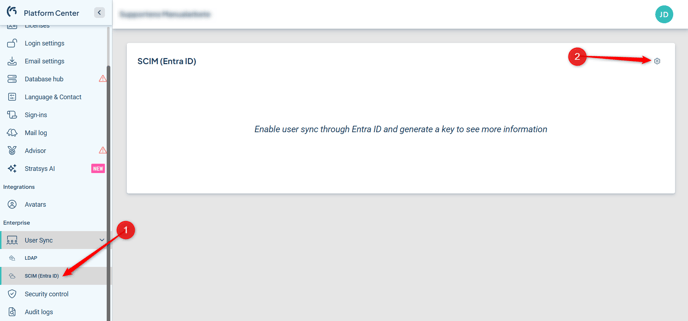
-
Click on Settings and enable the toggle next to Enable user synchronization via Entra ID

-
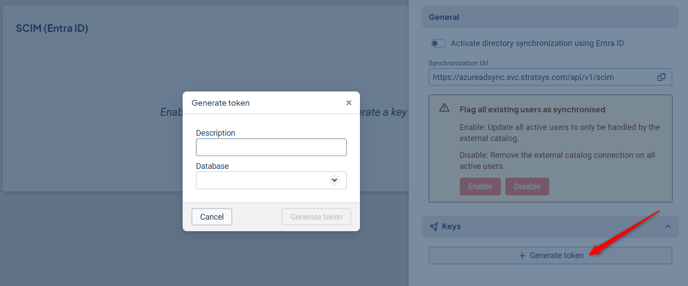
Under Keys, click Generate Token, provide a description for your token, and select the database that the user synchronization should target.
Generate the key and save it—it will only be displayed once.
Also copy the Azure AD Sync URL; this URL will be needed at a later stage.
Step 4 – Create and Configure Groups
In your Entra ID, create groups containing the users you want to synchronize with Stratsys. These groups should correspond to the permission groups in Stratsys, as they determine the permission level (e.g., reader, full user, administrator) that the user receives when synchronized into Stratsys.
To enable your Stratsys permission groups to synchronize with the groups in your Entra ID, follow the steps below.
Make Groups Available for Provisioning
-
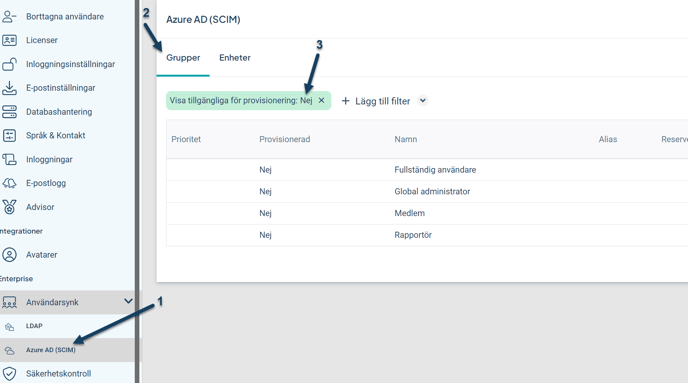
Go to Platform Administration and click on User Synchronization > Azure (SCIM)
-
Navigate to Groups
-
Set the filter Show Available for Provisioning to No to view your Stratsys permission groups that are not yet available for provisioning.
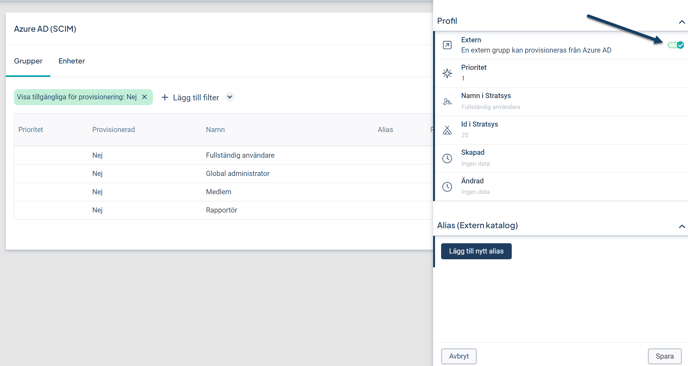
Perform the following 2 steps for each group you intend to synchronize with your Entra ID:
-
Click the row of the group to be synchronized
-
Enable the toggle to mark the group as External
Map Group with Alias
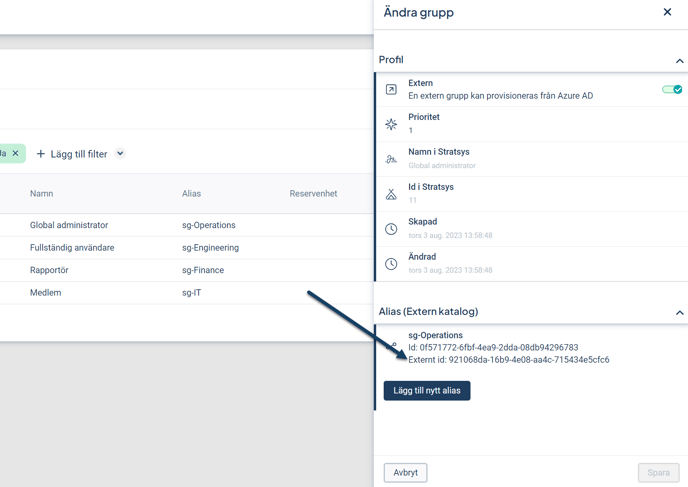
All groups to be synchronized with your Entra ID must be configured with an Alias that matches the group name in Entra ID.
Each group to be synchronized must have an alias, and synchronization with the corresponding group in Entra ID will only begin once the group has been configured with an alias.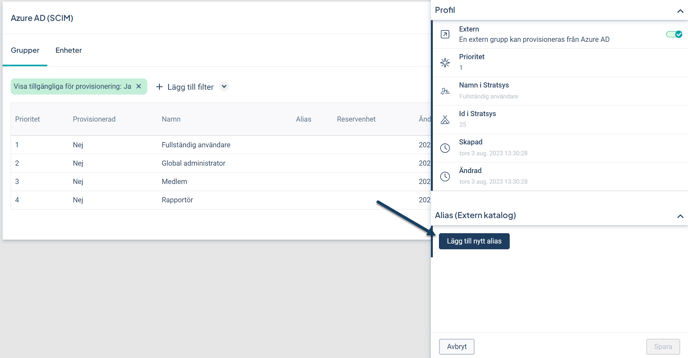
- Go to Groups
- Click the row of the permission group you want to add an alias for
- Click the field Add New Alias and enter the alias in the pop-up window, then click Add and Save. The alias should match the name of the group in your Entra ID that the permission group will synchronize with.
Repeat this process for all groups to be synchronized.
Note Once the group has been provisioned, it is no longer possible to remove the alias. If the name of a provisioned group in Entra ID is updated, the alias will automatically be updated in Stratsys.
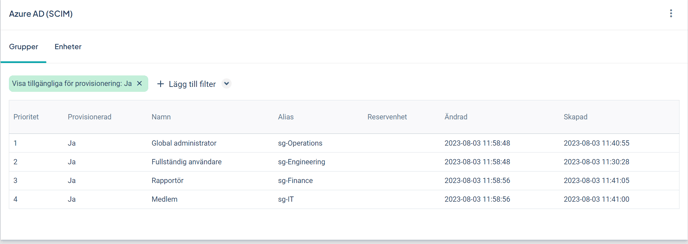
Configure Group Priority Order
The groups are sorted by priority, which determines which permission group becomes the user's primary permission and which becomes an additional permission when a user belongs to multiple groups.
User Example
The user Anna belongs to two groups in Entra ID and is assigned two permissions in Stratsys: "Full User" and "Member". According to the configuration in the image below, this means that "Full User" will be Anna's primary permission, and "Member" will be the additional permission since it is ranked lower in the priority list.
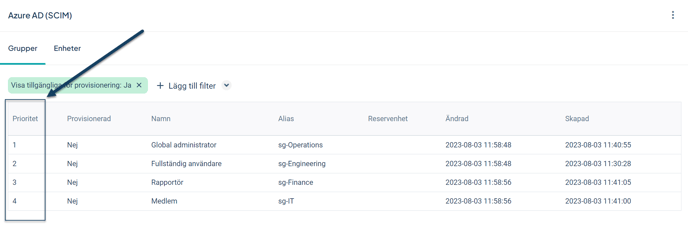
-
Go to Groups
-
In the Priority column, you will find the priority order for the groups, where 1 is the highest.
-
Adjust the order by clicking on a group and modifying its priority, then click Save.
Note We currently have an ongoing development task to ensure that changes in group priority order will be reflected in user permissions after synchronization has started. Until this is in place, it is important that the priority order is correctly set before starting synchronization.
Step 5 – Configure Departments
Just like permission groups, departments must have a unique alias. This means that the names of departments in Entra ID need to be mapped as aliases to the corresponding department in Stratsys. This ensures that users are assigned the correct departmental affiliation in Stratsys.
Unlike permission groups, departments do not need to be set as external—they are imported directly from Stratsys and are updated upon changes when you refresh the browser window.
As with permission groups, aliases are set by clicking on the department and entering the alias. The alias should match the name defined in Entra ID.
Map Department with Alias

-
Go to Departments, where you will find your organizational tree.
-
Click on a department to open the Edit Department side panel.
-
Enter the Alias for the department—the alias should match the name of the department in Entra ID that is to be mapped to the department in Stratsys.
Fallback Department
A fallback department is assigned to a user if they are synchronized into Stratsys with a department that does not match any department alias in Stratsys. In such cases, the user will be assigned the fallback department until their department in Entra ID is mapped to a department in Stratsys. The specific fallback department a user receives is determined by the permission group they belong to.
The fallback department is configured per group. A department can be used as a fallback for multiple groups, but each group can have only one fallback department. Setting a fallback department is not mandatory. When used, it is most common to configure it for a group with read-only permissions to ensure no user receives higher access than appropriate for their own department.
If no fallback department is configured and an alias is not found in Stratsys, the user will not be created in Stratsys until the alias for their department has been configured. In that scenario, an error message will be generated in the Provisioning Logs in Entra ID, and the user will be added to the Stratsys Platform but will not be granted access to Stratsys.
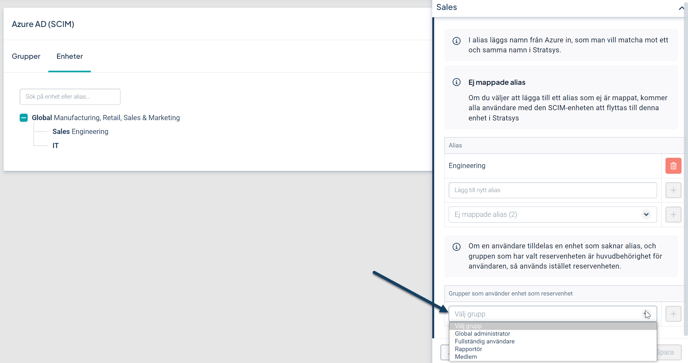
To configure a fallback department, follow these steps:
-
Go to Departments and click on the department you want to assign as a fallback for a permission group.
-
In the dropdown under Groups using this department as fallback, select the group for which this department should serve as the fallback.
Note Setting a fallback department for permission groups is optional and should be a deliberate decision. Configuring this means that users may be created under a department that does not match their actual department information in Entra ID.
Step 6 – Create an Azure AD Enterprise Application
Tips! Använd engelska som språk i Entra ID för att enklast följa stegen nedan. Observera att guiden nedan är under uppdatering efter namnbytet till Entra ID (fd Azure AD).
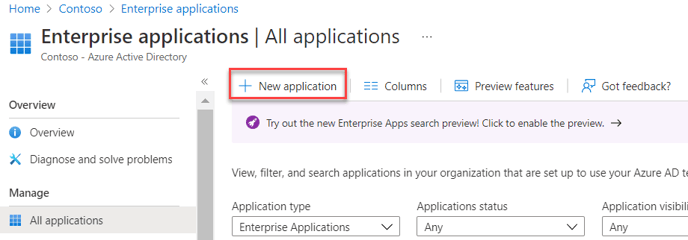
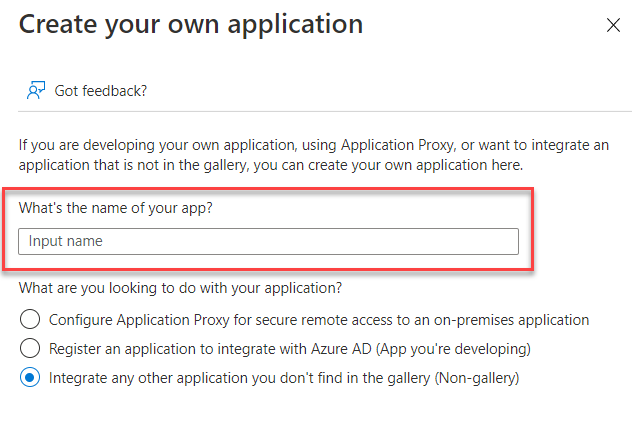
- Go to https://portal.azure.com. Select Azure Active Directory > Enterprise applications > New application.
- Choose "Create your own application"

- Non-gallery application > Choose a name for the application and click Create.
- Go to Provisioning > Get started.
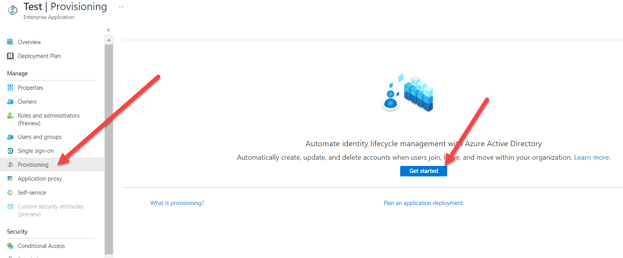
- Select Provisioning Mode as "Automatic" and follow the illustrated steps below.
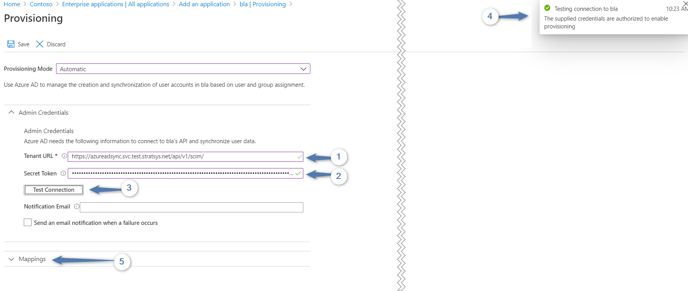
Step-by-Step Instructions:
-
Paste the URL copied earlier from the Platform Administration. It can be found again under User Synchronization > Settings in Platform Administration.
-
Paste the saved key/token from Platform Administration. This key cannot be retrieved again if not saved—so it's important to complete this step early.
-
Verify the connection by selecting Test Connection.
-
Everything should function correctly. If not, double-check the setup, and if the issue persists, contact Technical Support at support@stratsys.se.
-
Click Save at the top of the page.
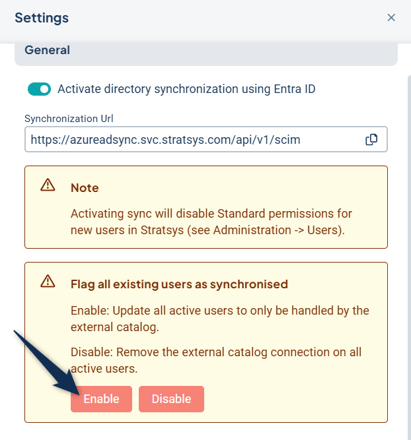
Step 7 – Flag Existing Users as Synchronized
In most cases, users already exist in Stratsys. Therefore, before starting the synchronization, these users need to be flagged as synchronized.
If this step is skipped, an error message will appear in the Provisioning Logs in Entra ID during synchronization, stating:
"User {platformId} is not set as external and will not be updated" or
"{userId} is not flagged as synchronized and won't be updated. Set to Synchronized in platform or remove from provisioning in Azure."
To flag existing users:
-
Go to Stratsys Platform Center
-
Click the wrench icon in the upper right corner
-
Enable Flag all existing users as synchronized
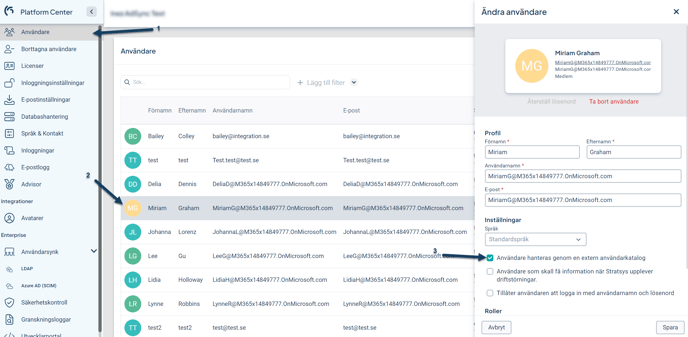
Exclude Users from User Synchronization
If you need to exclude one or more users from synchronization and manage them manually—for example, if a user is not present in Entra ID but should still have access to Stratsys—follow these steps:
-
Go to Users
-
Search for and click on the user so that a side panel appears on the right
-
Disable The user is managed through an external user directory
This means that any changes or removal of the user must be handled manually and will not be managed by the synchronization with Entra ID.
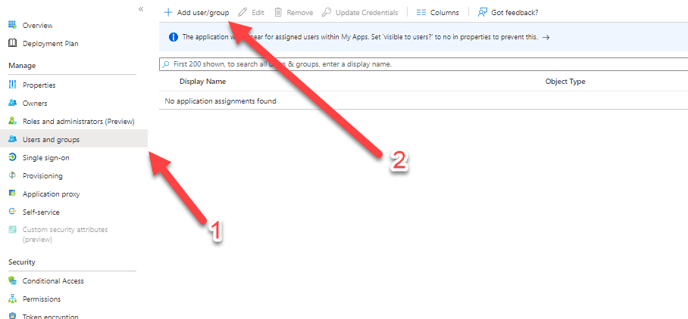
Step 8 – Synchronize Users and Groups
The connection between Entra ID and Stratsys is now established, and it's time to begin synchronizing user groups.
Add the groups to be synchronized with Stratsys to your Enterprise Application in Entra ID.
Note: Only users who are directly assigned to the groups will be synchronized with Stratsys—nested groups are not supported.
The initial synchronization can take anywhere from a few minutes to several hours, depending on the number of groups and users in Entra ID. Once the first cycle is complete, the results will be displayed on the same page.
More information about the synchronization results can be found here.
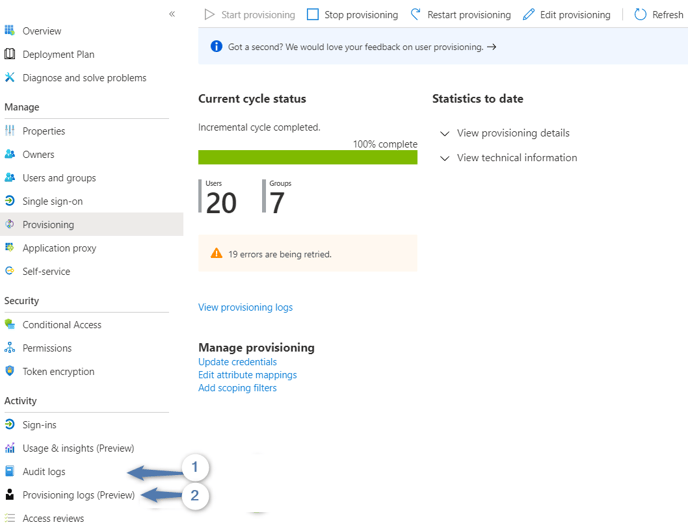
If something goes wrong, the errors will be shown on the synchronization page. The image below shows an example where the synchronization generated 19 errors.
More detailed information about the errors can be found in the Audit Logs (1) and Provisioning Logs (2).
Tip! It is possible to perform a Provisioning on demand both before and after activating scheduled provisioning. This allows you to run synchronization for only selected users and groups.
You can read more about the feature here.
This function is useful, for example, to test synchronization with a few users or groups before fully activating the sync. It can also be valuable in troubleshooting scenarios if synchronization issues arise with individual users.
Synchronization Completed
If no errors occurred during synchronization, the setup is complete!
Users will now be synchronized into Stratsys, and there is no longer a need to manually create users, provided they belong to one of the groups synchronized to Stratsys. User management also no longer needs to be handled in Stratsys, as everything is managed in Entra ID.
The synchronization runs every 40 minutes, and this interval cannot currently be adjusted.
You can now go to Stratsys Platform Center > User Synchronization > Azure AD (SCIM) > Groups to view the groups that have been synchronized. These will be marked as Provisioned and will display a Modified date (most recent change) and a Created date (when the group was initially created).
Then go to Users to verify that all users intended for synchronization are included in the list.

Management and Maintenance
Below is information for maintaining user synchronization with Entra ID. Please note that the user responsible for managing the synchronization must have the Super Administrator role in the Stratsys Platform.
Organizational Changes
New Department
If you add a new department to the organizational tree in Stratsys and want users to be synchronized to that department, you need to add an alias to the new department in Stratsys Platform Center for Entra ID. See the instructions on how to do this here.
Tips! Ni kan kontrollera om ni har några omappade alias genom att gå till Stratsys Platform Center >Azure AD (SCIM)>Enheter och klicka på valfri enhet, har ni några omappade alias så kommer de listas under Ej mappade alias och ni kan enkelt välja in aliaset på den enhet det ska mappas mot.
Remove a Department in Stratsys and Remap Alias to Another Department
If you plan to remove a department but want to remap the alias from an Entra ID department to another department in Stratsys before deletion, follow the steps in the video below.
If the department has already been removed, you can skip steps 2 and 3.

If the video is blurry, right-click on it to open it in a new window.
-
Go to Departments
-
Click on the department that currently has the alias to be remapped
-
Click the trash can icon next to the alias—this will make the alias available for reassignment
-
Navigate to the department that should be mapped with the alias going forward
-
Find the alias in the list of unmapped aliases and click Add
Important! If a department is removed without its alias being reassigned to a new department, users who were previously associated with the deleted department will not be able to access Stratsys.
To allow the user to access Stratsys again, the department must be mapped according to steps 4 and 5 in the description above.
New Permission Group
If you want to start synchronizing a new group in your Entra ID with a group in Stratsys, begin by creating and configuring the group in Stratsys according to the following instructions.
Then, add the corresponding group in Entra ID to your Enterprise Application so that it starts synchronizing with the group in Stratsys.
Troubleshooting
User Cannot Log In to Stratsys
Possible reasons for the issue:
-
The user has been removed from the Entra ID groups that synchronize with Stratsys
-
The user must belong to at least one group in your Entra ID to have access to Stratsys
-
-
The user's department is not mapped in Stratsys Platform Center, and their permission group does not have a fallback department
-
The user's department must be mapped to a department in Stratsys in order for them to have access to the platform
-
Troubleshooting:
1. Start by checking whether the user is linked to an external directory service—this indicates whether the user is synchronized with your Entra ID.
-
If it is enabled, the issue is related to user synchronization.
-
If it is disabled, a manual adjustment has been made to the user that is not a result of the synchronization.

- Go to Stratsys Platform Center, then navigate to Users
- Search for the user who cannot log in and click on their name
- Here, you can see whether the user is managed through an external directory service or not
2. Ensure that the user's department is properly mapped in Stratsys Platform Center.
Tip! You can find the user's department in their SCIM details. See more information here.
3. Ensure that the group the user belongs to in Entra ID is provisioned with Stratsys:
-
Go to Stratsys Platform Center, then User Synchronization > Groups
-
In the Provisioned column, there should be a checkmark (not a cross) if the group is provisioned. If not, this is likely the cause of the issue.
- If the group is not provisioned → Ensure that the group has an Alias in Stratsys that matches the group name in your Entra ID. If the alias is correct, check the logs in your Entra ID application to see if any errors have occurred for that group.
- If the group is provisioned → The issue is likely due to incorrect mapping of the user's department. Ensure the department alias is properly configured. If needed, check the logs in your Entra ID application to see if recent requests regarding that user have been made.
4. If you need further assistance, contact Stratsys Support at support@stratsys.se.
SCIM Details – User Information from Entra ID
In Stratsys Platform Center, you have the ability to view, for each user, which department they belong to in your Active Directory and which groups they are a part of in Entra ID.
Note that the names shown here often do not match the names of departments or groups in Stratsys—what is displayed are the names or IDs used in Azure.
1. Go to Stratsys Platform Center
2. Go to Users
3. Click on a user and expand the SCIM Details section
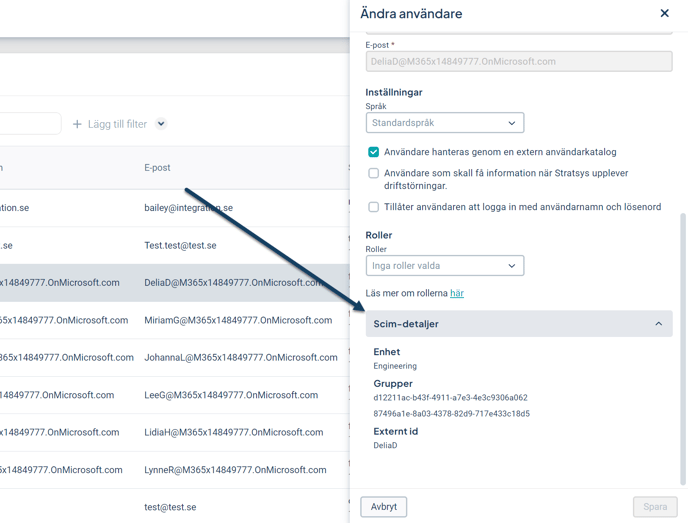
Department: The name displayed here is the department the user belongs to in Entra ID. This is typically retrieved from the department attribute in Entra ID.
Groups: The code shown under Groups is the group’s external ID from your Entra ID. To see which group in Stratsys this corresponds to:
1. Go to User Synchronization and then Azure AD
2. Navigate to Groups
3. Click on a group to view its details—there you will find the External ID
Felmeddelanden
Inträffar det fel i synken mot Entra ID så skickar Stratsys tillbaka felmeddelanden till er Enterprise Applikation i Entra ID och hittas i Audit logs och Provisioning logs. Se aktuella felmeddelanden nedan med reservation för att dessa kan komma att ändras.
"User {userId} has no main membership."
Indikerar på att användaren inte har någon behörighetsgrupp och har därför ingen behörighet till Stratsys.
Lösning: Kan bero på olika anledningar, kontakta Stratsys support.
"No matching group has been found for group with display name {name}. A group has to be configured with this alias."
Lösning: Kontrollera att ni konfigurerat samtliga grupper som ska synkas mot Entra ID i Stratsys Platform, se hur ni gör här.
"User {user.Id} has no department in platform nor does it exist in database and therefore cannot be added as a member of a group."
Felmeddelandet antyder på att användaren har en department/avdelning i Entra ID som inte är tillagd som alias i Stratsys Plattform.
Lösning: Uppdatera aliasmappningen av enheter, se hur ni gör här.
Error Messages
If synchronization errors occur with Entra ID, Stratsys returns error messages to your Enterprise Application in Entra ID. These can be found in the Audit Logs and Provisioning Logs. Below are some of the current error messages (subject to change):
"User {userId} has no main membership."
Indicates that the user does not have a permission group and therefore has no access to Stratsys.
Solution:
This can have various causes—please contact Stratsys Support for assistance.
"No matching group has been found for group with display name {name}. A group has to be configured with this alias."
Solution:
Ensure that all groups to be synchronized with Entra ID are configured in Stratsys Platform. See instructions here.
"User {user.Id} has no department in platform nor does it exist in database and therefore cannot be added as a member of a group."
This indicates that the user has a department in Entra ID that has not been added as an alias in Stratsys Platform.
Solution:
Update the alias mapping for departments.
"{userId} is not flagged as synchronized and won't be updated. Set to Synchronized in platform or remove from provisioning in Azure."
The user is not flagged as external in the platform.
Solution:
Flag the user as synchronized.
"User {platformId} is not set as external and will not be updated."
The user is not set as external in Stratsys.
Solution:
Flag the user as synchronized.
If the toggle "The user is managed through an external user directory" is already enabled, toggle it off and then on again.
"User {userId} not found in Stratsys."
The user cannot be found in Stratsys.
Solution:
Contact Stratsys Support.
"No standard department defined"
This error indicates that a user has a department in Entra ID that does not match any department alias configured in Stratsys Platform, and no default or fallback department is defined. This means the user will not be assigned to a department.
-
If the user already has an organizational unit in Stratsys, it will remain unchanged.
-
If the user is new, they will not be granted access to Stratsys.
To identify the user:
-
Go to Audit Logs in Entra ID
-
Open Audit Log Details
-
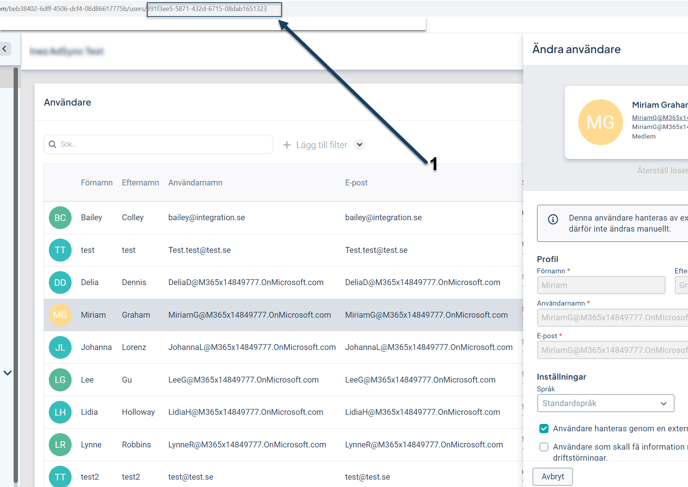
Check Modified Properties to find the user’s ID
-
You can then enter this ID in Stratsys to open the user details panel (see point 1 in the image below).
Solution:
Option 1: Check which department the user belongs to in Entra ID and add the department name as an alias to the corresponding organizational unit in Stratsys Platform. See the instructions here.
Once the alias is saved, the user will be assigned to the correct department.
Option 2: Assign a fallback department to the permission group. Wait for the next sync and verify that the user has been added to the fallback department.
Email Notifications
It is possible to configure an email address in the Entra ID Enterprise Application to receive email notifications in the event of errors.
Q&A
- I have a user in Stratsys who should no longer have access to the system. The user has left the organization and is no longer present in the directory. Why is the user still in Stratsys? How can I remove the user (they are locked for editing)?
Answer: The user was likely created in Stratsys and left the organization before synchronization was activated. When the sync is enabled, all users are marked accordingly. Disconnect the user from the synchronization in Stratsys Platform and then remove the user manually.
Tip! The scenario above can be avoided by cleaning up old users during the implementation phase.
Inform your project manager or account manager if you suspect that outdated users remain in Stratsys when user synchronization with Entra is activated.